To build a Claude skill, create a folder named after the skill, add a SKILL.md with YAML front matter (a `name` that matches the folder and a `description` of what it does and when to use it), then write the instructions below. Put it in `~/.claude/skills/` for Claude Code, or zip it and upload it in claude.ai under Customize, Skills.
The plan for this website was written with the help of a skill. Before writing any code, we used one that encodes how its author likes projects planned: which documents to write, in what order, what each must contain, which decisions to record. It turned "plan a directory site" from a vague request into a consistent set of ten documents, and it does the same for every project since. That's the kind of thing skills are best at.
This guide walks through building one from scratch: the folder, the SKILL.md fields, how to write a description that actually gets the skill loaded, when to add scripts, how to test it in Claude Code, and how to share it. If you're not sure what a skill is yet, read what Claude skills are first.
Key takeaways
- Pick a task you repeat and explain the same way each time; that is what a skill is for.
- Create
<name>/SKILL.mdwithname(matching the folder) and adescriptionthat says what it does and when to use it.- Write numbered steps, move long material into reference files, and add scripts where exact output matters.
- Test that
/nameworks and that the skill loads by itself from a normal request, then share it through a repo or plugin.
Step 1: pick a task worth a skill
Good skills come from repetition. Look for something you explain to Claude more than once, that has a right way to do it, and that takes more than a sentence to describe. A few examples that work well:
- Writing release notes in your team's format from merged pull requests.
- Reviewing a pull request against a specific checklist.
- Producing a weekly report from the same three data sources.
- Following your design system when building UI.
- Filling a particular kind of form or document correctly.
Things that don't need a skill: a single preference, which belongs in CLAUDE.md or custom instructions, and access to a system the agent can't reach, which needs an MCP server instead.
Step 2: create the folder
A skill is a folder whose name is the skill's name, with SKILL.md directly inside. Names are lowercase letters, numbers and hyphens, up to 64 characters.
For Claude Code, put personal skills under your home directory and project skills inside the repository:
mkdir -p ~/.claude/skills/release-notes          # all your projects
mkdir -p .claude/skills/release-notes            # this repository, shared with the team
The same folder works in other tools; only the parent directory changes. Codex reads ~/.agents/skills/, Gemini CLI reads ~/.gemini/skills/, and claude.ai takes a ZIP upload. Our installation guide lists them all.
Step 3: write the front matter
Open SKILL.md and start with the YAML block:
---
name: release-notes
description: Writes release notes from merged pull requests in our house style. Use when the user asks for release notes, a changelog entry, or a summary of what shipped between two tags.
---
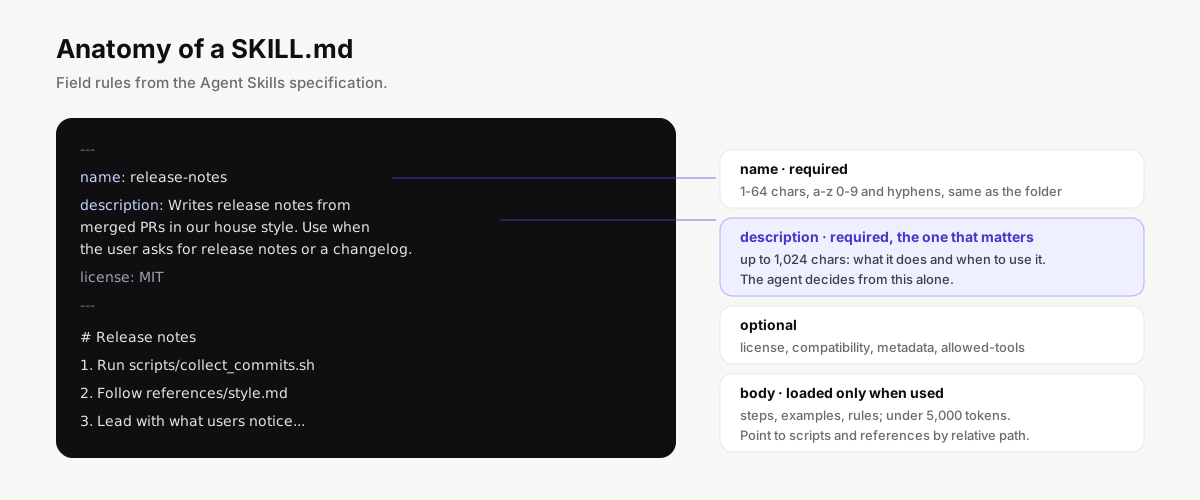
Two fields are required by the Agent Skills specification. The name must match the folder name exactly. The description can be up to 1,024 characters and should say both what the skill does and when to use it.
Optional fields include license, compatibility, metadata and an experimental allowed-tools. Claude Code adds its own on top: disable-model-invocation: true keeps Claude from loading the skill by itself, so it only runs when you type /release-notes; user-invocable: false does the opposite and hides it from the slash menu; allowed-tools lists tools Claude may use without asking while the skill runs. You won't need most of these for a first skill.
Step 4: write a description that gets loaded
This is the step most people rush, and it's the one that decides whether the skill ever runs. Until a skill is loaded, the agent sees only its name and description, so the description has to match how people actually ask.
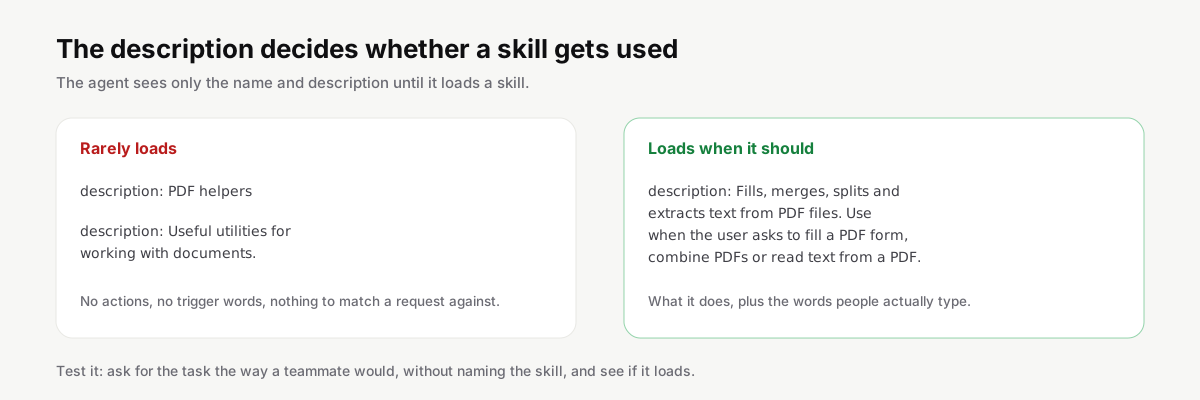
| Weak description | Strong description |
|---|---|
| "PDF helpers" | "Fills, merges and splits PDF files and extracts their text. Use when the user asks to fill a form, combine PDFs or pull text or tables out of a PDF." |
| "Helps with releases" | "Writes release notes from merged pull requests in our house style. Use when the user asks for release notes, a changelog entry or what shipped between two tags." |
| "Code review" | "Reviews a pull request against our checklist of correctness, tests, security, data and readability. Use when the user asks for a review of a PR or a diff." |
Three habits help. Start with what the skill does, using verbs. Add a "Use when..." sentence with the phrases people type, including synonyms: release notes, changelog, what shipped. And be specific about the boundary, so the skill doesn't load for the wrong task. "Writes release notes" is better than "Helps with releases", which could mean anything from tagging to deploying.
Among the skills we index, the ones with clear "Use when" sentences are noticeably easier to understand at a glance, which is a decent proxy for how easily a model can match them.
Step 5: write the instructions
Below the front matter, write the instructions in plain Markdown, the way you'd brief a capable colleague who has never seen your project. Steps work better than paragraphs. Concrete examples work better than rules.
# Release notes

## Steps

1. Ask for the two tags if the user didn't give them.
2. Run `scripts/collect_prs.sh <from> <to>` to list merged pull requests.
3. Group them under Added, Changed and Fixed. Skip internal-only changes
   such as CI tweaks and refactors with no user-visible effect.
4. Write one line per change, starting with what the user can now do.
5. Put breaking changes first, under a "Before you upgrade" heading.

## Style

- Present tense, no marketing words.
- Link each line to its pull request.
- See `references/examples.md` for three past releases we liked.
Keep the body under about 5,000 tokens, as the specification recommends; Claude Code's docs suggest staying under roughly 500 lines. If you have more, move it into reference files and tell the agent when to read them. That keeps the common case fast, because reference files load only when the instructions point to them.
Step 6: add scripts when exact output matters
Instructions are enough for judgment calls. When the output has to be exactly right, like extracting data from a file format, running a fixed sequence of commands, or validating something, a script is more reliable than asking the model to do it by hand.
Put scripts in a scripts/ folder and reference them by relative path. A minimal example for our release notes skill:
#!/usr/bin/env bash
# scripts/collect_prs.sh <from-tag> <to-tag>
# Prints the numbers of pull requests merged between two tags.
set -euo pipefail
git log "$1..$2" --merges --pretty=format:'%s' | sed -n 's/^Merge pull request #\([0-9]*\) from .*/\1/p'
Keep scripts short and readable, because they run with the agent's permissions and anyone installing your skill should be able to check them in a minute. In our catalog, about a third of skills are a single SKILL.md with no scripts at all, so don't feel you must add one; plenty of excellent skills are pure instructions.
Step 7: test it
In Claude Code, skills you add or edit are picked up within the current session, so testing is quick.
First, check that it loads on its own. Start a fresh conversation and ask for the task the way a teammate would, without naming the skill: "Can you write up what changed between v1.4.0 and v1.5.0?" If Claude reaches for the skill, the description works. If not, rewrite the description with the words you just used.
Then call it directly with /release-notes to test the instructions themselves, separately from the loading question. Watch where Claude deviates from what you wanted, and turn each deviation into a clearer step or an example. Two or three rounds of this usually gets a skill from "roughly right" to "does it the way we do".
If it doesn't load at all, check the usual suspects: the folder is nested one level too deep, the name doesn't match the folder, or the YAML front matter is invalid. Our skills overview has a short troubleshooting list.
Step 8: use it in claude.ai
For claude.ai and Claude Desktop, package the folder as a ZIP. The ZIP should contain the skill folder, with SKILL.md inside it, and the folder name must match the name field:
cd ~/.claude/skills
zip -r release-notes.zip release-notes
Then go to Customize, Skills, select the plus button, Create skill, Upload a skill, and choose the file. Skills there need code execution enabled; on Team and Enterprise plans an admin controls that in the organization settings.
Step 9: share it
| Audience | How to share | How they install it |
|---|---|---|
| Your team, one repository | Commit .claude/skills/<name>/ |
Nothing; it loads in that repo |
| Anyone, one skill | A public GitHub repository | npx degit into their skills folder |
| Anyone, a set of skills | A repository with .claude-plugin/marketplace.json |
/plugin marketplace add, then /plugin install |
| claude.ai users | A ZIP of the skill folder | Upload under Customize, Skills |
For a team, the simplest route is the repository. Commit .claude/skills/release-notes/ and everyone working in that repo gets the skill in Claude Code.
For a wider audience, put the skill in a public GitHub repository. A repository can hold many skills, one folder each, usually under skills/. If you want people to install several skills at once in Claude Code, add a .claude-plugin/marketplace.json so the repository works as a plugin marketplace; people then install with /plugin marketplace add your-org/your-repo. Anthropic's own skills repository is set up this way.
Then submit it to HostedMCP. We read every SKILL.md in the repository, check that the front matter has the required fields, and publish a page for each skill with its files and one-line install commands for Claude Code, Codex, Gemini CLI and claude.ai. Skills with invalid front matter are held back until they're fixed, so validate yours first.
Tip
Before you publish, open the skill in a fresh session, ask for the task in your own words without naming the skill, and check that it loads. If it only works with
/name, the description needs another pass.
A second example you can copy
Not every skill needs scripts. Here's a complete one that's pure instructions, a code review checklist. Save it as ~/.claude/skills/review-checklist/SKILL.md:
---
name: review-checklist
description: Reviews a pull request or diff against our team checklist and reports problems by severity. Use when the user asks to review a PR, check a diff, or look over changes before merging.
---

# Review checklist

Read the whole diff before commenting. Then check, in this order:

1. Correctness: does the change do what the PR description says?
   Look for off-by-one errors, missing null checks and unhandled errors.
2. Tests: is new behavior covered? Does any test only pass by accident?
3. Security: user input reaching SQL, shell or HTML without escaping;
   secrets in code or logs; new endpoints without auth.
4. Data: migrations that can't be rolled back, or that lock large tables.
5. Readability: names that lie, functions doing two jobs.

Report findings as a list, most severe first, each with file and line.
Say "no issues found" for a section rather than skipping it.
Do not comment on formatting the linter already enforces.
It's short, it's specific, and every line is something a reviewer on that team would actually say. That's the bar.
Updating and versioning a skill
Skills change as your process changes, so treat them like code.
Keep them in version control. Project skills already live in the repository; for personal skills, a small dotfiles repository works well.
Note changes in the skill itself when they matter. A line at the bottom such as "Updated: release notes now group by product area" helps teammates notice behavior changes. The specification's optional metadata field is a reasonable place for a version number if you publish skills for others.
Change one thing at a time and re-test with a fresh conversation. Skills fail quietly: a rewritten description can stop a skill from loading without any error, so check that it still triggers after every edit.
Mistakes to avoid
A few problems come up again and again in public skills.
| Mistake | Why it hurts | Fix |
|---|---|---|
| The description describes the folder | The agent cannot match it to a request | Say what it does and when to use it |
One huge SKILL.md |
The whole file loads every time | Move long material into reference files |
| Paragraphs that argue | Models skim past them | Numbered steps and short examples |
| Scripts that assume your machine | They break for everyone else | Check for required tools and fail clearly |
| Name and folder disagree | claude.ai rejects it | Keep them identical |
The description describes the folder, not the task. "Utilities and helpers" tells the agent nothing. Say what it does and when.
Everything is in one huge file. A 2,000-line SKILL.md gets loaded in full every time. Split long material into reference files.
The instructions argue instead of instruct. Long paragraphs about philosophy are easy to skim past. Numbered steps and short examples get followed.
Scripts assume your machine. Hard-coded paths, tools you happen to have installed, or a specific shell break on other people's computers. Check for the tools a script needs and fail with a clear message.
The name and folder disagree. Some tools forgive it, claude.ai doesn't. Keep them identical.
Next steps
Browse the skills directory to see how others structure theirs; Anthropic's skill creator skill is itself a good example, and it can help you draft new ones. When your skill works for you, submit it so others can find it.
Questions people ask
How do I create a skill in Claude Code?
Create ~/.claude/skills/<skill-name>/SKILL.md for a personal skill, or .claude/skills/<skill-name>/SKILL.md in a repository for a project skill. Add front matter with name and description, then instructions. Claude Code picks it up in the current session.
How do I add a skill to claude.ai?
Zip the skill folder so the ZIP contains the folder with SKILL.md inside, then go to Customize, Skills, select +, Create skill, Upload a skill. Code execution must be enabled for your account.
What should a skill description say?
What the skill does and when to use it, in the words people actually type. For example: Fills, merges and extracts text from PDF files. Use when the user asks to fill a PDF form or combine PDFs.
How long can a SKILL.md be?
The Agent Skills specification recommends keeping the body under 5,000 tokens, and Claude Code's docs suggest staying under about 500 lines. Move long reference material into separate files the skill points to.
Can a skill run code?
Yes. A skill can bundle scripts in any language the environment can run, and its instructions tell the agent when to run them. Scripts run with the agent's permissions, so keep them small and readable.
How do I call a skill directly?
In Claude Code, type /skill-name. You can also stop Claude from loading a skill on its own with disable-model-invocation: true in the front matter, so it only runs when you call it.