
delistd MCP server
Commit Nov 15, 2026Automates GDPR and CCPA data removal requests to hundreds of data brokers using your own email account.
Also known as drumandbytes/delistd
- Stars
- 69
- Tools
- —
- Downloads, 30 days
- —
- Latest version
- —
- Last commit
- Nov 15, 2026
- License
- MIT
What is delistd MCP?
delistd automates GDPR and CCPA data removal requests to hundreds of data brokers using your own email account.
Summary generated from the project's README
About delistd MCP server
Automating GDPR and CCPA data removal requests to hundreds of data brokers is what delistd enables for privacy-conscious individuals. This open source tool sends opt-out requests to over 700 brokers, such as Spokeo, BeenVerified, and Whitepages, using your own email account via SMTP and IMAP. It functions as a local application that can be run through a command-line interface or a web-based dashboard.
Users can set up the tool using various email providers including Gmail, Proton Mail, Fastmail, iCloud, and Amazon SES. To maintain security, the software requires an app password rather than your primary account password. The system includes a built-in daily sending limit of 450 emails to stay within provider constraints and features a setup wizard to guide users through entering personal information and configuring mail servers. While many brokers process requests automatically, the tool tracks responses that require manual intervention, such as identity verification or clicking confirmation links.
What you can do with it
- 1Bulk data removal requestsSend automated opt-out requests to hundreds of data brokers simultaneously to protect your privacy.
- 2Monitor removal request statusTrack which brokers have received requests and identify which ones require manual follow-up steps.
- 3Generate privacy compliance evidenceDownload a detailed report of all sent requests and replies to use for official complaints.
- 4Automate recurring privacy maintenanceSchedule the tool to run every few hours to re-send requests and check for inbox replies automatically.
Written from the project's README. Every use case is checked against a quote from it.
Automated checks
Ran Nov 14, 2026Full report →Not verified yet. A server needs a score of 80, no serious finding, and enough data for us to check. How checks work · What to fix for more points

- Source repository linked and reachabledrumandbytes/delistd is public and reachablegithub.com/drumandbytes/delistd ↗Pass
- Package names this repository as its sourceNot checked
- Build provenance (Sigstore attestation)Not checked
- Open source license (OSI)MITspdx.org/licenses/MIT.html ↗Pass
- Commit or release in the last yearLast commit or release 2026-11-10github.com/drumandbytes/delistd ↗Pass
- OpenSSF ScorecardNot checked
- Package name not close to a popular packageNot checked
- No critical advisory in the package or its dependenciesNot checked
- No hidden instructions to the model0 tool descriptions and the README read; no override phrases, credential paths or hidden charactersPass
- Destructive tools are labelledNot checked
- Remote endpoint answers the MCP handshakeNot checked
README
View on GitHubDelistd





Take back your privacy. Delistd sends data removal requests to 700+ data brokers on your behalf — for free.
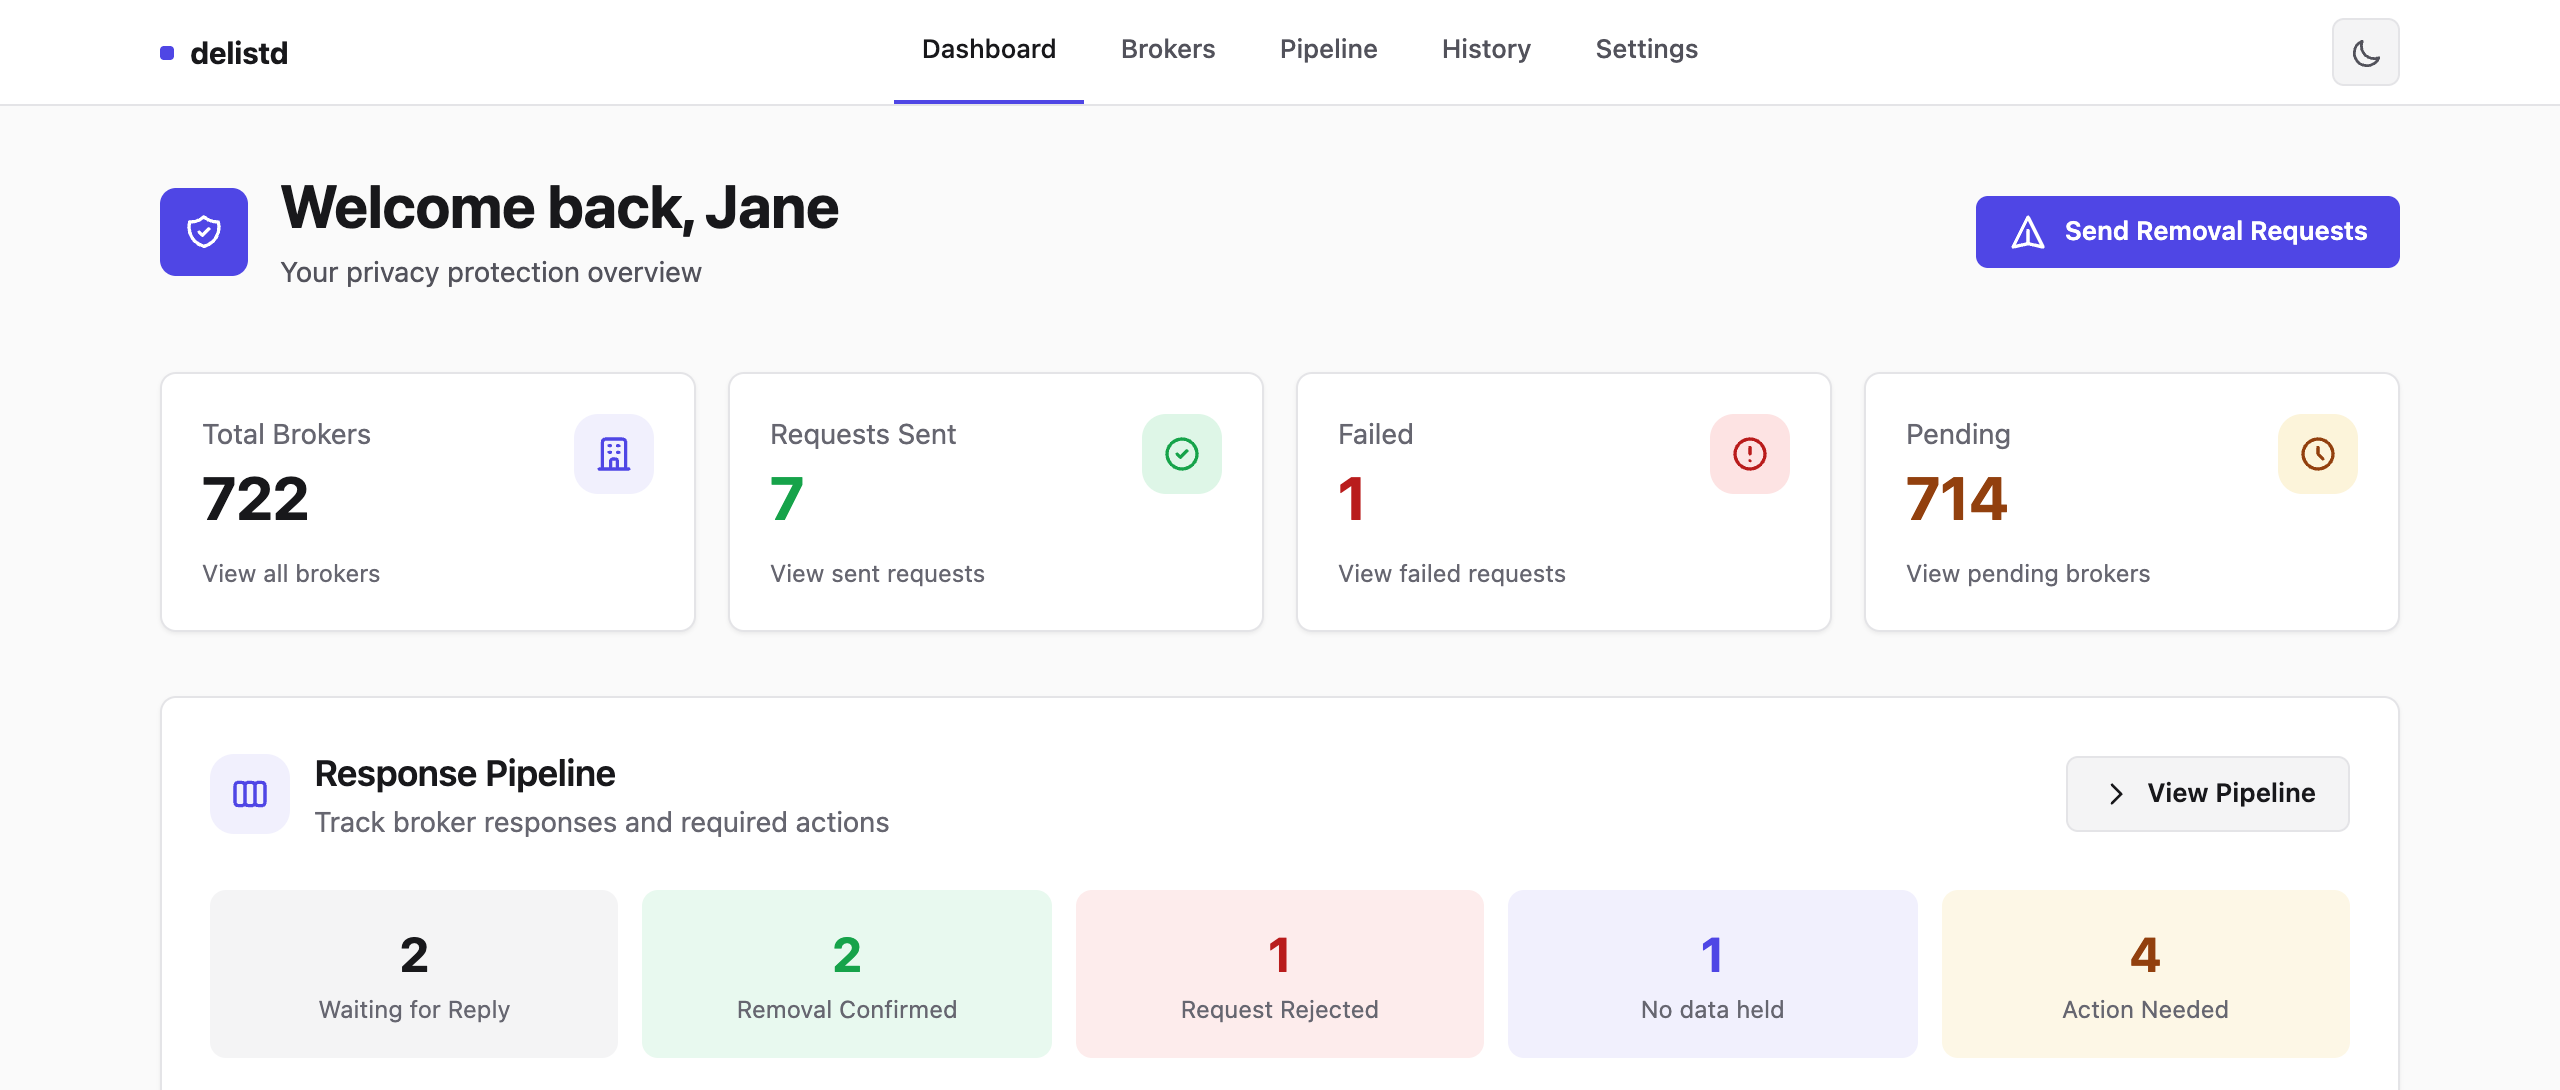
You know those sites like Spokeo, BeenVerified, and Whitepages that have your home address, phone number, and family members' names? They're called data brokers, and there are hundreds of them. Services like Incogni and DeleteMe charge $100+/year to send opt-out requests to these companies. Delistd does the same thing, but it's open source and completely free.
📖 delistd.dev — broker directory, opt-out guides, and the list of EU/EEA data protection authorities. 🔗 More Drumandbytes projects
New here and not technical? Start with the step-by-step setup guide. It covers downloading Delistd, creating a Gmail app password, and the setup wizard, with a fix for every common error.
Eraser is now Delistd. Same project, new name (the old one was too generic to find). Nothing breaks: the
erasercommand, theERASER_*environment variables, theghcr.io/drumandbytes/eraserimage and your~/.eraserdata all keep working for now, with a notice.brew upgrademoves you to thedelistdcask. The old names go away in the next major release; see docs/stability.md.
Upgrading from 1.x? 2.0 stores your profile's country as an ISO code, encrypts your mail passwords (with an optional passphrase), skips country-specific brokers that don't apply to you, and removes a few old settings. Your config is upgraded automatically on first run and the original is kept as
config.yaml.1x.bak. See the upgrade guide.
What to Expect
The good: Delistd automatically sends removal request emails to 700+ data brokers. Many brokers process these requests automatically—you send the email, they remove your data, done.
The reality: Some brokers require additional steps. They might send you a confirmation link to click, ask you to fill out a form on their website, or request identity verification. Delistd tracks these responses and shows you exactly what needs manual attention.
The bottom line: You're not paying $100+/year, and you're taking real action to protect your privacy. Even with some manual steps, Delistd handles the heavy lifting and gives you a fighting chance against the data broker industry.
The Easy Way (Web Interface)
If you're not comfortable with command-line tools, Delistd has a visual interface that runs in your web browser.
What You'll Need
- Delistd itself: install with Homebrew, or download the file for your OS from Releases. No Go needed, unless you want to build from source.
- An email account to send from: Gmail, Proton Mail (via Bridge), Fastmail, mailbox.org, Posteo, iCloud, Amazon SES, or any provider with SMTP access (setup instructions below)
Getting Started
Step 1: Get Delistd
Homebrew (macOS, and Linux where cask support is available):
brew tap drumandbytes/tap
brew install --cask drumandbytes/tap/delistd
Homebrew 6+ asks you to trust a third-party tap once — if it does, run
brew trust drumandbytes/tap and re-run the install. The cask removes macOS's
Gatekeeper quarantine from the (unsigned) binary after install, so there's no
"Open Anyway" step. If brew on your Linux setup doesn't do casks, use the
tarball below.
Prebuilt binary: grab your OS's file from the Releases page — the broker list is baked in, nothing to install:
-
Windows —
..._windows_amd64.exe(run it directly) or the.zip(also has the README andconfig.example.yaml). -
macOS / Linux —
..._<os>_<arch>.tar.gz;tar xzfit and run./delistd. -
macOS: the binary is unsigned, so Gatekeeper will block it on first run. Either right-click it → Open → Open, or run
xattr -dr com.apple.quarantine ./delistdonce. -
Windows: the archive contains
delistd.exe. -
delistd fillanddelistd confirm(browser automation for opt-out forms) need Chrome or Chromium installed; nothing else does.
Build from source (needs Go):
git clone https://github.com/drumandbytes/delistd.git
cd delistd
go build -o delistd ./cmd/delistd
Or install the current main straight from the module path (the broker list is baked in; the binary reports its version as dev):
go install github.com/drumandbytes/delistd/cmd/delistd@main
@latest doesn't work: Go only resolves v2+ tags for a module path ending in /v2, and this module's path doesn't. For a tagged release use Homebrew, the Docker image or a release download.
On Windows, build it as delistd.exe (go build -o delistd.exe ./cmd/delistd) —
Windows won't run a downloaded file with no extension.
Docker (distroless image; add --profile browser for headless Chromium and fill):
git clone https://github.com/drumandbytes/delistd.git
cd delistd
docker compose up -d   # then open http://localhost:8080
Keep the port published to 127.0.0.1 as compose.yaml does: the web UI has
no login. Releases also publish the image as ghcr.io/drumandbytes/delistd
(linux/amd64, linux/arm64; tags v2.2.0, 2.2 and latest), so you can pull
it instead of building. Data, backups, CLI commands, scheduling and the pull
setup are covered in docs/docker.md.
Step 2: Start the Web Interface
./delistd serve
On Windows, run .\delistd.exe serve instead.
Open your browser and go to http://localhost:8080
Step 3: Complete the Setup Wizard
The wizard walks you through entering your personal information (the data brokers need this to find your records) and setting up email. Just follow the prompts.
Step 4: Send Removal Requests
From the dashboard, you can:
- Browse the list of 700+ data brokers
- Send requests one at a time or in bulk
- Track which requests have been sent and their status
- Exclude a broker from sends with one click (and bring it back later) - useful for a broker you'd rather skip, e.g. one that demands ID verification
- Mark a sent request as bounced, so it's retried on the next send
- Download an evidence report of every request and reply (History → Export evidence) for a complaint to your data protection authority
- Fetch the latest broker list (Settings → Broker List)
- Add a broker that's missing from the list (Brokers → + Add broker) - kept on your machine and never removed by a list update
That's it. The whole process takes about 10 minutes to set up, and then Delistd handles the rest.
Setting Up Your Email Account
Delistd sends removal requests from your own email account over SMTP, and can read replies over IMAP. Pick your provider in the setup wizard (or delistd init) and it fills in the servers. You only enter your address and an app password, a separate password your provider generates for apps like Delistd. Never use your main account password.
| Provider | What you need | Notes |
|---|---|---|
| Gmail | App password (needs 2-Step Verification) | ~500 emails/day. Not your Google password, and no "Sign in with Google" (step by step) |
| Proton Mail | Proton Mail Bridge running on the same machine, paid plan | Use the password Bridge shows. Bridge's self-signed certificate is accepted because it only listens on localhost. Confirmed working by a user (paid plan, Bridge on the same machine). |
| Fastmail | App password with IMAP + SMTP access | |
| mailbox.org | Application password | |
| Posteo | Your Posteo address and password | |
| iCloud Mail | App-specific password | SMTP is on port 587 (STARTTLS) |
| Amazon SES | SES SMTP credentials; the From address/domain verified in SES | Send-only: set up reply monitoring on a separate mailbox. Change the region in the SMTP host if yours isn't eu-west-1 |
| Anything else | Choose "Other" and enter the SMTP (and optionally IMAP) server |
TLS: ports 465 (SMTP) and 993 (IMAP) use TLS from the start. Any other port must support STARTTLS. Delistd never sends your password without encryption.
Outlook.com / Hotmail isn't a preset: Microsoft turned off app-password (basic) authentication for consumer accounts, and Delistd doesn't support OAuth sign-in yet. Microsoft 365 work accounts whose admin enabled SMTP AUTH can try "Other" with smtp.office365.com:587.
Your provider isn't listed or doesn't work? Open a mail provider issue, or add it yourself (see CONTRIBUTING.md).
Daily sending limits: Delistd caps itself at 450 emails per rolling 24 hours by default (options.daily_send_limit), just under Gmail's ~500/day. Other providers have different (sometimes lower) caps, so check yours and lower the limit if needed. Delistd resumes where it left off on the next run, so it's safe to just re-run delistd send until it reports nothing left to send.
Automating it: delistd schedule install has your OS run Delistd every 6 hours. Each run sends to whichever brokers are due (each broker is re-sent 25 days after its last request, within the daily cap) and checks your inbox for replies. Everything stays on your machine; delistd schedule status shows the last run, delistd schedule remove undoes it. The web UI's Settings → Automation card does all of this with buttons, including a "run while this app is open" option for systems without launchd/systemd; on the CLI, delistd auto loops in the foreground instead.
Prefer not to give any tool your email password?
Choose "Skip — I'll send the emails myself" in the setup wizard (or options.send_mode: manual in the config, or pick option 2 in delistd init). Then Delistd never sends anything and needs no credentials:
- The Brokers page shows an Email link per broker (the ready-to-send removal request, with an "Open in mail app" button) and a Mark sent button.
- On the CLI:
delistd draft <broker-id>prints one email,delistd draft -o ./outwrites one.emlper broker (open them in your mail client), anddelistd send --manualwalks the whole list one at a time. - After you send one,
delistd mark-sent <broker-id>(or the web button) records it sostatus,pipelineandexportstill account for it.
Let a local AI agent handle follow-ups (experimental)
delistd mcp connects Delistd to Codex over local STDIO. Ask “Handle my pending
removal tasks”, review the proposed batch, and approve it in Delistd, on the
web UI's Automation page or with delistd mcp approve. The agent can
open confirmation links, fill forms, inspect receipts, and save notes and
screenshots in the existing Tasks page. Email sending uses your existing
settings, templates, limits, and history. Codex supplies the AI; Delistd needs no
separate AI API key. This feature is experimental: it should work, but its
commands and tools may change in a future minor release.
MCP tools exposed by delistd mcp: get_status, list_brokers, list_tasks,
get_task, prepare_batch, begin_batch, end_batch, scan_inbox,
send_request, open_task, observe_page, get_screenshot, browser_action,
record_result, retry_action. See docs/mcp.md for what each does.
Chrome/Chromium is required for forms. CAPTCHA, login, identity checks, uncertain submissions, and unexpected destinations need your intervention. A completed form means the request was accepted, not that the broker has erased your data.
Tried it? Tell us how it went with the MCP feedback form.
See MCP setup and the fake-data demo for the Codex configuration, how batches are approved, and supported workflows.
For Developers: CLI Usage
If you prefer the command line, Delistd has a full CLI.
Installation
git clone https://github.com/drumandbytes/delistd.git
cd delistd
go build -o delistd ./cmd/delistd
On Windows, build it as delistd.exe instead (go build -o delistd.exe ./cmd/delistd) and run commands as .\delistd.exe <command> - see the note above.
Quick Start
# Interactive setup
./delistd init

# Preview what would be sent (no emails go out)
./delistd send --dry-run

# Send removal requests to all brokers
./delistd send

# Check your history
./delistd status
Commands
| Command | What it does |
|---|---|
delistd init |
Interactive config setup |
delistd send |
Send removal requests (auto-capped at daily_send_limit/day, resumable) |
delistd send --dry-run |
Preview without sending |
delistd send --ignore-daily-limit |
Send everything in one run, ignoring the daily cap |
delistd send --resend |
Force re-send even to brokers within the cooldown window |
delistd list-brokers |
Show the 700+ brokers, minus those that only handle other countries than your profile's (--all-countries shows them all) |
delistd status |
View history and stats |
delistd status --limit 50 |
Show more history |
delistd add-broker |
Add a custom broker interactively |
delistd mark-bounced <broker-id>... |
Correct the record for brokers whose email actually bounced |
delistd cleanup-bounces |
Find and clear bounced broker email addresses (keeps the broker entry) |
delistd audit-brokers |
Check broker websites/email domains for signs of life |
delistd validate-brokers |
Structural check of a broker list (ids, names, regions, emails, URLs) |
delistd update-brokers |
Fetch the latest broker list (the list ships inside the binary; this refreshes it) |
delistd monitor |
Monitor your inbox (IMAP) for broker responses; --reclassify re-runs the classifier over every saved reply |
delistd draft / delistd mark-sent |
Write the removal emails as .eml files to send by hand, then record them as sent |
delistd passphrase set / clear |
Add or remove a passphrase on your stored mail passwords (details) |
delistd schedule install |
Run sends + inbox checks automatically every 6 hours (launchd on macOS, systemd on Linux) |
delistd auto |
Same cycle in the foreground, looping every 6 hours (Windows, containers) |
delistd pipeline |
Show pipeline status — which brokers need manual follow-up |
delistd export |
Write an evidence report (HTML/JSON) of every request and reply — for a DPA/noyb complaint |
delistd confirm |
Click confirmation links found in broker emails |
delistd fill |
Fill opt-out forms via browser automation |
delistd profile add / list / edit / remove |
Manage extra profiles, e.g. a household member (details) |
delistd mcp |
Connect a local AI agent over MCP (experimental); delistd mcp approve <id> approves its batch, delistd mcp pending lists waiting ones |
delistd serve |
Start web interface |
delistd serve -p 3000 |
Web interface on custom port |
Everything in the web interface has a command-line twin and the other way round, apart from a few maintainer commands and confirm; the full list is in docs/ui-cli-parity.md.
Configuration File
Your config lives at ~/.eraser/config.yaml. Here's the full schema:
profiles:
  - id: default
    first_name: Jane
    last_name: Doe
    email: jane@example.com
    # Optional but helps brokers find your records
    address: "123 Main Street"
    city: "San Francisco"
    state: "CA"
    zip_code: "94102"
    country: US  # ISO 3166-1 alpha-2 code; `init` and the web form accept a name and store the code
    phone: "+1-555-123-4567"
    date_of_birth: "1990-01-15"
    # Optional: other identities/addresses brokers may have indexed you under
    # additional_emails: [old-address@example.com]
    # name_variants: [Jane D.]
    # previous_addresses: ["456 Old Street, San Francisco, CA"]
    # additional_phones: ["+1-555-987-6543"]

email:
  from: jane@example.org

  smtp:
    host: smtp.fastmail.com  # see "Setting Up Your Email Account" for other providers
    port: 465                # 465 = TLS, any other port = STARTTLS
    username: jane@example.org
    password: your-app-password

options:
  template: generic  # or "gdpr" or "ccpa"
  rate_limit_ms: 2000  # delay between emails
  daily_send_limit: 450  # cap per rolling 24h window; keep it under your provider's daily limit

  # Optional: only target specific regions
  # regions:
  #   - us
  #   - global

  # Optional: skip specific brokers
  # excluded_brokers:
  #   - spokeo
  #   - whitepages

  # Optional: skip every broker in these categories - e.g. "requires-id" to
  # skip brokers that demand a government-issued ID document before they'll
  # act on a request (this tool won't supply one on your behalf)
  # excluded_categories:
  #   - requires-id

# Optional: monitor your inbox for broker replies (used by `delistd monitor`)
# inbox:
#   enabled: true
#   provider: fastmail  # gmail, proton, fastmail, mailbox-org, posteo, icloud - or drop it and set server + port
#   email: jane@example.org
#   password: your-app-password
Email Templates
Delistd includes three templates:
- GDPR — Invokes Article 17 "Right to Erasure" under EU law
- CCPA — Invokes California Consumer Privacy Act rights
- Generic — References multiple privacy laws, works anywhere
The generic template is a good default if you're not sure. EU residents should pick gdpr explicitly — see EU-NOTES.md.
Adding Brokers
The broker database is at data/brokers.yaml and is compiled into the binary, so a downloaded delistd is self-contained. delistd update-brokers pulls a fresh copy from this repo into ~/.eraser/brokers.yaml (a small conditional download — the app itself isn't touched). To add one by hand:
- id: example-broker
  name: Example Broker
  email: privacy@example.com
  website: https://example.com
  opt_out_url: https://example.com/optout
  region: us  # us, eu, or global
  countries: [DE]  # optional: only people connected to these countries (ISO codes); omit for everyone
  category: people-search  # people-search, marketing, background-check, financial-b2b, data-intermediary, device-id-only, or requires-id
countries is for brokers that only hold one market's data (a German credit bureau, a Mexican one) and ask not to be sent requests from elsewhere. Delistd skips them for profiles whose country is outside the list; an empty or unrecognised country never hides anything. Name a broker with send --broker <id> to send regardless, e.g. when you have a past address in that country.
Or use the interactive command:
./delistd add-broker
Choosing a broker list
The full list is broad, so it carries some noise (dead addresses, companies that turn out not to be brokers). If you'd rather email only companies that are confirmed data brokers with a current first-party privacy email or rights portal — built from registries and authoritative privacy notices across the US, EU, Latin America, New Zealand, and Kenya — use the smaller verified list:
./delistd send --list verified          # one run
./delistd send --broker spokeo,pipl     # explicit broker IDs
./delistd send --region eu --category financial-b2b
./delistd send --exclude broker-id --status never
--broker, --region, --category, and --exclude can be repeated or comma-separated. --status eligible is the safe default; use never, failed, or all to select by send history. The web Brokers page exposes the same filters before bulk sending.
Or set it permanently in config.yaml:
options:
  broker_list: verified                # or: broker_file: /path/to/your-own-list.yaml
"Verified" means each entry is confirmed to be a real data broker with a
current, working contact we found by hand — most of the US ones are also
cross-checked against California's data-broker registry. It doesn't mean
any of them have been sent a request and confirmed to actually act on it;
no list can promise that in advance. delistd status/pipeline is how you
find out what a broker actually does once you've emailed it.
The weekly CI audit keeps the full list from rotting — it clears dead email domains automatically and opens a PR for review.
Security Notes
- Your config file contains personal data. Don't commit it to git. The file is created with restricted permissions (readable only by you).
- Mail passwords are never stored in plain text.
smtp.passwordandinbox.passwordare saved inconfig.yamlasenc:v1:...(AES-256-GCM, key derived from this machine's ID and your user). A copied config, backup or synced dotfile can't be decrypted on another machine, so after moving to a new machine re-enter the passwords withdelistd initor in Settings. Someone logged in as you on the same machine can still use Delistd, and therefore the password, unless you add a passphrase:delistd passphrase setmakes the passwords undecryptable without it. Heads-up: with a passphrase, runs with nobody at the keyboard can't unlock them.delistd schedule install(the OS scheduler) is refused, whiledelistd autoanddelistd serveask once at startup. There is no recovery; if you forget it, re-enter the passwords withdelistd init. - Use app passwords, not your real password. Most providers require one for SMTP/IMAP access; where they don't, it's still a good idea.
- Consider using a dedicated email. This keeps your removal request activity separate from your main inbox.
delistd MCP questions
Can I automate the removal process?
Yes, you can install a scheduler that runs the tool every 6 hours to send requests and check for replies.