
Converts Terraform code into professional cloud architecture diagrams for AWS, Azure, and GCP using AI-powered refinement.
Also known as patrickchugh/terravision
- Stars
- 1,690
- Tools
- —
- Downloads, 30 days
- —
- Latest version
- 0.56.1
- Last commit
- Nov 12, 2026
- License
- AGPL-3.0
What is TerraVision MCP?
TerraVision converts Terraform code into professional cloud architecture diagrams for AWS, Azure, and GCP using AI-powered refinement.
Summary generated from the project's README
About TerraVision MCP server
Cloud engineers and architects can transform Terraform code into professional architecture diagrams for AWS, Azure, and GCP. By parsing terraform plans rather than remote statefiles, this tool ensures that visual documentation accurately reflects the actual infrastructure deployed in production. It operates entirely on the client side, meaning it does not require access to cloud credentials or environments to function.
Users can integrate the tool into CI/CD pipelines to automate documentation updates alongside build and release phases. The system supports AI-powered refinement through AWS Bedrock or local Ollama instances to improve resource groupings and connections. Developers can also use YAML-based annotations to add custom labels or unmanaged resources to the generated visuals. The tool requires Python 3.10+, Terraform 1.x, and Graphviz to run locally.
What you can do with it
- 1Automate infrastructure documentationIntegrate the tool into your CI/CD pipeline to update architecture diagrams automatically after deployment phases.
- 2Generate diagrams from variable filesCreate multiple different versions of architecture diagrams from the same codebase by using different Terraform variable files.
- 3Refine diagrams with local AIUse a local Ollama server to improve diagram connections and groupings without sending sensitive code to external APIs.
- 4Annotate existing architectureAdd custom labels or external systems that are not captured in your Terraform code using YAML files.
Written from the project's README. Every use case is checked against a quote from it.
How to install TerraVision MCP
Formats verified 10 Nov 2026Install TerraVision MCP in Claude Code
$ claude mcp add terravision -- uvx terravisionInstall TerraVision MCP in Cursor
~/.cursor/mcp.json
{
  "mcpServers": {
    "terravision": {
      "command": "uvx",
      "args": [
        "terravision"
      ]
    }
  }
}Install TerraVision MCP in VS Code
.vscode/mcp.json
{
  "servers": {
    "terravision": {
      "type": "stdio",
      "command": "uvx",
      "args": [
        "terravision"
      ]
    }
  }
}Install TerraVision MCP in Claude Desktop
claude_desktop_config.json
{
  "mcpServers": {
    "terravision": {
      "command": "uvx",
      "args": [
        "terravision"
      ]
    }
  }
}Install TerraVision MCP in Codex
~/.codex/config.toml
[mcp_servers.terravision]
command = "uvx"
args = ["terravision"]
Install TerraVision MCP in Gemini CLI
~/.gemini/settings.json
{
  "mcpServers": {
    "terravision": {
      "command": "uvx",
      "args": [
        "terravision"
      ]
    }
  }
}Configuration
OLLAMA_KEEP_ALIVE
| Name | Description | |
|---|---|---|
| OLLAMA_KEEP_ALIVE | — |
Automated checks
Ran Nov 12, 2026Full report →Passed our automated checks. That is not a security audit: read the code and give the server the narrowest access it needs. How checks work

- Source repository linked and reachablePass
- Open source license (OSI)Pass
- Commit or release in the last yearPass
- Package name not close to a popular packagePass
- Remote endpoint uses HTTPSNot checked
- Destructive tools are labelledNot checked
- No hidden instructions to the modelPass
- No critical advisory in the package or its dependenciesPass
README
View on GitHubTerraVision
TerraVision is an AI-powered CLI tool that converts Terraform code into Professional Cloud Architecture Diagrams and solves the problem of keeping the most important document in cloud projects, the architecture diagram, up to date. With high velocity releases the norm now, code is the new source of truth so machine generated architecture diagrams are more accurate than relying on the freestyle diagram drawn by the cloud architect that probably doesn't match the reality of what is actually deployed in the cloud anymore.
TerraVision securely runs 100% Client Side without any dependency or access to your Cloud environment, dynamically parses your conditionally created resources and variables and generates an automatic visual of your architecture. TerraVision is designed to be a 'Docs as Code' (DaC) tool that can be included in your CI/CD pipeline to update architecture diagrams after your build/test/release pipeline phases and supplement other document generators like readthedocs.io alongside it.
Status

Supported Cloud Providers
- ✅ AWS (Full support with 200+ services)
- 🔄 Google Cloud Platform (Partial Support)
- 🔄 Microsoft Azure (Partial Support)
Turn this...
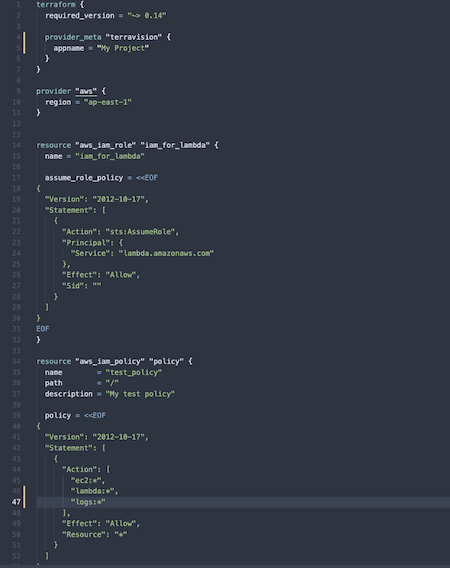
into this...
⚠️ Alpha Software Notice
This software is still in alpha testing and code is shared on an "AS IS" BASIS, WITHOUT WARRANTIES OR CONDITIONS OF ANY KIND, either express or implied. Use at your own risk.
Benefits of terravision
- Cost
- Save Visio/Drawing software licenses - terravision is free and open source
- Doesn't require any cost incurring cloud resources to be spun up, it works instantly from your local machine
- Regularly updating diagrams aligning, connecting dots and laying out icons is not the best use of your architect staff costs
- Accelerate and Automate
- Use TF variable files as inputs to create multiple variant diagrams from the same TF code
- Doesn't require infrastructure to exist to document it. Terravision works off your terraform plan not your remote statefile
- Automate creation of architecture diagrams by running terravision as part of CI/CD pipelines
- YAML based Diagrams as code allows you to Annotate generated diagrams with additional custom labels and resources e.g. unmanaged resources or external systems not captured in TF code
- Consistency across organisation
- Auto downloads your organisational / external modules to ensure the latest view of downstream Terraform modules
- Consistent design of architecture diagrams using industry standard icons and AWS/GCP/Azure approved style across teams
- Accurate Visibility
- Real time state of diagram shows current infrastructure that matches exactly what is deployed in production today
- Helps in third party architecture reviews, auditing, monitoring, reporting and debugging of the stack in a visual way
- Custom Diagram code and output images can be put into source/version control for better maintainability and discoverability
- Security
- Don't need to give access to your AWS account, credentials or CLI to draw diagram
- Doesn't create intrusive cloud resources e.g. scanning instances or metadata tables which enterprises would need to approve
- All source code stays in your local environment, diagrams are generated on your machines without calling out to external APIs
- Only metatdata is sent to LLM models with only minimal aggregate data saved in external files, not any sensitive code or runtime environment values
CI/CD Pipeline Integration
TerraVision seamlessly integrates into your CI/CD pipeline to automatically keep architecture diagrams synchronized with your infrastructure code:
graph TD
    A[Developer Commits<br/>Terraform Code] --> B[Git Push]
    B --> C[CI/CD Pipeline<br/>Triggered]
    C --> D[Build Stage]
    D --> E[Test Stage]
    E --> F[Terraform Plan]
    F --> G[🎨 TerraVision<br/>Generate Diagrams]
    G --> H[Deploy Stage]
    H --> I[Update Docs]
    I --> J[Publish to<br/>Confluence/ReadTheDocs]

    style G fill:#ff9900,stroke:#232f3e,stroke-width:3px,color:#fff
    style A fill:#4a90e2,stroke:#2e5c8a,stroke-width:2px,color:#fff
    style J fill:#36b37e,stroke:#1f7a54,stroke-width:2px,color:#fff
Installation and Usage
System Requirements
- Python 3.10+
- Terraform 1.x
- Git
- Graphviz
- Ollama (Optional - only required if using
--aibackend ollama)
1. Install External Dependencies
Required Dependencies
-
Graphviz - https://graphviz.org/download/
# macOS brew install graphviz # Ubuntu/Debian sudo apt-get install graphviz # Windows # Download from https://graphviz.org/download/ -
Git - https://git-scm.com/downloads
# Most systems have git pre-installed git --version -
Terraform - https://developer.hashicorp.com/terraform/downloads
# Verify installation
terraform version
# Must be v1.0.0 or higher
2. Install TerraVision
Method 1: Quick Install in MacOS/Linux (For Casual Users - will install packages globally)
# Clone the repository
git clone https://github.com/patrickchugh/terravision.git
cd terravision

# Install Python dependencies
pip install -r requirements.txt

# Make script executable in Linux
chmod +x terravision.py

# Create symbolic link without extension (Unix/Linux/macOS)
ln -s $(pwd)/terravision.py $(pwd)/terravision

# Add to PATH
export PATH=$PATH:$(pwd)
For Windows:
# Clone the repository
git clone https://github.com/patrickchugh/terravision.git
cd terravision

# Install Python dependencies
pip install -r requirements.txt

# Create batch file wrapper
echo @python "%~dp0terravision.py" %* > terravision.bat

# Add current directory to PATH or copy terravision.bat to a directory in PATH
copy terravision.bat C:\Windows\System32\
Method 2: Poetry Install (Recommended for Developers and Power Users)
# MacOS or Linux users - Install Poetry if not already installed
curl -sSL https://install.python-poetry.org | python3 -

# For Windows Users
(Invoke-WebRequest -Uri https://install.python-poetry.org -UseBasicParsing).Content | py -

# Clone and install with Poetry
git clone https://github.com/patrickchugh/terravision.git
cd terravision
poetry install

# Activate virtual environment
source $(poetry env info --path)/bin/activate

# Create symbolic link without extension
ln -s $(pwd)/terravision.py $(pwd)/terravision

# Add current terravision directory to PATH
export PATH=$PATH:$(pwd)
Basic Usage
Generate Architecture Diagram
# Basic usage - analyze current directory
terravision draw

# Specify source directory
terravision draw --source ~/src/my-terraform-code

# Use specific Terraform workspace
terravision draw --source ~/src/my-terraform-code --workspace production

# Use variable files
terravision draw --source ~/src/my-terraform-code --varfile prod.tfvars

# Generate different formats
terravision draw --source ~/src/my-terraform-code --format svg
terravision draw --source ~/src/my-terraform-code --format pdf

# Show diagram after generation
terravision draw --source ~/src/my-terraform-code --show

# Use AI backend for diagram refinement (default: bedrock)
terravision draw --source ~/src/my-terraform-code --aibackend bedrock
terravision draw --source ~/src/my-terraform-code --aibackend ollama
Remote Git Repository Support
# Analyze Git repository
terravision draw --source https://github.com/your-repo/terraform-examples.git

# Analyze specific subfolder in Git repo
terravision draw --source https://github.com/your-repo/terraform-examples.git//aws/vpc
Export Graph Data
# Export resource relationships as JSON
terravision graphdata --source ~/src/my-terraform-code

# Show only unique services used
terravision graphdata --source ~/src/my-terraform-code --show_services

# Export to custom filename
terravision graphdata --source ~/src/my-terraform-code --outfile my-resources.json
Advanced Features
Use with annotations
# Add your own custom annotations such as labels, resources or new connections
terravision draw --source https://github.com/your-repo/terraform-examples.git --annotate ./custom-annotations.yml
Working with Pre-generated JSON from previous terravision run (faster)
# Export and reuse graph data
terravision graphdata --source ~/src/terraform --outfile graph.json

# Use previously exported JSON data (just the graph dict)
terravision draw --source ./graph.json
terravision draw --source ./graph.json --format svg

# Reprocess and replay from previous debug (for troubleshooting without calling slow terraform init/plan/analayse again)
terravision draw --source /your_source_files --debug  # createas a tfdata.json in current folder
terravision draw --source tfdata.json
Debug Mode
# Enable debug output for troubleshooting and which will dump all state info into tfdata.json
terravision draw --source ~/src/my-terraform-code --debug
AI-Powered Diagram Refinement
TerraVision can use AI models to automatically refine and improve your architecture diagrams by fixing resource groupings, adding missing connections, and ensuring proper AWS architectural conventions.
Supported AI Backends
AWS Bedrock (Default)
Uses AWS Bedrock API via API Gateway for cloud-based AI refinement.
# Use Bedrock backend (default)
terravision draw --source ~/src/my-terraform-code --aibackend bedrock
Configuration:
Edit modules/cloud_config.py to set your Bedrock API endpoint:
BEDROCK_API_ENDPOINT = "https://your-api-id.execute-api.us-east-1.amazonaws.com/prod/chat"
Ollama (Local)
Uses a local Ollama server for privacy-focused, offline AI refinement.
# Use Ollama backend
terravision draw --source ~/src/my-terraform-code --aibackend ollama
Setup:
- Install Ollama from https://ollama.ai/download
- Start Ollama server and pull a model:
# Start Ollama (runs automatically on macOS/Linux after install) ollama serve # Pull the llama3 model ollama pull llama3 # Set model to stay loaded longer (optional, prevents premature unloading) # Default timeout is 5 minutes, extend to 1 hour: export OLLAMA_KEEP_ALIVE=1h - Edit
modules/cloud_config.pyto set your Ollama server (default is localhost):OLLAMA_HOST = "http://localhost:11434"
AI Refinement Prompts
The AI models use specialized prompts defined in modules/cloud_config.py:
- AWS_REFINEMENT_PROMPT: Guides the AI to fix resource groupings, connections, and ensure AWS best practices
- AWS_DOCUMENTATION_PROMPT: Generates architecture summaries and documentation
Setting Up AWS Bedrock Backend
TerraVision includes Terraform code to deploy a serverless AWS Bedrock proxy with API Gateway:
# Navigate to the Terraform directory
cd ai-backend-terraform

# Configure your settings
cp terraform.tfvars.example terraform.tfvars
# Edit terraform.tfvars with your settings

# Deploy the infrastructure
terraform init
terraform apply

# Get your API endpoint
terraform output api_endpoint
Infrastructure Components:
- API Gateway: REST API with streaming support for real-time responses
- Lambda Function: Node.js 20.x function with response streaming
- DynamoDB: Rate limiting and usage tracking
- CloudWatch: Monitoring, logging, and cost alerts
- IAM Roles: Least-privilege access for Lambda to invoke Bedrock
Terraform Variables:
variable "bedrock_model_id" {
  description = "Bedrock model ID"
  type        = string
}

variable "rate_limit_per_hour" {
  description = "Maximum requests per client per hour"
  type        = number
  default     = 100
}

variable "cost_alert_threshold" {
  description = "Cost alert threshold in USD"
  type        = number
  default     = 50
}
After deployment, update modules/cloud_config.py with the output endpoint:
BEDROCK_API_ENDPOINT = "<your-api-endpoint-from-terraform-output>"
Annotating generated diagrams
No automatically generated diagram is going to have all the detail you need, at best it will get you 80-90% of the way there. To add custom annotations such as a main diagram title, additional labels on arrows or additional resources created outside your Terraform, include a terravision.yml file in the source code folder and it will be automatically loaded. Alternatively, specify a path to the annotations file as a parameter to terravision.
terravision --source https://github.com/your-repo/terraform-examples.git --annotate /Users/me/MyDocuments/annotations.yml
The .yml file is a standard YAML configuration file that is similar to the example below with one or more headings called title, connect, disconnect, add, remove or update. The node names follow the same conventions as Terraform resource names https://registry.terraform.io/providers/hashicorp/aws/latest/docs and support wildcards. You can add a custom label to any TF resource by modifying the attributes of the resource and adding the label attribute (doesn't exist in Terraform). For lines/connections, you can modify the resource attributes by adding terravision specific edge_labels to add text to the connection line to a specific resource node. See the example below:
format: 0.1
# Main Diagram heading
title: Serverless Wordpress Site
# Draw new connection lines that are not apparent from the Terraforms
connect:
  aws_rds_cluster.this:
    - aws_ssm_parameter.db_master_user : Retrieve credentials from SSM
# Remove connections between nodes that are currently shown
disconnect:
  # Wildcards mean these disconnections apply to any cloudwatch type resource called logs
  aws_cloudwatch*.logs:
    - aws_ecs_service.this
    - aws_ecs_cluster.this
# Delete the following nodes
remove:
  - aws_iam_role.task_execution_role
# Add the following nodes
add:
  aws_subnet.another_one :
    # Specify Terraform attributes for a resource like this
    cidr_block: "123.123.1.1"
# Modify attributes of existing node
update:
  aws_ecs_service.this:
    # Add custom labels to the connection lines that already exist between ECS->RDS
    edge_labels:
      - aws_rds_cluster.this: Database Queries
  # Wildcards save you listing multiple resources of the same type. This edge label is added to all CF->ACM connections.
  aws_cloudfront* :
    edge_labels:
      - aws_acm_certificate.this: SSL Cert
 # Add a custom label to a resource node. Overrides default label
  aws_ecs_service.this :
   label: "My Custom Label"
Example Pipeline Configuration
# .github/workflows/infrastructure-docs.yml
name: Update Architecture Diagrams

on:
  push:
    branches: [main, develop]
    paths:
      - '**.tf'
      - '**.tfvars'

jobs:
  update-diagrams:
    runs-on: ubuntu-latest
    steps:
      - uses: actions/checkout@v3

      - name: Setup Terraform
        uses: hashicorp/setup-terraform@v2

      - name: Setup Python
        uses: actions/setup-python@v4
        with:
          python-version: '3.10'

      - name: Install Graphviz
        run: sudo apt-get install -y graphviz

      - name: Install TerraVision
        run: |
          git clone https://github.com/patrickchugh/terravision.git
          cd terravision
          pip install -r requirements.txt

      - name: Generate Architecture Diagrams
        run: |
          terravision draw --source ./terraform --format svg --outfile architecture-${{ github.sha }}
          terravision draw --source ./terraform --format png --outfile architecture-${{ github.sha }}

      - name: Update Documentation Site
        run: |
          cp architecture-*.svg docs/images/
          cp architecture-*.png docs/images/
          # Update your docs (ReadTheDocs, MkDocs, etc.)

      - name: Publish to Confluence
        env:
          CONFLUENCE_TOKEN: ${{ secrets.CONFLUENCE_TOKEN }}
        run: |
          # Upload diagrams to Confluence page
          curl -X PUT "https://your-domain.atlassian.net/wiki/rest/api/content/$PAGE_ID" \
            -H "Authorization: Bearer $CONFLUENCE_TOKEN" \
            -H "Content-Type: application/json" \
            --data @confluence-update.json
Command Reference
Main Commands
terravision draw
Generates architecture diagrams from Terraform code.
Options:
--source- Source location (folder, Git URL, or JSON file)--workspace- Terraform workspace (default: "default")--varfile- Path to .tfvars file (can be used multiple times)--outfile- Output filename (default: "architecture")--format- Output format: png, pdf, svg, bmp (default: png)--show- Automatically open diagram after generation--simplified- Generate simplified high-level diagram--annotate- Path to custom annotations YAML file--aibackend- AI backend for diagram refinement: bedrock, ollama (default: bedrock)--debug- Enable debug output
terravision graphdata
Exports resource relationships and metadata as JSON.
Options:
--source- Source location (folder, Git URL, or JSON file)--workspace- Terraform workspace (default: "default")--varfile- Path to .tfvars file (can be used multiple times)--outfile- Output JSON filename (default: "architecture.json")--show_services- Show only unique services list--annotate- Path to custom annotations YAML file--aibackend- AI backend for diagram refinement: bedrock, ollama--debug- Enable debug output
Global Options
--version- Show version information--help- Show help message
Supported File Types
Input Sources
- Terraform files (
.tf,.tf.json) - Variable files (
.tfvars,.tfvars.json) - Git repositories (HTTPS URLs)
- Pre-generated JSON (
.jsongraph data) - Annotation files (
.yml,.yaml)
Output Formats
- PNG (default) - Raster image format
- SVG - Scalable vector graphics
- PDF - Portable document format
- BMP - Bitmap image format
- JSON - Graph data export
Troubleshooting
Common Issues
-
"terraform command not found"
# Verify Terraform installation terraform version # Should show v1.x.x -
"dot command not found"
# Install Graphviz brew install graphviz # macOS sudo apt-get install graphviz # Ubuntu -
"Terraform version not supported"
- terravision requires Terraform v1.0.0 or higher
- Upgrade Terraform: https://developer.hashicorp.com/terraform/downloads
-
"No resources found"
- Ensure your Terraform code is valid
- Run
terraform planto verify configuration - Check that source path contains
.tffiles
-
"Cannot reach Ollama server"
- Verify Ollama is running:
curl http://localhost:11434/api/tags - If server is unresponsive, kill existing processes:
lsof -ti:11434 | xargs kill -9 ollama serve - Ensure llama3 model is installed:
ollama pull llama3
- Verify Ollama is running:
-
"Stale or cached module issues"
- Clear the terravision cache folder:
rm -rf ~/.terravision - This removes all cached modules and temporary files
- Clear the terravision cache folder:
Debug Mode
Use --debug flag for detailed troubleshooting information:
terravision draw --source ~/src/terraform --debug
This will:
- Show detailed processing steps
- Export intermediate JSON files
- Display full error traces
- Show detailed intermediate variable information
Getting Help
For detailed help on any command:
terravision --help
terravision draw --help
terravision graphdata --help
Performance Tips
-
Large Terraform Projects
- Use
--simplifiedfor overview diagrams - Export to JSON first, then generate multiple diagram variants
- Use specific workspaces to reduce scope
- Use
-
CI/CD Integration
# Example CI pipeline step terravision draw --source . --format svg --outfile architecture-${BUILD_NUMBER} -
Batch Processing
# Generate multiple formats
for format in png svg pdf; do
  terravision draw --source . --format $format --outfile arch-$format
done
Version Information
Recent Updates:
- Enhanced cloud provider support
- Improved JSON export capabilities
- Better error handling and debugging
- Performance optimizations for large projects
TerraVision MCP questions
How do I add TerraVision MCP to Claude Code?
Run claude mcp add terravision -- uvx terravision in your terminal. Add --scope user to make it available in every project.
How do I add TerraVision MCP to Cursor?
Open ~/.cursor/mcp.json and add the server under mcpServers, using the Cursor config shown in the install section above.
Does TerraVision require access to my cloud environment?
No, it runs 100% client-side without any dependency or access to your cloud environment, working off your terraform plan rather than your remote statefile.
Can I use local AI models for diagram refinement?
Yes, you can use Ollama as a local AI backend for privacy-focused, offline AI refinement.
Can this be integrated into a CI/CD pipeline?
Yes, it is designed as a 'Docs as Code' tool that can be included in your CI/CD pipeline to update diagrams automatically after build or test phases.