
UI Annotator MCP server
✓ VerifiedAnnotates web pages with visible hover labels and provides structured element data to AI assistants via a reverse proxy.
Also known as mcpware/ui-annotator-mcp, @mcpware/ui-annotator
- Stars
- 21
- Tools
- —
- Downloads, 30 days
- —
- Latest version
- 0.1.6
- Last commit
- Mar 24, 2026
- License
- MIT
What is UI Annotator MCP?
UI Annotator annotates web pages with visible hover labels and provides structured element data to AI assistants via a reverse proxy.
Summary generated from the project's README
About UI Annotator MCP server
Providing a shared visual language between developers and AI assistants is what ui-annotator-mcp enables. By using a reverse proxy, this tool injects visible hover labels onto web elements, displaying human-readable names, CSS selectors, and dimensions directly in any browser. This eliminates the need for browser extensions or code changes, making it compatible with Chrome, Firefox, Safari, and Edge.
Developers use this server to bridge the communication gap when requesting UI updates from an AI client like Claude. Instead of describing an element by its position or vague characteristics, you can use specific component names identified through the hover overlay. The server provides specialized tools such as get_elements to share structured DOM data, highlight_element to visually confirm a component, and inspect_mode to allow clicking elements to copy their names to the clipboard.
Setup is straightforward via npx, running a local proxy on port 7077 that fetches your target application. It works by scanning the DOM and reporting interactive elements back to the AI, ensuring that both the human user and the assistant are looking at the exact same interface components.
What you can do with it
- 1Identify UI components by nameA developer can hover over a button to see its specific identifier before asking an AI to modify it.
- 2Execute precise UI design changesYou can instruct an AI assistant to move or resize a specific component using its actual name rather than vague descriptions.
- 3Verify element selection visuallyAn AI can flash a highlight on a specific part of the page to confirm it has identified the correct element.
- 4Capture element details for codingUsers can enter an inspection mode to click elements and automatically copy their names to the clipboard.
Written from the project's README. Every use case is checked against a quote from it.
How to install UI Annotator MCP
Formats verified 10 Nov 2026Add to CursorAdd to GooseInstall UI Annotator MCP in Claude Code
$ claude mcp add ui-annotator-mcp -- npx -y @mcpware/ui-annotatorInstall UI Annotator MCP in Cursor
~/.cursor/mcp.json
{
  "mcpServers": {
    "ui-annotator-mcp": {
      "command": "npx",
      "args": [
        "-y",
        "@mcpware/ui-annotator"
      ]
    }
  }
}Install UI Annotator MCP in VS Code
.vscode/mcp.json
{
  "servers": {
    "ui-annotator-mcp": {
      "type": "stdio",
      "command": "npx",
      "args": [
        "-y",
        "@mcpware/ui-annotator"
      ]
    }
  }
}Install UI Annotator MCP in VS Code CLI
$ code --add-mcp '{"name":"ui-annotator-mcp","type":"stdio","command":"npx","args":["-y","@mcpware/ui-annotator"]}'Install UI Annotator MCP in Claude Desktop
claude_desktop_config.json
{
  "mcpServers": {
    "ui-annotator-mcp": {
      "command": "npx",
      "args": [
        "-y",
        "@mcpware/ui-annotator"
      ]
    }
  }
}Install UI Annotator MCP in Codex
$ codex mcp add ui-annotator-mcp -- npx -y @mcpware/ui-annotatorInstall UI Annotator MCP in Codex config.toml
~/.codex/config.toml
[mcp_servers.ui-annotator-mcp]
command = "npx"
args = ["-y", "@mcpware/ui-annotator"]
Install UI Annotator MCP in Gemini CLI
$ gemini mcp add -s user ui-annotator-mcp npx -- -y @mcpware/ui-annotatorInstall UI Annotator MCP in Gemini settings.json
~/.gemini/settings.json
{
  "mcpServers": {
    "ui-annotator-mcp": {
      "command": "npx",
      "args": [
        "-y",
        "@mcpware/ui-annotator"
      ]
    }
  }
}Automated checks
Ran Nov 15, 2026Full report →Passed our automated checks. That is not a security audit: read the code and give the server the narrowest access it needs. How checks work

- Source repository linked and reachablemcpware/ui-annotator-mcp is public and reachablegithub.com/mcpware/ui-annotator-mcp ↗Pass
- Package names this repository as its source@mcpware/ui-annotator names mcpware/ui-annotator-mcp as sourcenpmjs.com/package/@mcpware/ui-annotator ↗Pass
- Build provenance (Sigstore attestation)No build attestation published for this releaseNot checked
- Open source license (OSI)MITspdx.org/licenses/MIT.html ↗Pass
- Commit or release in the last yearLast commit or release 2026-03-24github.com/mcpware/ui-annotator-mcp ↗Pass
- OpenSSF ScorecardNot checked
- Package name not close to a popular packageNo popular package one edit away from @mcpware/ui-annotatorPass
- No critical advisory in the package or its dependencies99 resolved dependencies checked; no critical advisoryosv.dev ↗Pass
- No hidden instructions to the model0 tool descriptions and the README read; no override phrases, credential paths or hidden charactersPass
- Destructive tools are labelledNot checked
- Remote endpoint answers the MCP handshakeNot checked
README
View on GitHubUI Annotator MCP





English | 廣東話
Bridge the gap between what you see and what AI can reference — in any browser, zero extensions.
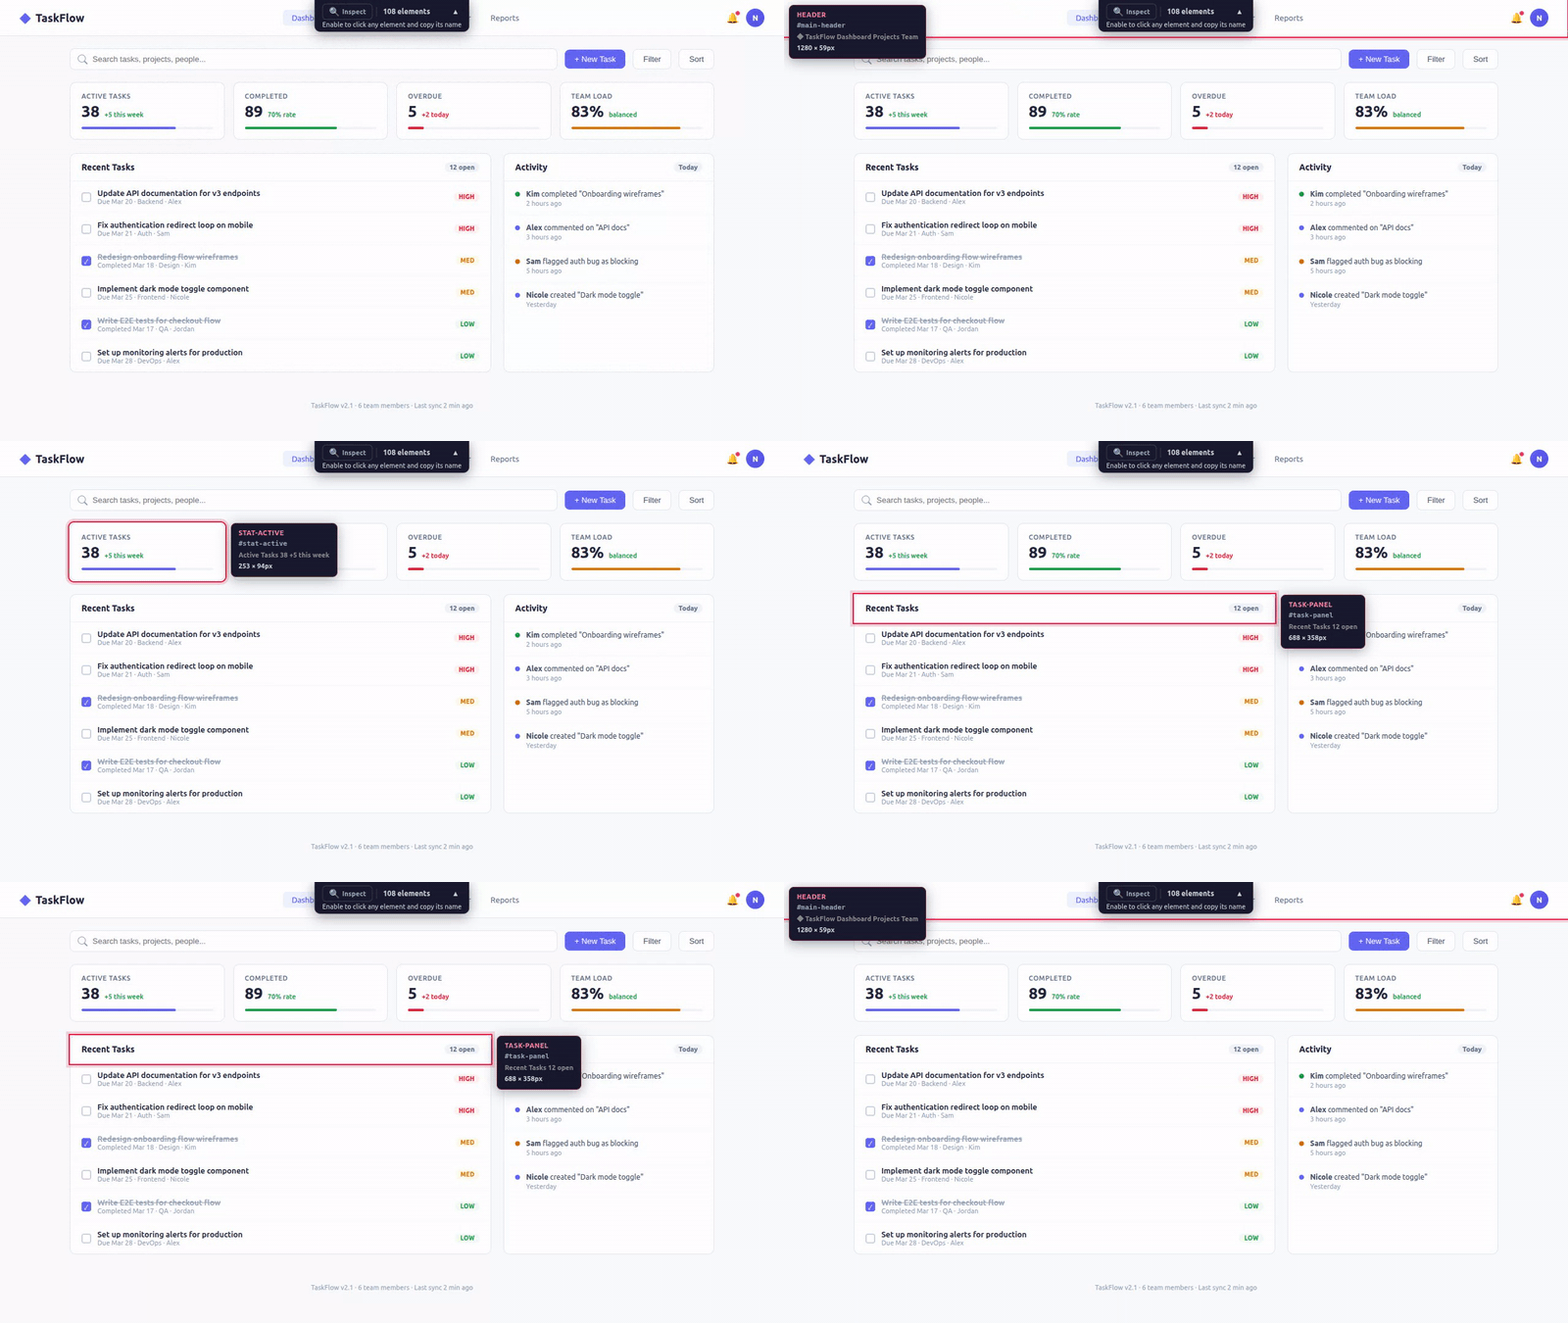
The only tool that puts visible labels on every web element. Hover any element, see its name. Tell your AI assistant "make the sidebar wider" — it knows exactly which element you mean. No screenshots, no CSS selectors, no miscommunication.
Why It Matters
Dramatically improves AI-driven UI design and iteration. The pain: telling AI "move that button next to the search bar" never works because the AI can't see your page. UI Annotator fixes this — hover over any element and its component name appears as a label. Now you say "move SearchButton below NavBar" and Claude edits the right component instantly. No browser extensions, works with any framework. The workflow becomes: open page → hover to identify elements → describe changes using real component names → Claude edits → refresh and repeat. Turns a frustrating back-and-forth into a fluid design loop.
The Problem
When reviewing a web UI with an AI coding assistant, the hardest part isn't the code change — it's describing which element you want changed.
"That thing on the left... the second row... no, the one with the icon..."
You don't know what it's called. The AI doesn't know what you're pointing at. You waste time on miscommunication instead of shipping.
The Solution
Open your page through the annotator proxy. Hover any element — instantly see its name, CSS selector, and dimensions. Now you both speak the same language.
# Start the MCP server
npx @mcpware/ui-annotator

# Open in ANY browser
http://localhost:7077/localhost:3847
That's it. No browser extensions. No code changes. No setup. Works in Chrome, Firefox, Safari, Edge — any browser.
How It Works
Your app (localhost:3847)
        │
        ▼
┌─────────────────────┐
│  UI Annotator Proxy  │ ← Reverse proxy on port 7077
│  (MCP Server)        │
└─────────────────────┘
        │
        ▼
Proxied page with hover annotations injected
        │
        ├──► User sees: hover overlay + tooltip with element names
        └──► AI sees: structured element data via MCP tools
The proxy fetches your page, injects a lightweight annotation script, and serves it back. The script scans the DOM, identifies named elements, and reports them to the MCP server. Your AI assistant queries the server to understand what's on the page.
Features
Hover Annotations
Hover any element to see:
- Element name (pink) — the human-readable identifier
- CSS selector (monospace) — the technical reference
- Content preview — what text the element contains
- Dimensions — width × height in pixels
Inspect Mode
Click the Inspect button in the toolbar (or let your AI toggle it). In inspect mode:
- Click any element → copies its name to clipboard
- All page interactions are paused (clicks don't trigger buttons/links)
- Click Inspect again to return to normal mode
Collapsible Toolbar
The toolbar sits at the top center of the page showing:
- Inspect toggle button
- Element count
- Helpful subtitle explaining what to do
- Collapse button (▲) to minimize when not needed
MCP Tools for AI
| Tool | What it does |
|---|---|
annotate(url) |
Returns proxy URL for user to open in any browser |
get_elements() |
Returns all detected UI elements with names, selectors, positions |
highlight_element(name) |
Flash-highlights a specific element so user can confirm |
rescan_elements() |
Force DOM rescan after page changes |
inspect_mode(enabled) |
Toggle inspect mode remotely |
Why Not Just Use DevTools?
| Browser DevTools | UI Annotator | |
|---|---|---|
| Target user | Frontend developers who know the DOM | Anyone — QA, PM, designer, junior dev |
| Learning curve | Need to understand DOM tree, CSS selectors, box model | Hover and read — zero learning |
| Communication | "The div.flex.gap-4 inside the second child of..." |
"The sidebar" |
| Language | CSS/HTML technical terms | Human-readable names |
| Setup | Teach people to open DevTools + navigate the DOM | Open a URL |
| AI integration | None — AI can't see what you're inspecting | MCP — AI sees the same element names you do |
DevTools is for debugging. UI Annotator is for communication — giving humans and AI a shared vocabulary for UI elements.
Why Not Use Existing Tools?
None of these do what UI Annotator does — live visual labels on every element via reverse proxy:
| Tool | Approach | Why we're different |
|---|---|---|
| browser-use (82K⭐) | AI automation framework | Automates browsers, doesn't label elements for humans. Different use case entirely. |
| Chrome DevTools MCP (31K⭐) | DOM snapshot + element UIDs | AI can inspect, but humans don't see visual annotations. No shared vocabulary. |
| Playwright MCP (29K⭐) | Accessibility tree snapshot | Returns structured text, no visual overlay. Truncates important context. |
| OmniParser | Screenshot + CV detection | Screenshot-based, not live DOM. ~40% accuracy on hard benchmarks. |
| MCP Pointer (526 users) | Chrome extension + MCP | Requires Chrome extension. Human clicks to select — no hover overlay. |
| Agentation | npm embedded in your app | Requires code changes. React 18+ dependency. Not zero-config. |
| Vibe Annotations | Chrome extension | Extension-based, developer-only annotation workflow. |
Feature Comparison
| Feature | UI Annotator | MCP Pointer | Agentation | Cursor | Chrome DevTools MCP |
|---|---|---|---|---|---|
| Visual hover annotation | Yes | No | Partial | Yes (IDE only) | No |
| Shows element names | Yes | Yes | Yes | No (high-level) | Programmatic |
| Shows dimensions | Yes | Yes | Yes (Detailed) | Yes | Programmatic |
| MCP server | Yes | Yes | Yes | No | Yes |
| Zero browser extensions | Yes | No | Yes | N/A | No |
| Zero code changes | Yes | Yes | No | N/A | Yes |
| Any browser | Yes | Chrome only | Desktop only | Cursor only | Chrome only |
| Zero dependencies | Yes | Chrome ext | React 18+ | Cursor | Chrome |
| Click to copy element name | Yes | No | No | No | No |
Architecture
Zero external dependencies
- Reverse proxy: Node.js built-in
httpmodule - MCP server:
@modelcontextprotocol/sdk(stdio transport) - Communication: HTTP POST (browser → server) + GET polling (server → browser)
- No WebSocket, no Express, no browser extension
How the proxy works
- User requests
localhost:7077/localhost:3847 - Proxy fetches
http://localhost:3847 - For HTML responses:
- Injects
fetch()/XMLHttpRequestinterceptor (rewrites API paths through proxy) - Rewrites
href="/..."andsrc="/..."attributes to route through proxy - Injects annotation script before
</body>
- Injects
- For non-HTML (CSS, JS, images): passes through directly
- Strips
Content-Security-Policyheaders to allow injected script
How annotation works
- Script scans DOM for elements with
id,class, semantic roles, or interactive roles - On hover: positions overlay border (follows
border-radius) + positions tooltip (always within viewport) - Reports all detected elements to server via
POST /__annotator/elements - Polls
GET /__annotator/commandsevery second for server instructions (highlight, rescan, inspect toggle) MutationObserverauto-rescans when DOM changes
Quick Start
With Claude Code
# Add as MCP server
claude mcp add ui-annotator -- npx @mcpware/ui-annotator

# Then in conversation:
# "Annotate my app at localhost:3847"
# → AI returns proxy URL, you open it, hover elements, discuss changes by name
Manual
npx @mcpware/ui-annotator
# Proxy starts on http://localhost:7077
# Open http://localhost:7077/localhost:YOUR_PORT
Environment Variables
| Variable | Default | Description |
|---|---|---|
UI_ANNOTATOR_PORT |
7077 |
Port for the proxy server |
More from @mcpware
| Project | What it does | Install |
|---|---|---|
| Instagram MCP | 23 Instagram Graph API tools — posts, comments, DMs, stories, analytics | npx @mcpware/instagram-mcp |
| Claude Code Organizer | Visual dashboard for Claude Code memories, skills, MCP servers, hooks | npx @mcpware/claude-code-organizer |
| Pagecast | Record browser sessions as GIF or video via MCP | npx @mcpware/pagecast |
| LogoLoom | AI logo design → SVG → full brand kit export | npx @mcpware/logoloom |
License
MIT
UI Annotator MCP questions
How do I add UI Annotator MCP to Claude Code?
Run claude mcp add ui-annotator-mcp -- npx -y @mcpware/ui-annotator in your terminal. Add --scope user to make it available in every project.
How do I add UI Annotator MCP to Cursor?
Open ~/.cursor/mcp.json and add the server under mcpServers, using the Cursor config shown in the install section above.
How do I use it with Claude Code?
You can add it using the command 'claude mcp add ui-annotator -- npx @mcpware/ui-annotator' and then ask the AI to annotate your app.
Can the AI control the UI inspection?
Yes, the AI can use MCP tools to toggle inspect mode, highlight specific elements, or force a DOM rescan.