
Enables AI clients to manage product design lifecycles from discovery and requirements to RICE prioritization, flow diagrams, and Jira synchronization.
Also known as macorifice/yeti, yeti-mcp
- Stars
- 3
- Tools
- 36
- Downloads, 30 days
- —
- Latest version
- 1.1.0
- Last commit
- Oct 30, 2026
- License
- MIT
What is Yeti MCP?
Yeti enables AI clients to manage product design lifecycles from discovery and requirements to RICE prioritization, flow diagrams, and Jira synchronization. It exposes 36 tools, such as create_project, list_projects, get_project.
Summary generated from the project's README
About Yeti MCP server
Product managers and designers can manage the entire product design lifecycle directly through Claude using Yeti. The server guides projects through five distinct phases: discovery, definition, prioritization, flows, and verification. It helps users move from initial problem statements to a verified scope by managing MoSCoW requirements, user stories, RICE scoring, and Mermaid flow diagrams.
Setup involves adding the server to Claude Desktop via npx and specifying a local SQLite database path through the PRODUCT_DESIGN_DB environment variable. While most features run locally, the server can synchronize work with Jira or GitHub Issues. To use these integrations, you must provide credentials like JIRA_API_TOKEN or GITHUB_TOKEN in your environment variables. Users can also access a live, read-only dashboard to monitor project progress and requirement coverage.
What you can do with it
- 1Automate product discovery and definitionStart a new project by describing a problem, target users, and a specific goal to Claude.
- 2Visualize user journeys with diagramsGenerate Mermaid flow diagrams that include decision branches for user paths.
- 3Synchronize design work with JiraPush requirements and user stories into a Jira project to begin execution.
Written from the project's README. Every use case is checked against a quote from it.
How to install Yeti MCP
Formats verified 10 Nov 2026Add to CursorAdd to GooseInstall Yeti MCP in Claude Code
$ claude mcp add --env 'JIRA_API_TOKEN=<YOUR_JIRA_API_TOKEN>' yeti -- npx -y yeti-mcpInstall Yeti MCP in Cursor
~/.cursor/mcp.json
{
  "mcpServers": {
    "yeti": {
      "command": "npx",
      "args": [
        "-y",
        "yeti-mcp"
      ],
      "env": {
        "JIRA_API_TOKEN": "<YOUR_JIRA_API_TOKEN>"
      }
    }
  }
}Install Yeti MCP in VS Code
.vscode/mcp.json
{
  "servers": {
    "yeti": {
      "type": "stdio",
      "command": "npx",
      "args": [
        "-y",
        "yeti-mcp"
      ],
      "env": {
        "JIRA_API_TOKEN": "<YOUR_JIRA_API_TOKEN>"
      }
    }
  }
}Install Yeti MCP in VS Code CLI
$ code --add-mcp '{"name":"yeti","type":"stdio","command":"npx","args":["-y","yeti-mcp"],"env":{"JIRA_API_TOKEN":"<YOUR_JIRA_API_TOKEN>"}}'Install Yeti MCP in Claude Desktop
claude_desktop_config.json
{
  "mcpServers": {
    "yeti": {
      "command": "npx",
      "args": [
        "-y",
        "yeti-mcp"
      ],
      "env": {
        "JIRA_API_TOKEN": "<YOUR_JIRA_API_TOKEN>"
      }
    }
  }
}Install Yeti MCP in Codex
$ codex mcp add yeti --env 'JIRA_API_TOKEN=<YOUR_JIRA_API_TOKEN>' -- npx -y yeti-mcpInstall Yeti MCP in Codex config.toml
~/.codex/config.toml
[mcp_servers.yeti]
command = "npx"
args = ["-y", "yeti-mcp"]

[mcp_servers.yeti.env]
JIRA_API_TOKEN = "<YOUR_JIRA_API_TOKEN>"
Install Yeti MCP in Gemini CLI
$ gemini mcp add -s user -e 'JIRA_API_TOKEN=<YOUR_JIRA_API_TOKEN>' yeti npx -- -y yeti-mcpInstall Yeti MCP in Gemini settings.json
~/.gemini/settings.json
{
  "mcpServers": {
    "yeti": {
      "command": "npx",
      "args": [
        "-y",
        "yeti-mcp"
      ],
      "env": {
        "JIRA_API_TOKEN": "<YOUR_JIRA_API_TOKEN>"
      }
    }
  }
}Yeti MCP tools 36
Detected from the READMEcreate_projectlist_projectsget_projectproject_summaryupdate_projectadvance_phaseset_project_modeduplicate_projectcreate_project_from_templatelist_templatesarchive_projectdelete_project
| create_project | — | |
| list_projects | — | |
| get_project | — | |
| project_summary | — | |
| update_project | — | |
| advance_phase | — | |
| set_project_mode | — | |
| duplicate_project | — | |
| create_project_from_template | — | |
| list_templates | — | |
| archive_project | — | |
| delete_project | — |
Show all 36 toolsShow fewer tools
add_requirementlist_requirementsupdate_requirementset_requirement_statusdelete_requirementadd_user_storyadd_decisionlist_decisionslist_storiesupdate_user_storyset_criterion_statusdelete_user_storysearch_itemsprioritize_ricemap_user_flowlist_flowsdelete_flowexport_backlogimport_requirementsopen_dashboardexport_dashboardset_project_trackerpush_to_trackersync_tracker
| add_requirement | — | |
| list_requirements | — | |
| update_requirement | — | |
| set_requirement_status | — | |
| delete_requirement | — | |
| add_user_story | — | |
| add_decision | — | |
| list_decisions | — | |
| list_stories | — | |
| update_user_story | — | |
| set_criterion_status | — | |
| delete_user_story | — | |
| search_items | — | |
| prioritize_rice | — | |
| map_user_flow | — | |
| list_flows | — | |
| delete_flow | — | |
| export_backlog | — | |
| import_requirements | — | |
| open_dashboard | — | |
| export_dashboard | — | |
| set_project_tracker | — | |
| push_to_tracker | — | |
| sync_tracker | — |
Configuration
JIRA_API_TOKENSecretAtlassian API token. Only needed for the Jira tools.
JIRA_EMAILEmail of the Atlassian account. Only needed for the Jira tools.
JIRA_SITEJira site, e.g. https://your-team.atlassian.net. Only needed for the Jira tools.
PRODUCT_DESIGN_DBAbsolute path of the SQLite database file. Set it to a folder you keep when running with npx.
| Name | Description | |
|---|---|---|
| JIRA_API_TOKEN | Atlassian API token. Only needed for the Jira tools. | Secret |
| JIRA_EMAIL | Email of the Atlassian account. Only needed for the Jira tools. | |
| JIRA_SITE | Jira site, e.g. https://your-team.atlassian.net. Only needed for the Jira tools. | |
| PRODUCT_DESIGN_DB | Absolute path of the SQLite database file. Set it to a folder you keep when running with npx. |
Automated checks
Ran Nov 12, 2026Full report →Passed our automated checks. That is not a security audit: read the code and give the server the narrowest access it needs. How checks work

- Source repository linked and reachablePass
- Open source license (OSI)Pass
- Commit or release in the last yearPass
- Package name not close to a popular packagePass
- Remote endpoint uses HTTPSNot checked
- Destructive tools are labelledNot checked
- No hidden instructions to the modelPass
- No critical advisory in the package or its dependenciesPass
README
View on GitHubYeti


An MCP server for product design with Claude. It takes a project from the problem to a verified scope: requirements, user stories, RICE priorities and flow diagrams. Then it sends the work to Jira.
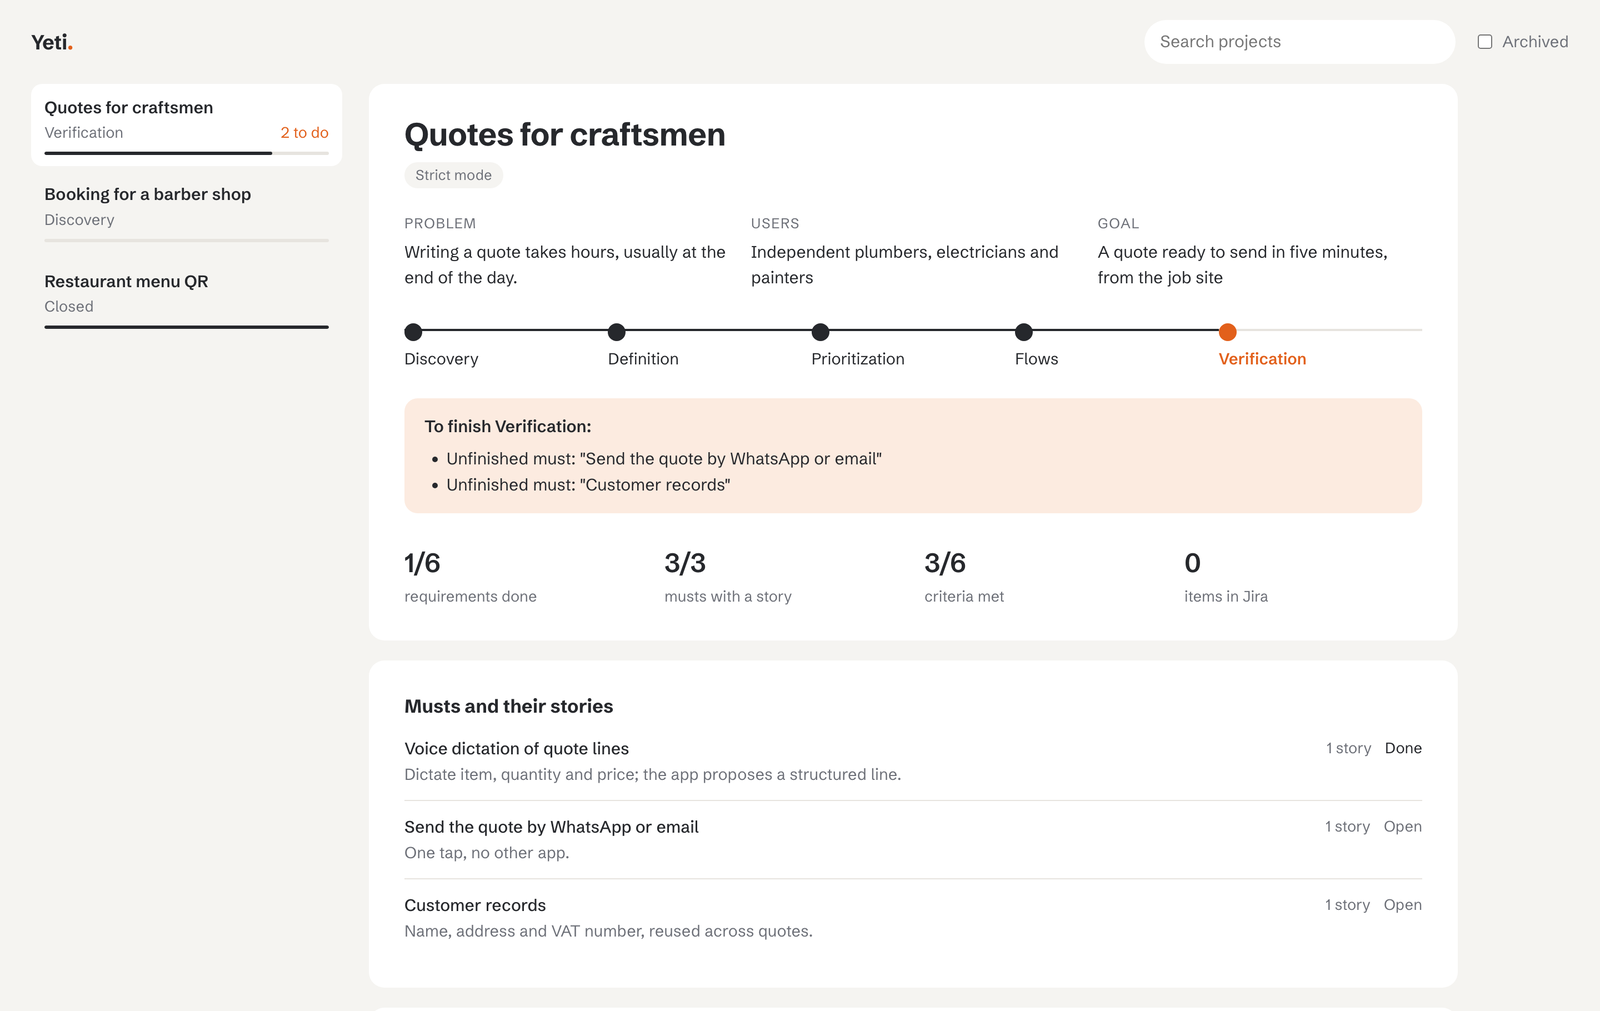
Quick start
Add Yeti to Claude Desktop, in claude_desktop_config.json, then restart Claude Desktop:
{
  "mcpServers": {
    "yeti": {
      "command": "npx",
      "args": ["-y", "yeti-mcp"],
      "env": { "PRODUCT_DESIGN_DB": "/Users/you/yeti/yeti.sqlite" }
    }
  }
}
Set PRODUCT_DESIGN_DB to a file in a folder you keep. With npx the package lives in a cache that can be cleared, and a database stored there would go with it. Yeti needs Node.js 22.13 or later.
Then ask Claude:
Create a project "Quotes for craftsmen" with Yeti. Problem: writing quotes takes hours. Users: plumbers and painters. Goal: a quote in five minutes.
Open the Yeti dashboard.
How it works
A project goes through five phases, in order:
- discovery: problem, users and goal
- definition: requirements (MoSCoW) and user stories
- prioritization: RICE scoring of ideas
- flows: Mermaid flow diagrams
- verification: every
mustrequirement completed and covered by a user story, then the project closes
Projects have a mode, chosen at creation:
strict(default): a phase advances only when its requirements are met.advance_phasetells you what is missing.free: phases advance regardless, and the response lists what was skipped.
Tools
Projects
| Tool | What it does |
|---|---|
create_project |
Start a project in the discovery phase, in strict or free mode |
list_projects |
List projects with id, name, phase and mode; archived ones are hidden unless includeArchived is set |
get_project |
Show phase, what is missing, and linked items |
project_summary |
Progress overview: requirements by priority and status, musts covered by stories, criteria done, RICE leader, Jira links, and what is missing to close |
update_project |
Change a project's name, problem, users or goal |
advance_phase |
Move to the next phase, or list what is missing |
set_project_mode |
Switch a project between strict and free |
duplicate_project |
Copy a project's requirements and stories into a new project, as open items (a template) |
create_project_from_template |
Create a project from a starter template: a marketplace MVP or a customer portal, with linked requirements and stories |
list_templates |
List the starter project templates |
archive_project |
Hide a project from list_projects without deleting it |
delete_project |
Permanently delete a project and its items. Requires confirm: true; Jira issues are not touched |
Requirements and user stories
| Tool | What it does |
|---|---|
add_requirement |
Add a requirement with a MoSCoW priority |
list_requirements |
List requirements, filtered by priority, status or project |
update_requirement |
Change a requirement's title, description or priority |
set_requirement_status |
Mark a requirement open or done |
delete_requirement |
Delete a requirement and unlink it from stories |
add_user_story |
Create a user story with acceptance criteria, optionally linked to requirements (requirementIds) |
add_decision |
Record a design decision with its reason and the options rejected |
list_decisions |
List a project's design decisions, oldest first |
list_stories |
List user stories with their ids, links, criteria state and Jira key |
update_user_story |
Change a story's persona, goal, benefit, linked requirements or criteria. Changing criteria resets their done state |
set_criterion_status |
Mark one acceptance criterion of a user story as done or not done |
delete_user_story |
Delete a user story |
search_items |
Search requirements and stories by text, optionally within one project |
Prioritization and flows
| Tool | What it does |
|---|---|
prioritize_rice |
Compute and sort RICE scores |
map_user_flow |
Generate a Mermaid flow diagram, with Yes/No branches, next and ends |
list_flows |
List the flow diagrams saved in a project, with their index |
delete_flow |
Delete one saved flow diagram, by the index shown by list_flows |
Import, export and dashboard
| Tool | What it does |
|---|---|
export_backlog |
Export a project backlog as Markdown or CSV; with save, also writes it to data/exports/ |
import_requirements |
Import requirements and user stories from CSV in the export_backlog format. Story-to-requirement links are not restored |
open_dashboard |
Start the live, read-only dashboard and return its local address |
export_dashboard |
Write a static HTML snapshot of the dashboard to data/exports/dashboard.html |
Jira
| Tool | What it does |
|---|---|
set_project_tracker |
Bind a project to its work tracker: a Jira project key (e.g. PROJ) or GitHub owner/repo. Set it once; a project cannot change tracker once its items are linked |
push_to_tracker |
Create the project's work items in its tracker: requirements become Tasks (Jira) or labelled issues (GitHub), stories become Stories or issues. Dry run by default; limit sends a subset; items already sent are skipped |
sync_tracker |
Mark items done or open from the status of their issues in the project's tracker. Read-only on the tracker |
Requirements, stories, RICE scores and flows accept an optional projectId to link them to a project.
Install from source
You need Node.js 22.13 or later (Yeti uses the built-in node:sqlite module).
git clone https://github.com/macorifice/yeti.git
cd yeti
npm install
npm run build
Then add it to claude_desktop_config.json, using the absolute path to dist/index.js on your machine:
{
  "mcpServers": {
    "yeti": {
      "command": "node",
      "args": ["/absolute/path/to/yeti/dist/index.js"]
    }
  }
}
Restart Claude Desktop after editing the file.
Usage
Once connected, you work with Yeti by talking to Claude. A typical project looks like this.
1. Create a project
Create a project "Quotes for craftsmen". Problem: writing quotes takes hours. Users: plumbers and painters. Goal: a quote in five minutes.
Yeti creates the project in the discovery phase.
2. Move through the phases
- definition: add at least one requirement and one user story linked to it.
- prioritization: score the ideas with RICE.
- flows: draw at least one flow diagram.
- verification: every
mustrequirement is done and covered by a user story.
In strict mode (the default), Yeti will not advance until the phase is complete, and it tells you what is missing. In free mode, it advances and lists what it skipped. You can switch with set_project_mode.
3. Work on the backlog
- Edit or delete requirements and stories.
- Mark acceptance criteria as done.
- Search across a project.
- Duplicate a project to reuse it as a template.
- Import requirements from a CSV file.
4. Export
Export the project backlog as Markdown and save it to a file.
With save: true, the file is written to data/exports/ next to the database.
Good to know
- Data is stored locally, in
data/yeti.sqlite. The content still passes through the chat, so do not put sensitive data in it. - RICE scores are the numbers you enter. Yeti sorts them; it does not estimate them.
Case study
A small project from requirements to Jira, using the Mastro example: creating the project, requirements and user stories, RICE prioritisation, a flow diagram, the verification gate, sending to Jira, and keeping the status in sync.
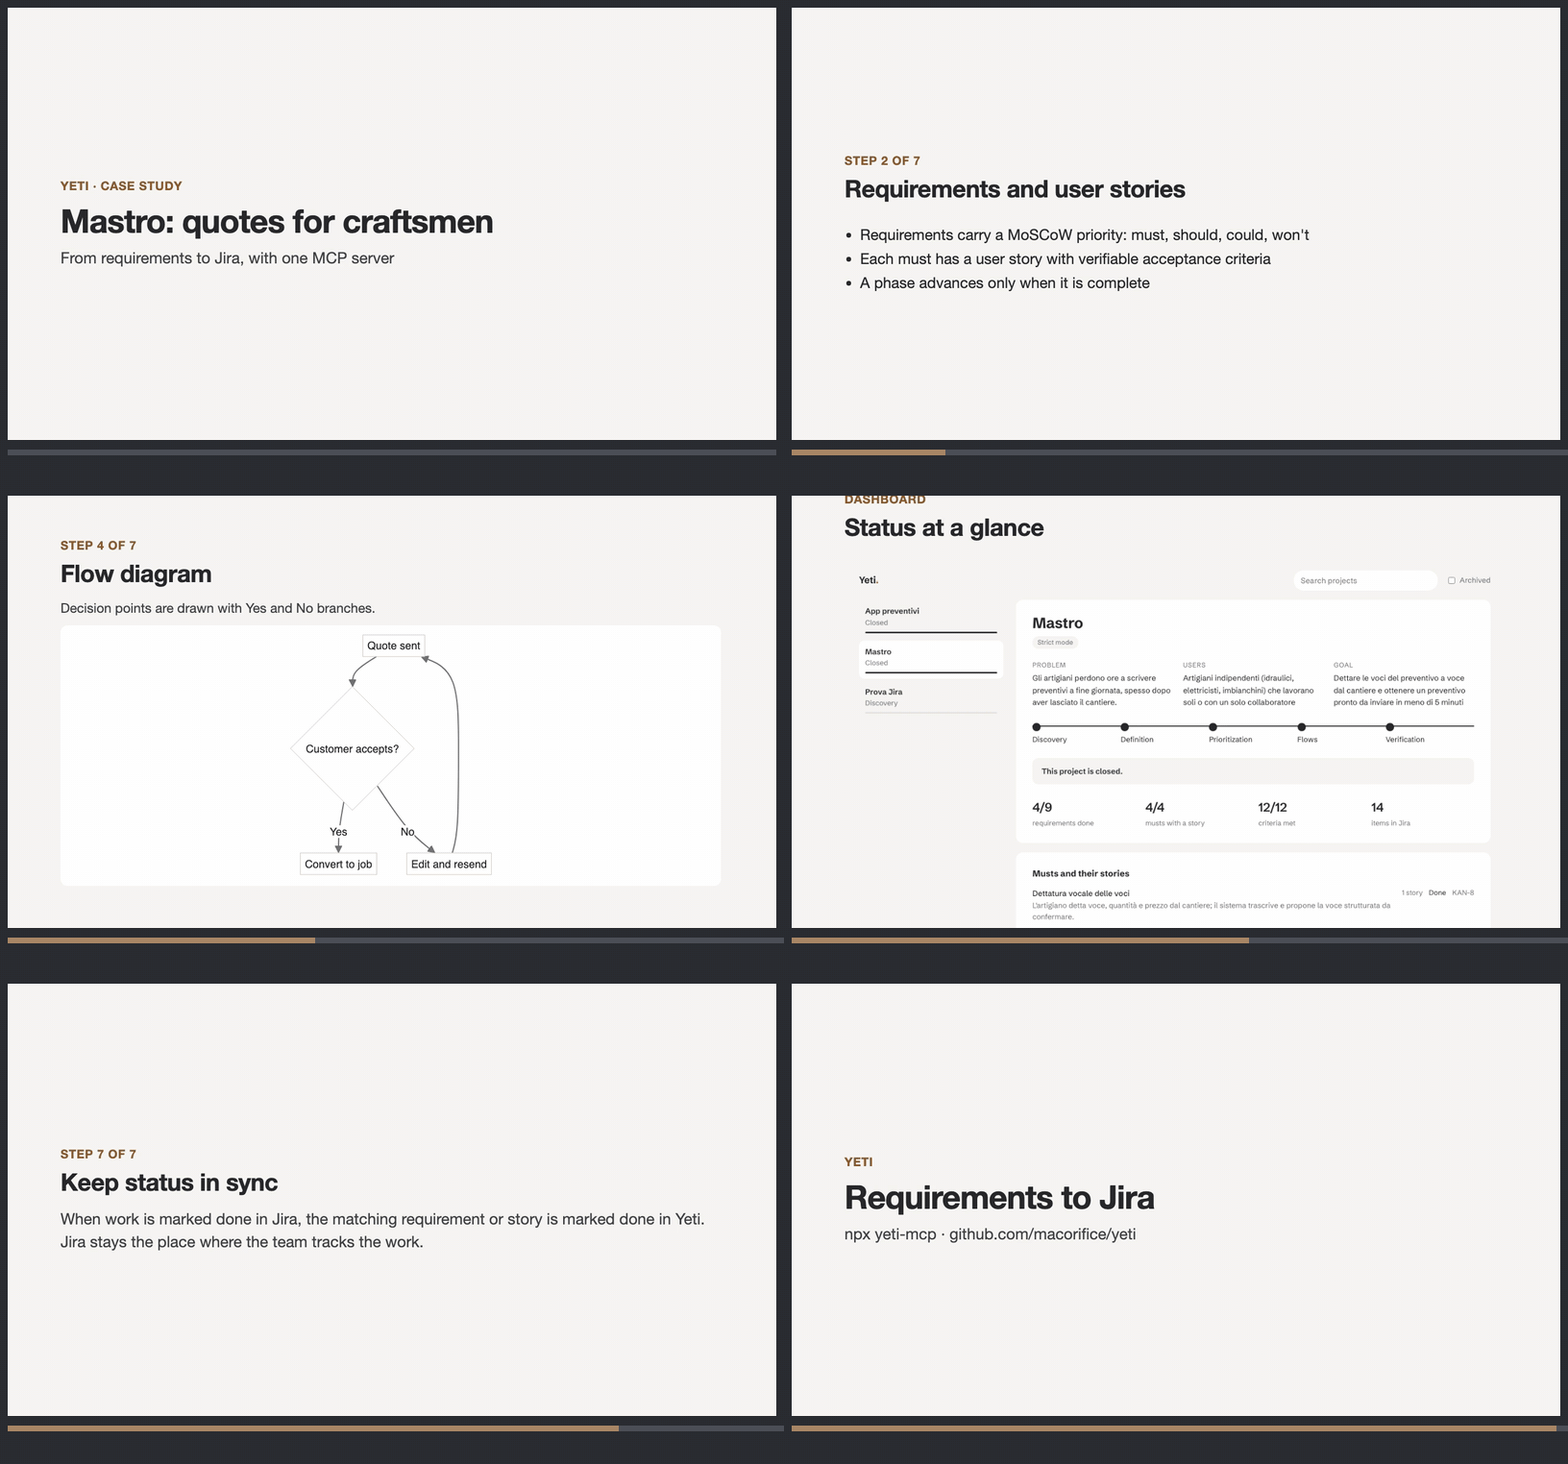
Dashboard
Yeti has a read-only dashboard for the design side of your projects: the phase each project is in, what is missing to move on, which musts are covered by user stories, acceptance criteria, RICE scores and flow diagrams. It does not show a task board: execution belongs in Jira.
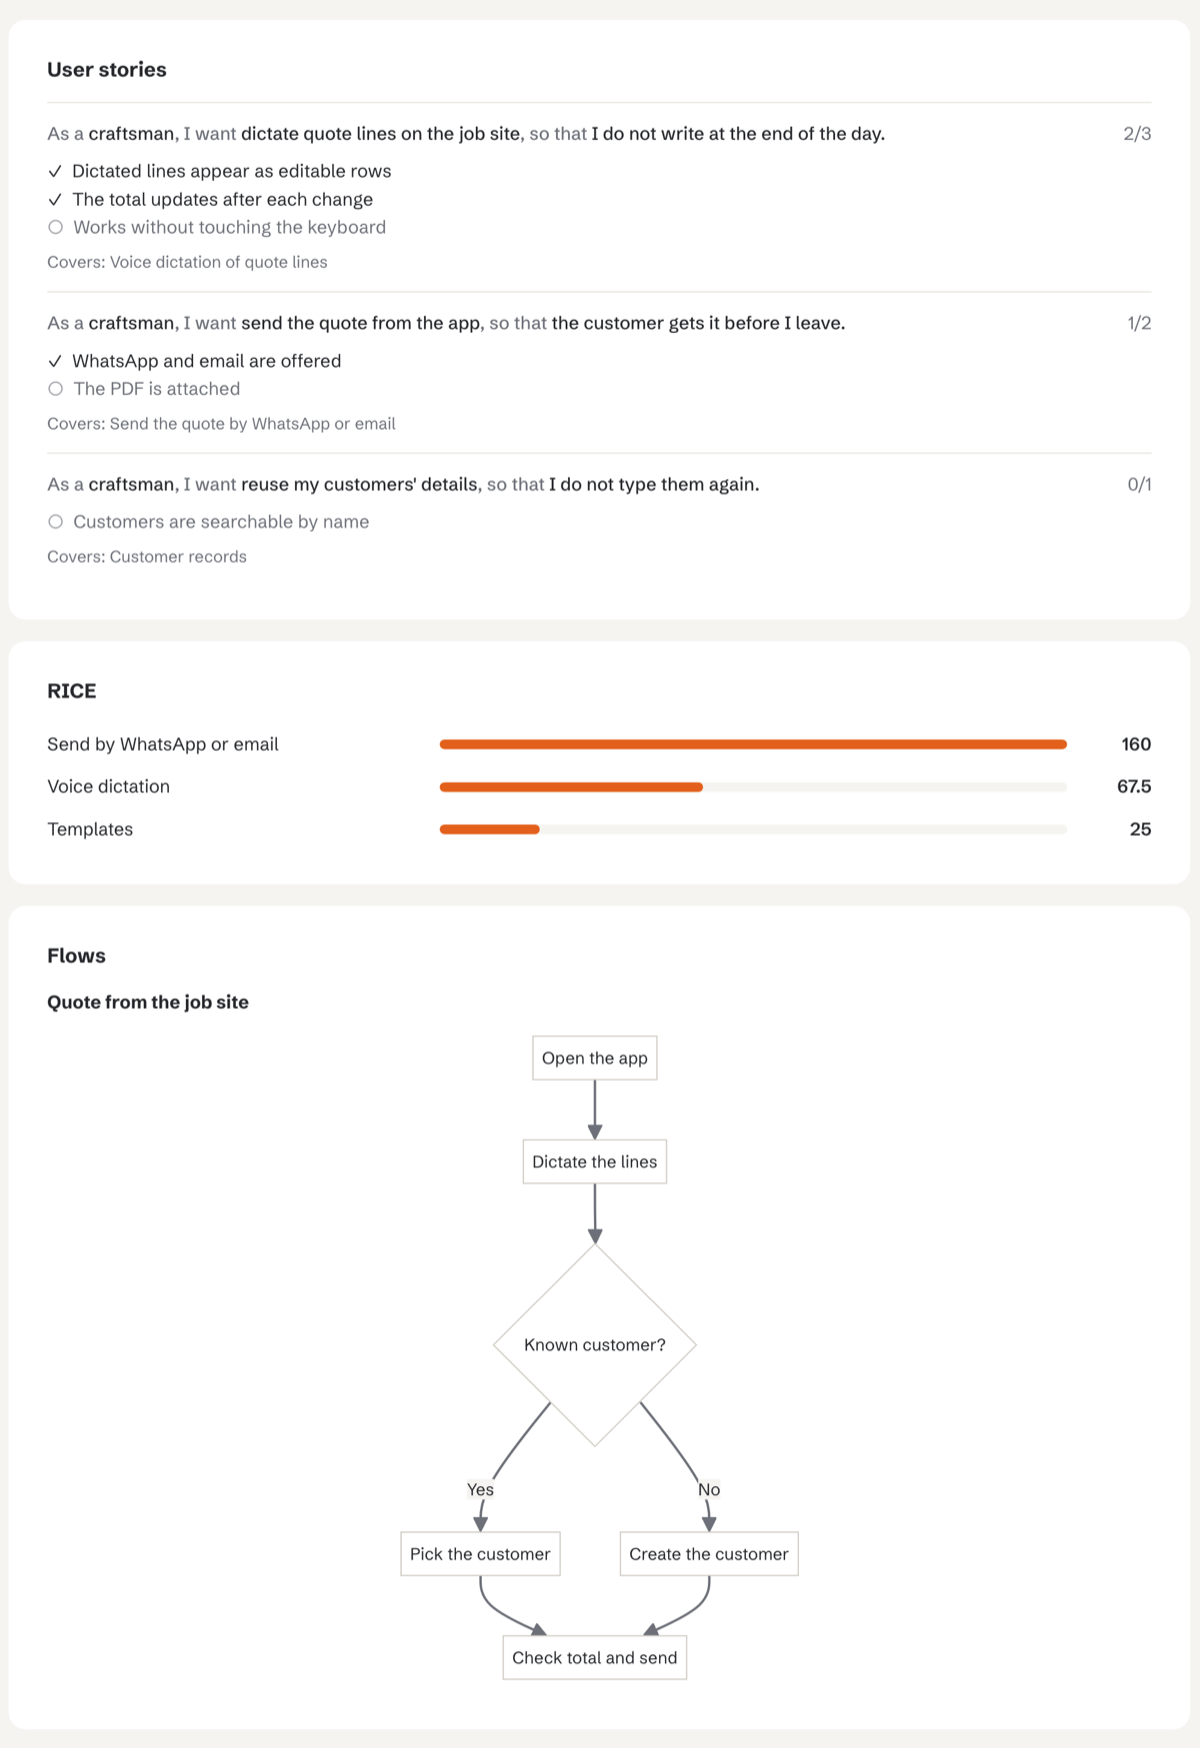
Open it from Claude:
Open the Yeti dashboard.
Claude calls open_dashboard and gives you an address such as http://127.0.0.1:4321. Or start it from a terminal:
npx yeti-mcp dashboard --port 4321
- It listens on
127.0.0.1only, so it is not reachable from other machines, and it refuses requests for other host names. - It reads the same database as the MCP server and refreshes every 10 seconds.
- Jira keys become links when
JIRA_SITEis set. - Diagrams are drawn with Mermaid, loaded from a CDN. Without a connection they are shown as text.
export_dashboard still writes a static snapshot to data/exports/dashboard.html, for sharing.
Credentials
Yeti works without any account. Only one tool talks to an external service:
- Everything else (projects, requirements, stories, RICE, flows, verification, export, search) runs locally and needs no credentials.
push_to_trackercreates items in Jira, when the project is bound to Jira. It needs three environment variables:
| Variable | Value |
|---|---|
JIRA_SITE |
Your Jira site, e.g. https://your-team.atlassian.net |
JIRA_EMAIL |
The email of your Atlassian account |
JIRA_API_TOKEN |
An API token created at id.atlassian.com → Security → API tokens |
Set them in your shell profile, for example in ~/.zshrc:
export JIRA_SITE="https://your-team.atlassian.net"
export JIRA_EMAIL="you@example.com"
export JIRA_API_TOKEN="your-token-here"
Never put the token in the repository, in a config file you commit, or in a chat. If a token is exposed, revoke it in the same page and create a new one.
For GitHub Issues, set GITHUB_REPO (owner/repo) and GITHUB_TOKEN instead. Without the variables for the bound tracker, sending is refused and the message names what is missing. Dry-run previews work without them.
Yeti supports two work trackers, Jira and GitHub Issues. A project is bound to one of them with set_project_tracker. Each sits behind a common interface, so more can be added: see CONTRIBUTING.md.
For GitHub Issues, set GITHUB_REPO to owner/repo and GITHUB_TOKEN to a token with issues write access. Requirements become issues labelled requirement and priority: must (or should, could, wont); user stories become issues labelled user-story. An item is done when its issue is closed. The GitHub integration has been checked end-to-end against a real repository: an item was sent, its issue was closed by hand, and the sync marked the item done.
Data
Data is stored in SQLite. From a source checkout the default is data/yeti.sqlite inside the project folder; with npx, set PRODUCT_DESIGN_DB as shown in the quick start. Earlier versions used data/db.json: it is imported automatically the first time the new version runs, and then left untouched. To use another location, set the PRODUCT_DESIGN_DB environment variable:
"env": { "PRODUCT_DESIGN_DB": "/absolute/path/to/yeti.sqlite" }
Test
npm test
The test starts the server on a temporary database and checks every tool and the phase flow.
Status
Stable since 1.0.0. The tools, their inputs and the data format are covered by semantic versioning: breaking changes will come with a new major version.
Sponsor
If Yeti is useful to you, you can support its development through GitHub Sponsors.
License
MIT. See LICENSE.
Yeti MCP questions
How do I add Yeti MCP to Claude Code?
Run claude mcp add --env 'JIRA_API_TOKEN=<YOUR_JIRA_API_TOKEN>' yeti -- npx -y yeti-mcp in your terminal. Add --scope user to make it available in every project.
How do I add Yeti MCP to Cursor?
Open ~/.cursor/mcp.json and add the server under mcpServers, using the Cursor config shown in the install section above.
What tools does Yeti MCP provide?
It exposes 36 tools, including create_project, list_projects, get_project, project_summary, update_project.
What is the difference between strict and free modes?
In strict mode, a phase only advances when all requirements are met; in free mode, phases advance regardless and list what was skipped.
Where is the project data stored?
Data is stored locally in a SQLite database.