
JuTell MCP server
Commit Nov 1, 2026Provides a verification layer for AI coding agents by generating project maps and detailed work receipts that distinguish between AI claims and Git reality.
Also known as ju0o/jutell
- Stars
- 1
- Tools
- —
- Downloads, 30 days
- —
- Latest version
- —
- Last commit
- Nov 1, 2026
- License
- MIT
What is JuTell MCP?
JuTell provides a verification layer for AI coding agents by generating project maps and detailed work receipts that distinguish between AI claims and Git reality.
Summary generated from the project's README
About JuTell MCP server
Developers using AI coding agents like Claude Code, Codex, or OpenCode can use JuTell to verify that agent actions match actual code changes. It acts as a verification layer that sits alongside your existing agent to bridge the gap between what an AI claims to have done and what Git actually recorded. By generating a project map and detailed work receipts, it helps you distinguish between verified file changes and mere AI assertions.
To use it, you can run it locally via npx without a permanent installation, which avoids permission errors. It creates a JuTellMap.md file and an HTML map at .jutell-local/map.html to group your files by feature. After an agent completes a task, running the jutell receipt command produces a one-page report that labels every line as an AI claim, a Git-verified change, or a JuTell observation. This ensures you know exactly which parts of a task were actually completed and which parts remain unchecked.
What you can do with it
- 1Navigate complex project structuresUse an automatically updated feature map to understand how files are grouped by functionality.
- 2Audit agent work historyReview detailed reports of previous agent sessions saved in local markdown files.
Written from the project's README. Every use case is checked against a quote from it.
How to install JuTell MCP
Formats verified 10 Nov 2026Add to CursorAdd to GooseInstall JuTell MCP in Claude Code
$ claude mcp add jutell -- npx -y jutellInstall JuTell MCP in Cursor
~/.cursor/mcp.json
{
  "mcpServers": {
    "jutell": {
      "command": "npx",
      "args": [
        "-y",
        "jutell"
      ]
    }
  }
}Install JuTell MCP in VS Code
.vscode/mcp.json
{
  "servers": {
    "jutell": {
      "type": "stdio",
      "command": "npx",
      "args": [
        "-y",
        "jutell"
      ]
    }
  }
}Install JuTell MCP in VS Code CLI
$ code --add-mcp '{"name":"jutell","type":"stdio","command":"npx","args":["-y","jutell"]}'Install JuTell MCP in Claude Desktop
claude_desktop_config.json
{
  "mcpServers": {
    "jutell": {
      "command": "npx",
      "args": [
        "-y",
        "jutell"
      ]
    }
  }
}Install JuTell MCP in Codex
$ codex mcp add jutell -- npx -y jutellInstall JuTell MCP in Codex config.toml
~/.codex/config.toml
[mcp_servers.jutell]
command = "npx"
args = ["-y", "jutell"]
Install JuTell MCP in Gemini CLI
$ gemini mcp add -s user jutell npx -- -y jutellInstall JuTell MCP in Gemini settings.json
~/.gemini/settings.json
{
  "mcpServers": {
    "jutell": {
      "command": "npx",
      "args": [
        "-y",
        "jutell"
      ]
    }
  }
}Automated checks
Ran Nov 14, 2026Full report →Not verified yet. A server needs a score of 80, no serious finding, and enough data for us to check. How checks work · What to fix for more points

- Source repository linked and reachableju0o/jutell is public and reachablegithub.com/ju0o/jutell ↗Pass
- Package names this repository as its sourcejutell names ju0o/jutell as sourcenpmjs.com/package/jutell ↗Pass
- Build provenance (Sigstore attestation)No build attestation published for this releaseNot checked
- Open source license (OSI)MITspdx.org/licenses/MIT.html ↗Pass
- Commit or release in the last yearLast commit or release 2026-11-01github.com/ju0o/jutell ↗Pass
- OpenSSF ScorecardNot checked
- Package name not close to a popular packageNo popular package one edit away from jutellPass
- No critical advisory in the package or its dependenciesNot checked
- No hidden instructions to the model0 tool descriptions and the README read; no override phrases, credential paths or hidden charactersPass
- Destructive tools are labelledNot checked
- Remote endpoint answers the MCP handshakeNot checked
README
View on GitHubJuTell — by Ju0
English | 한국어


Your AI agent says "Done!" — but did it really?
JuTell does two things for you, with no code or logs to read:
- A project map, made and kept up to date automatically. JuTell writes
JuTellMap.mdat your project root — your files grouped by feature (login, payment, api…) — plus an easy-to-read page at.jutell-local/map.html. It is created when you set JuTell up, refreshed every time your agent finishes with a receipt (new and deleted files are added/removed; your own notes are kept), and you can refresh it any time withjutell map. - A one-page receipt after your agent works: what you asked for, what the AI says it did, and what Git actually saw change — each line labeled so you know who is speaking.



Before / after
| Without JuTell — the agent's own words | With JuTell — the receipt (real output, trimmed) |
|---|---|
| (a typical agent reply, for illustration)"Done! I updated the login button to blue and all tests pass. 🎉" | [요청 대조] request check — 1 of 1 requests has a change [Git 기준] (checked by Git)→ 바뀐 곳 있음 changed: src/pages/Login.tsx✔ checked: npm test passed [AI가 적음] (AI's claim)✖ not checked: screen not viewed in a browserⓘ test results come from the AI; JuTell did not run them [JuTell이 적음] |
| "Where is the payment code? What did it touch?" — you dig through folders. | Project map — JuTellMap.md / map.html: 결제 (payment) → src/pages/Checkout.tsx, src/payment/charge.ts, src/payment/refund.ts, tests/payment.test.ts; the receipt links each change to a map feature ([지도: 로그인] = map: login). |
| You have to trust it — or read the diff yourself. | You see what's verified, what's only claimed, and what's still unchecked. |
Start in 3 steps
Recommended: run it without installing — no global install, so npm's global-folder permission
errors (EACCES) can't happen. You need Node.js 18+:
-
Run it in your project folder:
cd your-project
npx jutell@latest
It finds your agent (Codex, Claude Code, OpenCode) and connects it.
-
Open your project map —
.jutell-local/map.htmlin a browser (orJuTellMap.md) — then ask your agent as usual in a new session. When it finishes, it prints a JuTell receipt and the map is refreshed.
Prefer a permanent install? It's one command more, and on Linux it can hit npm's EACCES
permission error (fix below):
npm install -g jutell
jutell
See it (real terminal recording, unedited)
Setup → a small change → jutell receipt. The output is in Korean; the labels are glossed below.

The project map in your browser (.jutell-local/map.html, real page generated by jutell map
in a small demo shop project; screenshots from headless Chrome, cards opened one by one). Labels:
화면 screen · 코드 code · 테스트 tests · [지도로 짐작] guessed from file names ·
아직 분류 안 된 파일 not yet sorted.

The same map in the terminal — JuTellMap.md and jutell map --list:

Label glossary: [AI가 적음] = written by the AI · [Git 기준] = checked against Git ·
[지도 …] = matched with the project map · [JuTell이 적음] = JuTell's own note ·
영수증 = receipt · 확인 못 한 것 = not checked yet.
Linux EACCES permission error on npm install -g? The recommended npx jutell@latest path above
never touches the global folder, so it cannot hit this. If you prefer a permanent global install,
don't use sudo; point npm at a folder in your home (npm config set prefix ~/.npm-global and add ~/.npm-global/bin to PATH) or install Node with nvm.
Two key features
JuTell's terminal output is written in Korean for now. The examples below are real, unedited output
from running jutell --yes and then jutell receipt in a small temporary Git project.
1. A plain-language work receipt
When your agent finishes, it runs jutell receipt. JuTell prints a one-page receipt and saves it in
.jutell-local/reports/. Every line says who it comes from:
| Label | Meaning |
|---|---|
[AI가 적음] |
Written by the AI agent (its own claim) |
[Git 기준] |
Checked by JuTell against the real file changes in Git |
[지도 대조] / [지도: …] |
Matched against the project map (feature 2) |
[JuTell이 적음] |
A note written by JuTell itself, such as the ⓘ line |
If the AI's words and Git disagree, trust Git. The ⓘ line below is JuTell pointing out that the
test result is only what the AI reported; JuTell did not run the tests itself.
==============================
  JuTell 작업 영수증
  2026-10-24 14:17
==============================
[요청 대조]  요청 1개 중 1개 바뀐 곳 있음  [Git 기준 · 지도 대조]
 1. 로그인 버튼을 파란색으로  [AI가 적음]
    → 바뀐 곳 있음: src/pages/Login.tsx  [Git 기준 · 지도: 로그인]

[이번에 한 작업]  [AI가 적음]
 1. 로그인 버튼을 파란색으로 바꿨어요

[바뀐 파일]  [Git 기준]
 1. src/pages/Login.tsx

[확인]  [AI가 적음 · JuTell이 적은 줄은 따로 표시]
 ✔ 직접 확인한 것: Login.tsx에 파란색 클래스가 들어간 것을 확인  [AI가 적음]
 ✔ 직접 확인한 것: `npm test` 실행해서 3개 통과  [AI가 적음]
 ✖ 확인 못 한 것: 브라우저 화면은 열어 보지 않음  [AI가 적음]
 ⓘ 위 테스트·명령 결과는 AI가 알려 준 내용이에요. JuTell이 직접 돌려 보지는 않았어요  [JuTell이 적음]
------------------------------
[다음 추천]  [AI가 적음]
 ○ 추천  [AI가 적음]
   - 브라우저에서 색이 맞는지 직접 봐 주세요  [AI가 적음]
------------------------------
 저장됨: .jutell-local/reports/2026-10-24-141734.md  [JuTell이 적음]
==============================
한 줄 요약: 로그인 버튼을 파란색으로 바꿨어요  [AI가 적음] · 요청 1개 중 1개 처리  [Git 기준]
2. JuTellMap — a feature map of your project
On first run, JuTell writes JuTellMap.md, which groups your files by feature (for example,
"로그인" = login, "할 일" = to-do). The agent uses it to connect a request like "fix the login" to the
right files, and the receipt uses it to check whether the requested feature was actually touched.
[지도로 짐작] means "guessed from file names". You can freely edit the descriptions, or move lines
into a different section. This is the real map from the same run; only the hidden auto-section
marker lines are omitted. jutell map --list shows it in the terminal, and
.jutell-local/map.html is an easy-to-read view.
# JuTell 지도 — 이 프로젝트는 어떻게 생겼나요?
표와 목록은 JuTell이 자동으로 다시 채워요. 설명 글은 마음대로 고쳐도 되지만, 숨은 칸 표시(HTML 주석)는 지우지 마세요.
마지막 갱신: 2026-10-24 14:17 (UTC+0) · 파일 7개 · 분류 안 된 파일 4개 · 목록 기준 Git 파일 목록

## 할 일 [지도로 짐작]
- src/api/todos.ts — 기능
- src/components/TodoList.tsx — 화면

## 로그인 [지도로 짐작]
- src/pages/Login.tsx — 화면

## 아직 분류 안 된 파일
설명: 아래 줄을 원하는 기능 칸으로 옮기면, 다음부터 그 칸에 둡니다.
- .jutell.json — 설정
- AGENTS.md — 문서
- README.md — 문서
- package.json — 설정
Quick start
First, go to your project folder:
cd /path/to/your-project
Recommended (no install, no permission errors):
npx jutell@latest
Or install permanently first:
npm install -g jutell
jutell
JuTell creates or updates AGENTS.md, .agents/, .jutell.json, and .jutell-local/ in that
folder. When you connect Codex, it also adds connection settings to ~/.codex/config.toml. The ChatGPT desktop app (Codex app) and the Codex IDE extension share that same file, so connecting Codex once covers all three; after it, restart the app (Settings → MCP servers → Restart) or the IDE extension (Restart extension).
Run jutell receipt to print a one-page work receipt and save it at
<project>/.jutell-local/reports/YYYY-MM-DD-HHmmss.md (-2, -3, etc. handle name collisions).
JuTell creates .jutell-local/.gitignore containing *; this keeps receipts out of Git without changing your .gitignore.
Input comes from .jutell-local/receipt.json (deleted after reading), --file <path>, or --file - (stdin).
Set "features": { "receiptReport": false } in .jutell.json to turn off receipt reports.
For non-interactive or automated runs, use jutell --yes to skip the (Y/n) prompt.
Don't want to install anything? That's the recommended way to start (see Start in 3 steps above): JuTell's normal job is a one-time connection - it hands you back to your own agent and gets out of the way - so you can just run it without installing:
npx jutell@latest
No install files are left, but the connection settings and project files remain; it also sidesteps npm's global-folder permission errors entirely. Node.js is still required either way.
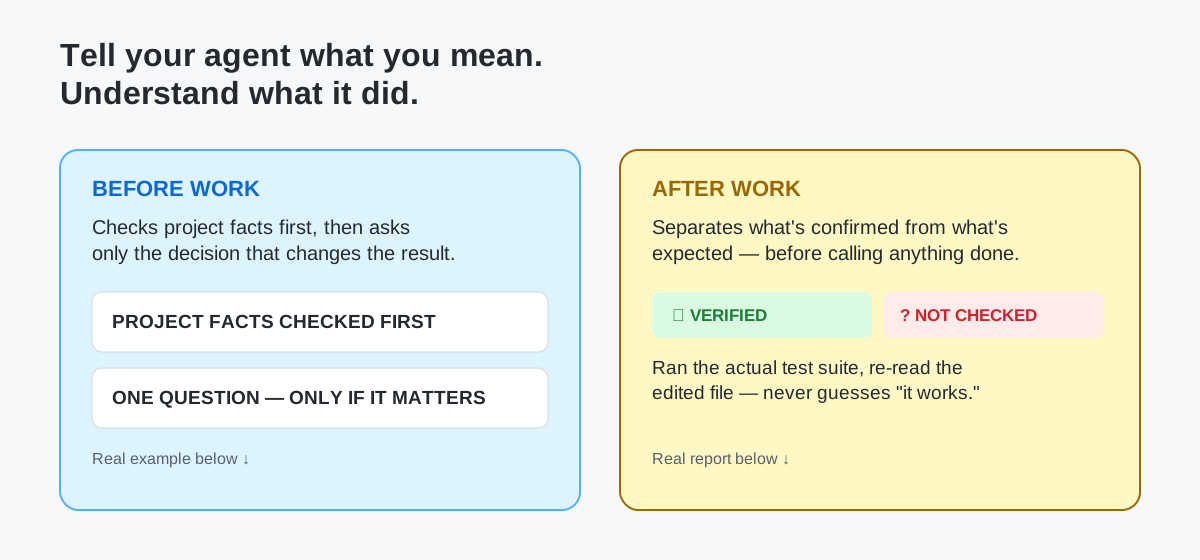
JuTell sits beside a coding agent you already use — Codex, Claude Code, or OpenCode — checking project facts before work and separating verified from assumed after it. It does not provide Codex, Claude Code, or OpenCode, and it is not an AI model itself (more on what JuTell is and isn't, further down).
The problem JuTell solves
AI coding agents made writing code faster. They didn't fix two older problems:
- Before work: it's hard to explain exactly what you mean, and an agent that guesses wrong can quietly do the wrong thing.
- After work: it's hard to tell what an agent actually did — a wall of diffs and "I tested it" don't tell you what's real and what's assumed.
JuTell sits in that gap. It doesn't replace your coding agent or write code itself — it makes the conversation around the code clearer, on both ends.
See it in action
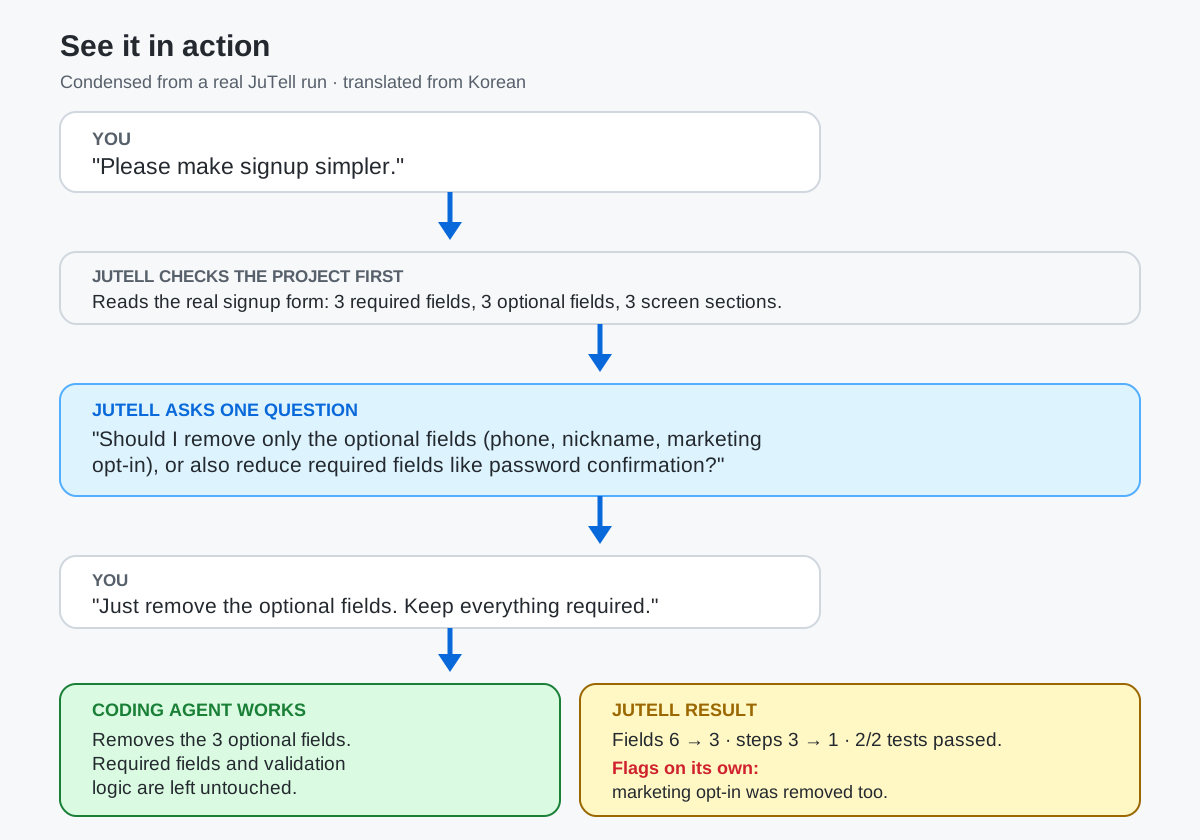
This is condensed from an actual run, not invented dialogue — the full raw output is in the 2.0.0 release showcase. Notice what JuTell asked: one question, grounded in the real form it had just read — not a generic "what do you mean?"
After your agent finishes
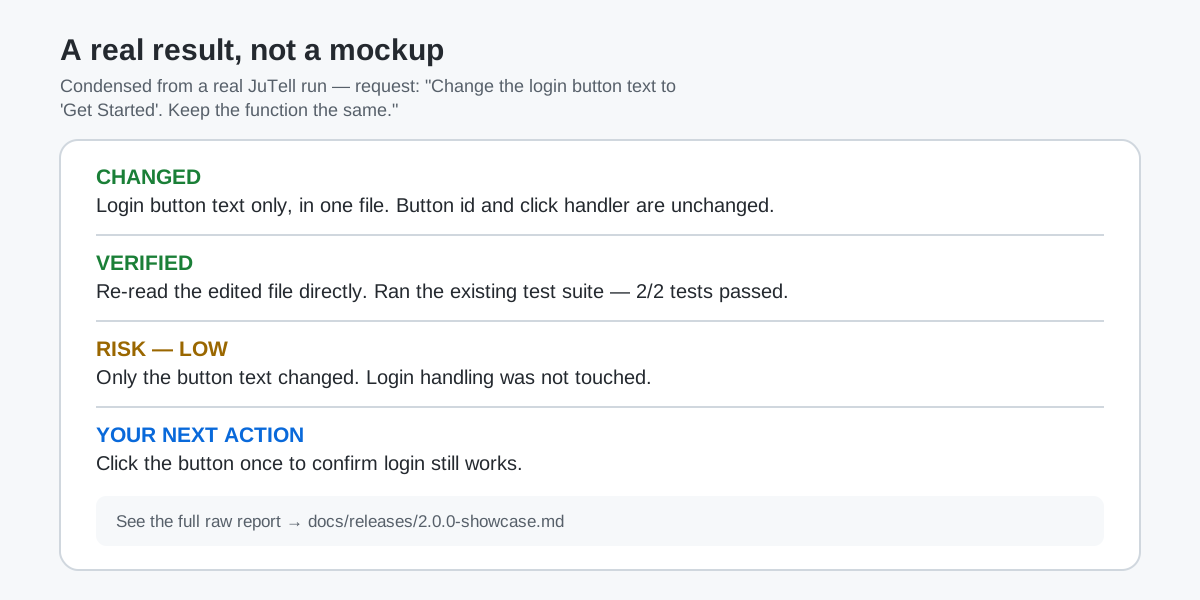
JuTell does not call something "verified" unless it actually checked it. A code-based expectation and an unchecked browser result stay clearly labeled, every time — see the full raw report in the release showcase.
When something goes wrong
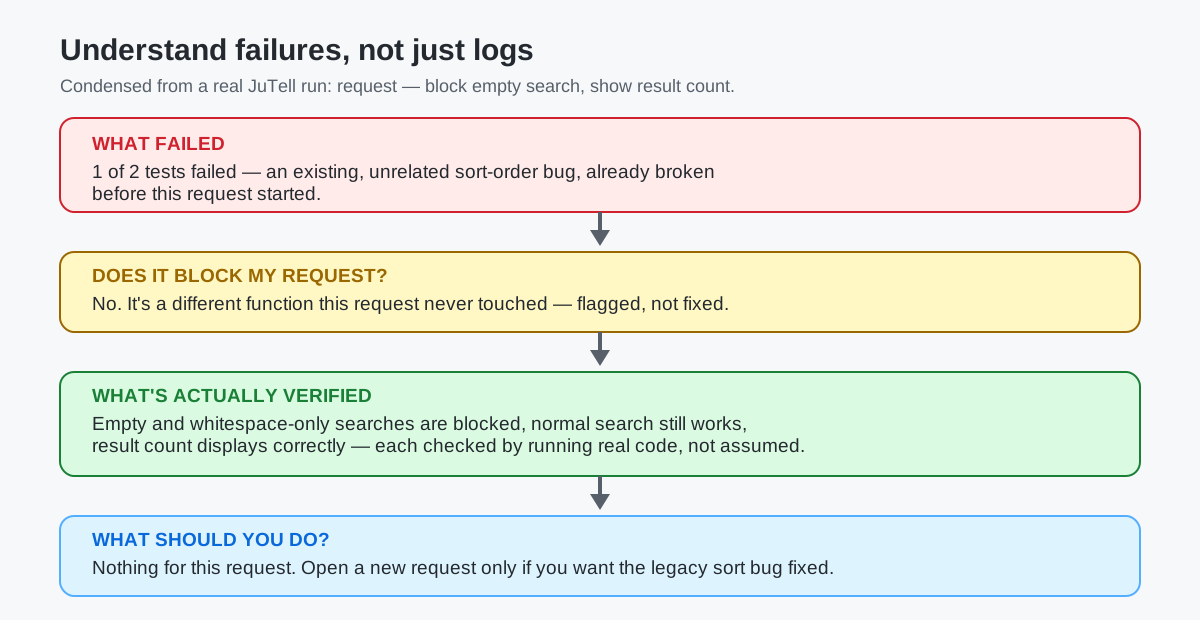
This is JuTell's real behavior on a run where a pre-existing, unrelated test was already broken — not a scripted demo. JuTell doesn't claim to be a full autonomous debugger; it explains what a failure means for your request instead of leaving you to read raw test output. Full raw output: release showcase.
When something can't be checked yet
Some things — like whether a screen actually looks right in a real browser — JuTell cannot confirm by reading code alone. A real run that changed an empty-search message's styling reported it honestly:
| Code checked | ✅ the style values actually changed |
| Test checked | ✅ the existing test still passed |
| Real browser view | ❌ not checked — no browser was available |
| Your action | Open the screen once and look. |
JuTell does not turn "looks right in code" into "confirmed on screen." If it didn't run a browser, it says so, and asks you to look.
What extra work does JuTell add?
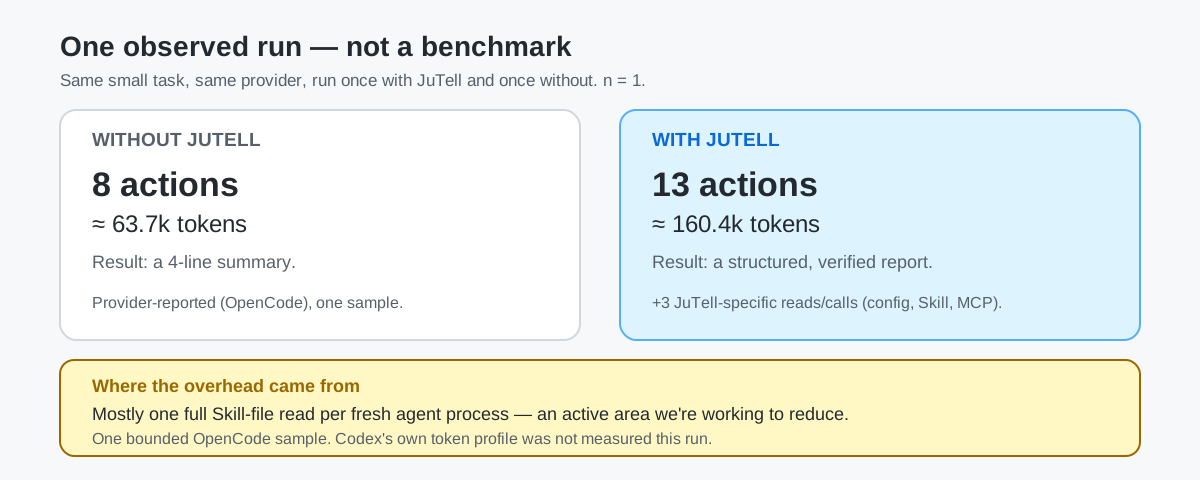
This is one bounded, single-sample comparison — not a claim that JuTell always costs a fixed multiple of tokens, and not a claim that it saves tokens either. The extra actions in that run were a config read, a Skill-file read, and one MCP call. Full numbers and caveats: release showcase. Reducing that overhead — starting with the full Skill-file read — is an active area of work, not something already solved.
Try it
npx jutell@latest
That's the recommended, no-install way — if you've read this far and want to try it, this is all it
takes. A permanent install (npm install -g jutell, then bare jutell) works the same once it's in.
Supported agents & platforms
| What you need | Current status |
|---|---|
| Codex | Supported |
| Claude Code | Beta |
| OpenCode | Beta |
| Windows | Tested |
| Ubuntu | Limited testing |
| macOS | Available / unverified |
You need a coding agent first. JuTell connects to an agent you already installed; it is not the agent or the AI model itself.
Before installing
You need:
- A coding agent: Codex, Claude Code, or OpenCode already installed. Codex is the fully supported connection; Claude Code and OpenCode are Beta.
- Node.js: JuTell is installed with
npm, which comes with Node.js. If you do not have it, install the current Node.js release from nodejs.org. - A terminal: PowerShell on Windows, or Terminal on Ubuntu/macOS. It is just the place where you paste the two commands below.
- Internet access: npm downloads JuTell during installation.
Install, step by step
Already ran the two commands above? Here's exactly what should happen at each step, plus what to do if something looks wrong — including the Ubuntu/Linux permission fix.
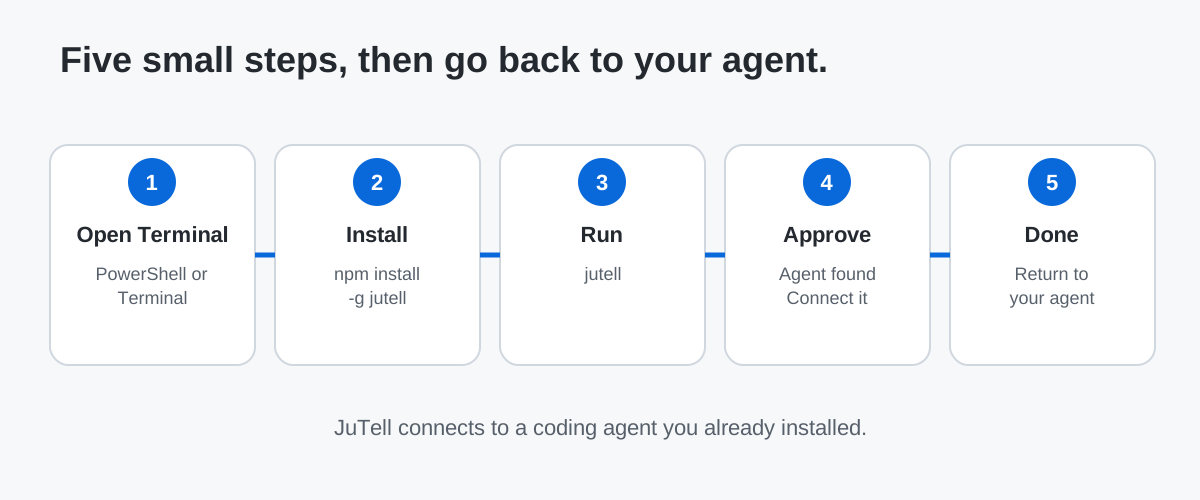
Step 1 — Open PowerShell or Terminal
On Windows, search for PowerShell and open it. On Ubuntu or macOS, open Terminal.
Step 2 — Install JuTell
Paste this, then press Enter:
npm install -g jutell
Permission error on Ubuntu/Linux? If this fails with
EACCES/permission denied, it's a common npm global-folder ownership issue on Linux, not something specific to JuTell. Avoidsudo npm install -g jutell— it can leave root-owned files that cause the same problem again later. See Ubuntu/Linux install permission error for two safe fixes.
Step 3 — Run JuTell
jutell
Or paste the normal install path together:
npm install -g jutell
jutell
Step 4 — Approve the detected agent connection
JuTell looks for Codex, Claude Code, and OpenCode that are already on your computer. Read the short preview and approve the connection you want. It only manages JuTell's own setup blocks and keeps other agent settings in place.
Step 5 — Return to your normal coding agent
Setup finishes in the terminal. There is no new dashboard you must keep open. Go back to Codex, Claude Code, or OpenCode and use it as usual.
Step 6 — What successful setup looks like
Setup asks two questions: JuTell을 지금 연결할까요? (Y/n) ("Connect JuTell now?") and
프로젝트 지도(JuTellMap.md)를 만들까요? 파일이 어디 있는지 기능별로 정리해요. (Y/n) ("Create the project map?").
Press Enter for yes.
If it ends with JuTell 준비됨, 하나 확인 필요. ("Ready, one thing to check") instead of JuTell 준비 완료., read
the ⚠ line just above it. Usually Codex cannot find the jutell command; jutell doctor shows the one fix.
영수증은 AI가 알아서 만들어요 — the agent makes the receipt by itself at the end of its answer; you never need to type jutell receipt.
Running jutell again once everything is connected only prints a short status; open the admin screen in your browser with jutell dashboard. If JuTell was turned off or needs a fix, an interactive run asks to turn it back on and then opens the admin screen in the browser.
You should see that an agent was found and connected, without an error. Then run jutell status if
you want a short connection summary. If it says there is a problem, run jutell doctor for the
next step to take.
First things to try
Start with a request you can recognize easily:
- "Change the login button to blue."
- "Please make signup simpler."
- "Make the empty search box show a helpful message."
For the first and third, JuTell should let your agent get on with a clear request. For "make signup simpler," it should check the project first and ask only if a real choice remains. It should not turn your request into a technical questionnaire.
How do I know it is working?
jutell status
Real output (the CLI speaks Korean) from a small practice project right after jutell --yes
with only Codex installed, trimmed to the key lines:
$ jutell status
JuTell 상태

CLI: 2.2.0
Skill: 설치됨
AGENTS.md: JuTell 블록 있음
JuTell 연결 정책: 켜짐
Codex MCP (전역, Codex는 프로젝트 설정을 읽지 않음): 활성화됨 (명령 감지됨)
OpenCode MCP: 미등록 (명령 미감지)
Claude Code MCP (현재 프로젝트(local)): 미등록 (명령 미감지)
MCP 서버 응답: 확인하지 않음
현재 Agent 세션 적용: 직접 확인 필요
Profile: balanced
설치 범위 (설정·Skill·AGENTS.md): 현재 프로젝트
Telemetry: 비활성화
외부 전송: 없음
지도: 지도가 최신이에요.
"MCP 서버 응답: 확인하지 않음" means "MCP server response: not checked", and "현재 Agent 세션 적용: 직접 확인 필요" means "applied to the current agent session: confirm it yourself".
It separates "configured" from "actually checked," so an untested tool call is not presented as a failure.
jutell doctor
Use this when setup looks wrong. It checks JuTell files, configuration, permissions, and whether anything would be sent outside your computer, line by line, each marked OK, error, or needs a closer look. Its normal output avoids showing full paths or secret values.
Something went wrong
| If this happens | Try this |
|---|---|
| No agent was found | Install and open a supported coding agent first, then run jutell again. |
| Connection failed | Run jutell doctor, then follow its message. |
| You want to reconnect one agent | Run jutell again, or use the manual connection commands in Advanced. |
| You want to turn JuTell off | Run jutell off --yes. It turns off the MCP connection; your settings and the records in .jutell-local (receipts, map, Beta Journal) stay. |
| You want to remove JuTell | Run jutell uninstall --yes. It keeps local data unless you explicitly add --remove-data. |
EACCES / permission denied installing on Ubuntu/Linux |
See Ubuntu/Linux install permission error. Avoid sudo npm install -g jutell. |
What JuTell is — and is not
JuTell is:
- a communication layer beside your coding agent
- something that helps clarify material intent before work starts
- something that explains actual work and evidence after it finishes
JuTell is not:
- an AI model
- a replacement coding agent
- a correctness guarantee
- a full autonomous debugger
- a multi-agent orchestrator
It keeps what changed, what was verified, what is expected, and what was not checked separate, and it does not guarantee agent correctness, find every dependency, verify browser behavior automatically, or make the approval decision for you.
Trust and privacy
JuTell explains work using files, Git, and command output already on your computer. It does not collect or send your project code, prompts, raw agent answers, diffs, or secrets. Telemetry is off by default, and storage or transmission for it is not implemented at this stage.
Read the details in Privacy principles. For the full scope and limitations, see Product scope.
What's new
jutell@2.2.0 is out on npm (released 2026-10-25). It helps before work starts as well as after it finishes: project facts
are checked first, only a real decision is asked, and verified / expected / not-checked remain
separate.
See the 2.0.0 release showcase for a real report, a real failure, an honest efficiency snapshot, and this release's known limits — not marketing copy, the actual output.
Install, control & advanced
JuTell MCP questions
How do I add JuTell MCP to Claude Code?
Run claude mcp add jutell -- npx -y jutell in your terminal. Add --scope user to make it available in every project.
How do I add JuTell MCP to Cursor?
Open ~/.cursor/mcp.json and add the server under mcpServers, using the Cursor config shown in the install section above.
What does JuTell do?
JuTell creates an automatically updated project map and provides a one-page receipt after an AI agent works, labeling what was verified by Git versus what was only claimed by the AI.
Does JuTell write code?
No, JuTell is not an AI model and does not write code; it sits beside your existing coding agent to clarify project facts and verify outcomes.
How do I run JuTell without installing it globally?
You can run it using npx to avoid permission errors: npx jutell@latest.