
OpenStudy MCP server
Commit 24. Okt. 2026Ermöglicht es einem AI-Client, Kurse, Zeitpläne, Lernthemen, Abgaben, Aufgaben und Vorlesungsdateien in einem selbst gehosteten Study-Dashboard zu verwalten.
Auch bekannt als OpenStudy-dev/OpenStudy
- Stars
- 80
- Tools
- —
- Downloads, 30 Tage
- —
- Neueste Version
- —
- Letzter Commit
- 24. Okt. 2026
- Lizenz
- MIT
Was ist OpenStudy MCP?
OpenStudy ist ein MCP server. Ermöglicht es einem AI-Client, Kurse, Zeitpläne, Lernthemen, Abgaben, Aufgaben und Vorlesungsdateien in einem selbst gehosteten Study-Dashboard zu verwalten.
Zusammenfassung generiert aus dem README des Projekts
Über OpenStudy MCP server
Das Ziel von OpenStudy ist es, die Verwaltung von Kursen, Zeitplänen, Vorlesungen, Lernthemen, Abgaben und Aufgaben eines Semesters direkt über einen AI-Client zu ermöglichen. Das selbst gehostete Dashboard wird mit einem MCP server und 44 Tools ausgeliefert. Alles, was du in der Web-UI tun kannst, kann Claude ebenfalls, einschließlich create_course, create_schedule_slot, update_exam, create_deliverable, list_study_topics und mark_studied. Es richtet sich an Studierende, die Kursmaterialien bereits auf der Festplatte oder in einem LMS speichern und einen zentralen Ort suchen, um ihren Fortschritt zu tracken.
Der MCP Endpoint verbindet sich mit Claude.ai als Custom Connector mit vollem OAuth 2.1. Von dort aus funktionieren die Tools in Claude Code auf dem Laptop, in claude.ai im Browser und in der Claude iOS App. Claude Code kann den Endpoint über localhost erreichen, während der Zugriff über Browser und Smartphone einen öffentlichen Hostnamen erfordert, der auf deine Instanz zeigt. Der Stack läuft in Docker Compose mit Postgres, FastAPI und einem statischen Frontend auf einer Maschine; das Setup dauert etwa 15 Minuten, und das README schlägt vor, dass ein 5 €/Monat VPS ausreicht. Du musst eine Operator-E-Mail, einen Passwort-Hash sowie generierte Session- und Encryption-Secrets angeben.
Was OpenStudy unterscheidet, ist der Datei-Speicher: list_course_files findet eine PDF innerhalb von OpenStudy und read_course_file rendert jede Seite als PNG für den Vision-Input, sodass die Datei deine Instanz nie verlässt. Jede Tabelle besitzt eine user_id, und SIGNUPS_ENABLED=true ermöglicht die Registrierung.
Was du damit machen kannst
- 1Ein Semester aus Kursnotizen erstellenSage Claude Code, er soll jede course.md lesen und den Kurs, die wiederkehrenden Zeitplan-Slots, Prüfungsinformationen und Abgaben im Dashboard erstellen.
- 2Eine Folie während der Vorlesung erklären lassenLass Claude während der Vorlesung das aktuelle Slide-Deck abrufen und eine spezifische Folie im Detail erklären.
- 3Eine gerade besuchte Vorlesung protokollierenBeschreibe auf dem Heimweg, was behandelt wurde, und lass Claude die Vorlesung erstellen, verknüpfte Lernthemen hinzufügen und sie als besucht markieren.
- 4Ein Thema anhand von Slides lernenBitte Claude, ein Lernthema unter Verwendung der Definitionen und Beispiele des Professors aus den Kurs-Slides zu erklären und es anschließend als gelernt zu markieren.
- 5Aufgaben für die Woche planenLass Claude auflisten, was diese Woche fällig ist, und füge eine hochpriorisierte Aufgabe mit einer Deadline hinzu.
Geschrieben aus dem README des Projekts. Jeder Use Case wurde gegen ein Zitat daraus geprüft.
Konfiguration
POSTGRES_DBPOSTGRES_PASSWORDPOSTGRES_USER
| Name | Beschreibung | Typ |
|---|---|---|
| POSTGRES_DB | — | |
| POSTGRES_PASSWORD | — | |
| POSTGRES_USER | — |
Automatisierte Checks
Geluften am 13. Nov. 2026Vollständiger Bericht →Noch nicht verifiziert. Ein Server benötigt einen Score von 80, keine kritischen Befunde und genug Daten für unsere Prüfung. Wie die Checks funktionieren · Was du für mehr Punkte verbessern kannst

- Source Repository verknüpft und erreichbaropenstudy-dev/openstudy is public and reachablegithub.com/openstudy-dev/openstudy ↗Bestanden
- Paket nennt dieses Repository als QuelleNicht geprüft
- Build-Provenienz (Sigstore-Attestierung)Nicht geprüft
- Open Source Lizenz (OSI)MITspdx.org/licenses/MIT.html ↗Bestanden
- Commit oder Release im letzten JahrLast commit or release 2026-10-24github.com/openstudy-dev/openstudy ↗Bestanden
- OpenSSF ScorecardNicht geprüft
- Package-Name ähnelt keinem populären PackageNicht geprüft
- Keine kritischen Advisories im Paket oder seinen AbhängigkeitenNicht geprüft
- Keine versteckten Anweisungen an das Modell0 tool descriptions and the README read; no override phrases, credential paths or hidden charactersBestanden
- Destruktive Tools sind markiertNicht geprüft
- Remote-Endpoint beantwortet den MCP-HandshakeNicht geprüft
README
Auf GitHub ansehenA self-hostable personal study dashboard. Track your courses, schedule, lectures, study topics, deliverables, and tasks in one place — and let your Claude subscription use OpenStudy from your browser, phone, desktop, or Claude Code.






Five themes — pick the one that fits your brain
Terminal — mono everywhere, teal-on-black, hacker cockpit:
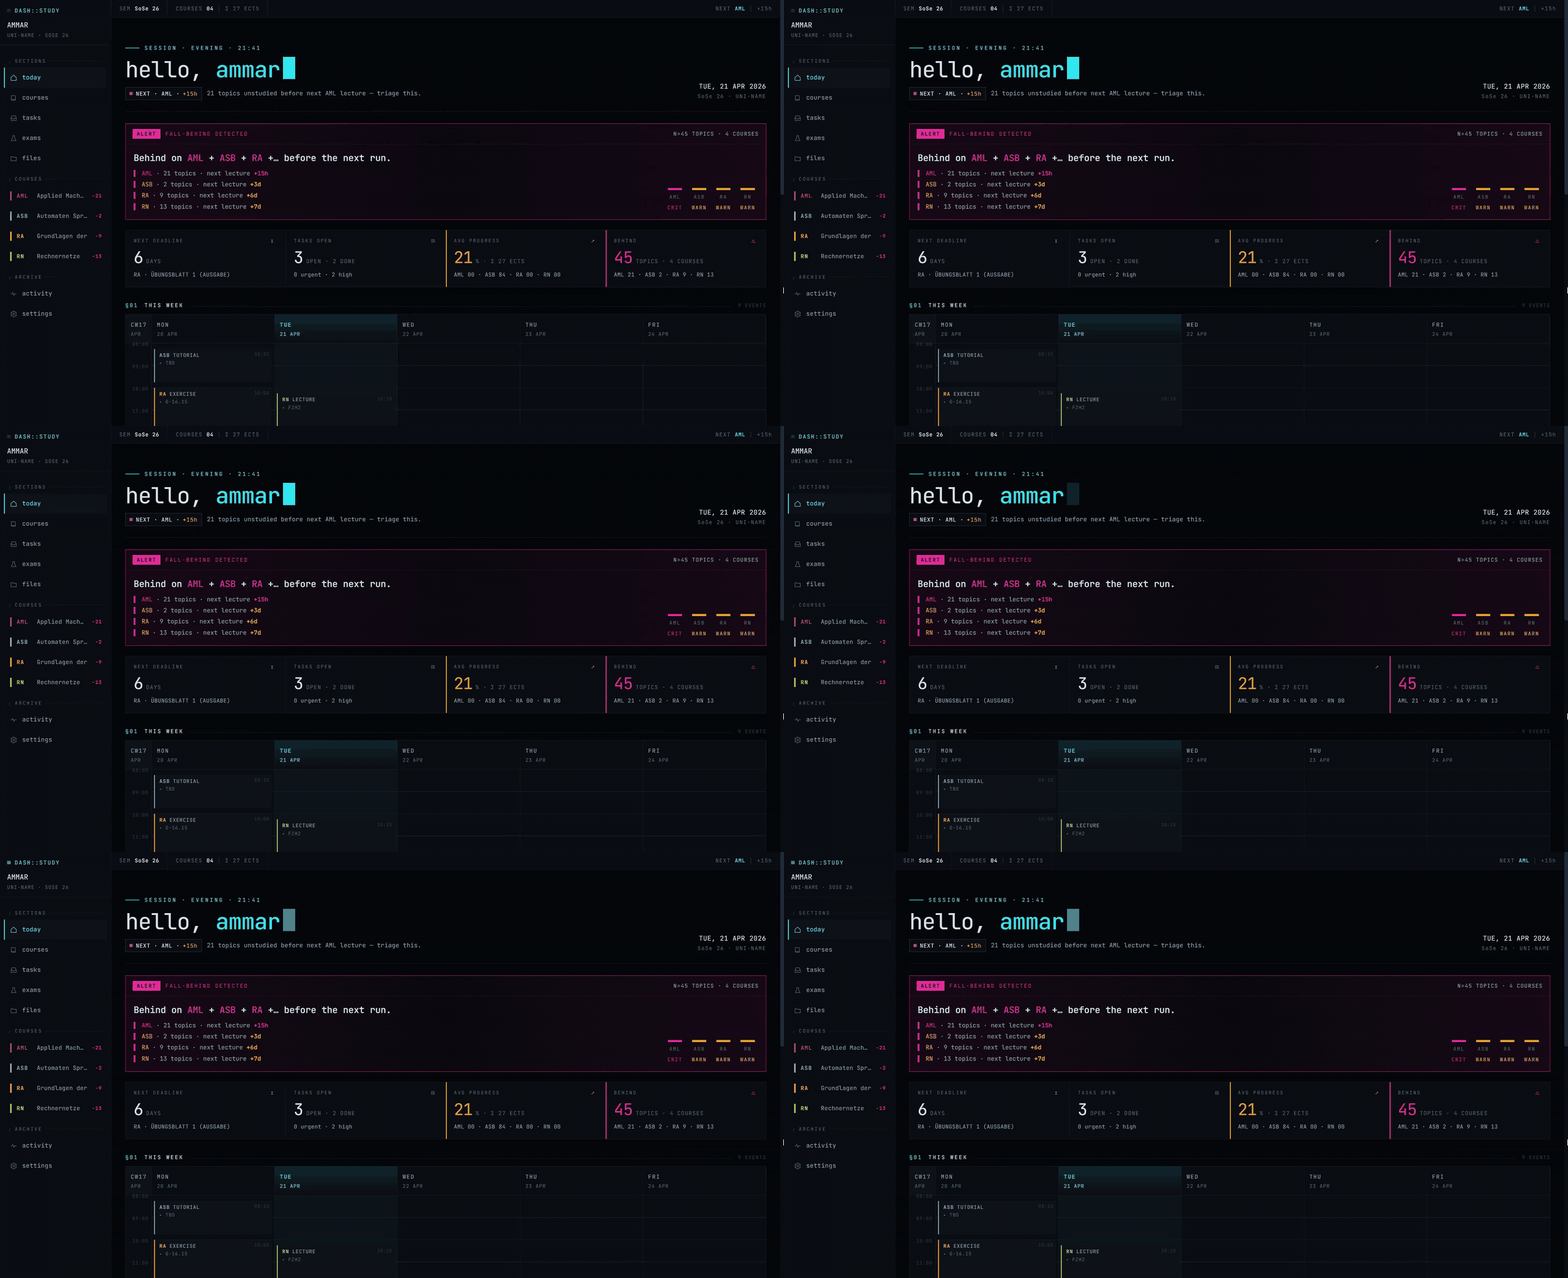
Switch between all five in Settings → Theme. Each one is a full reskin of the dashboard, sidebar, and typography — not just a color palette.
Demo — Claude reading a lecture PDF straight out of OpenStudy
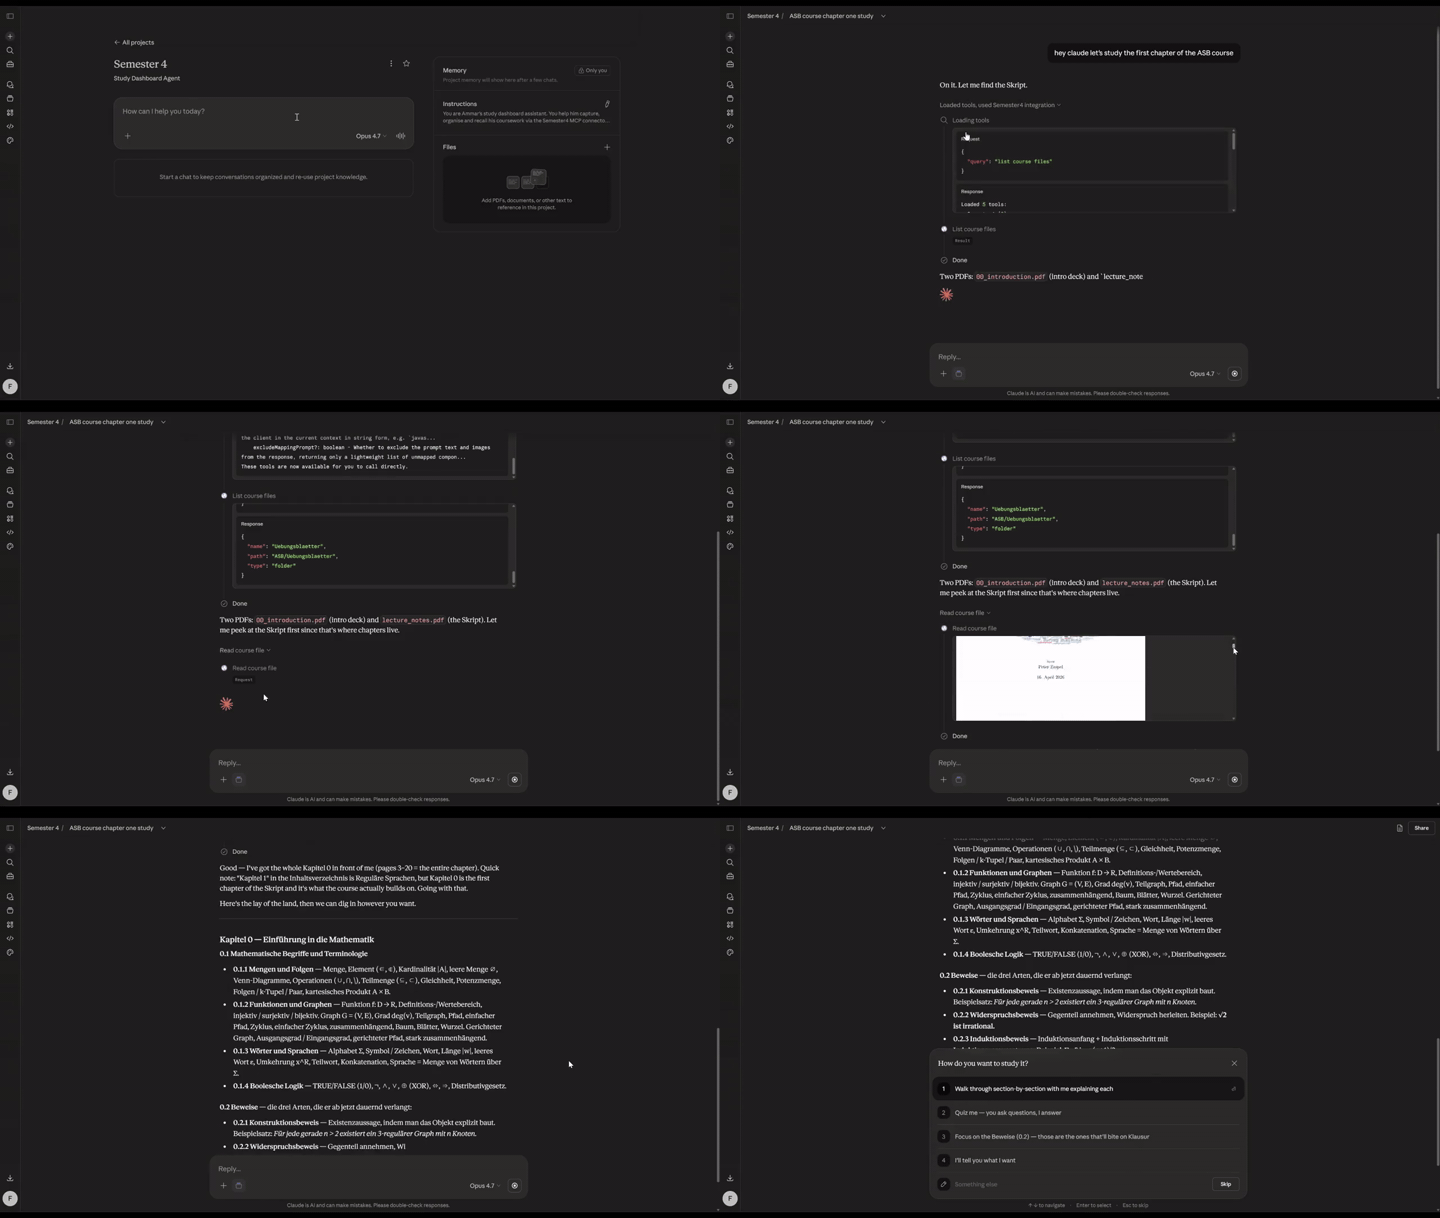
That's claude.ai in the browser, with the OpenStudy MCP server connected as a custom connector. No file was uploaded into the chat — Claude calls list_course_files to find the PDF inside OpenStudy's own file store, then read_course_file renders each page to a PNG and streams it back as vision input. Claude answers questions about the lecture while the PDF never leaves your self-hosted instance.
How I use this
The one-time seed
Before any of the day-to-day stuff, I had to get a semester's worth of courses, schedules, exam rules, and lecture material into the app. I didn't want to do that by hand and I didn't want to write a bespoke import script, so I let Claude Code do it:
-
Pulled everything off my university's LMS (Moodle, in my case) into a local folder. For each course I downloaded the syllabus, schedule, the professor's organizational slides, existing exercise sheets, and the official module catalogue. Structure on disk:
Semester 4/ semester.md # one-liner per course, semester dates, links schedule.md # weekly schedule (my source of truth) module-catalogue.pdf ASB/ course.md # structured source-of-truth (see below) 00_introduction.pdf # prof's org slides exercise-sheets/ Computer-Architecture/ course.md 1 Intro und History.pdf ... ... -
Had Claude Code build one
course.mdper course. It read every PDF, the LMS copy, and the module catalogue entry, and produced a normalized markdown with aMetatable (official name, module code, ECTS, professor, language, exam format, retries, weight), the weekly schedule in the prof's own words, and any grading rules / attendance requirements (e.g. "lab attendance ≥ 75 % for exam admission"). That file became the course's source of truth — everything else downstream pulls from it. -
Seeded the dashboard via the MCP connector. With Claude Code pointed at the running dashboard over MCP, I asked it to walk through each
course.mdand:create_coursewith the meta (code, full name, color, ECTS, professor, language, and afolder_namematching the local folder — so the course-detail Files tab scopes to the right prefix in the bucket)create_schedule_slotfor every recurring slot inschedule.md(kind islecture/exercise/tutorial/lab)update_examwith the exam format + retriescreate_deliverablefor every known exercise sheet / project deadline in the semester- upload every PDF from each course folder into the
course_filesbucket (soread_course_filecan hand them to Claude as vision later)
If you don't want to keep a local
Semester 4/folder at all, every PDF upload can also happen from inside the app — drag-and-drop into the Files view. The local folder is just what works for me because I'm already downloading the files anyway. -
Opened the dashboard → everything was there. Weekly grid populated, four courses with accents, exam info per course, every exercise sheet showing up in the deadlines list.
From then on it's incremental. New lectures land on the LMS, I either drop the PDFs into the corresponding Semester 4/<course>/ folder on my laptop (Claude Code picks them up and uploads) or drag-and-drop them straight into the app's Files view. If the course.md needs an update (new grading rule announced, exam date confirmed, topic added), Claude edits the markdown and pushes the change through the MCP (update_course, update_exam, etc.) so the dashboard and the source-of-truth stay aligned.
A typical week
During the lecture itself. The prof introduces a topic I want more depth on without losing the thread of where the lecture is. I open Claude on my phone: "I'm in ASB lecture 4, slide 12 on the pumping lemma — expand on the intuition for why it works, complement what the prof is saying with more detail." Claude calls list_course_files, finds the ASB lecture 4 slides, uses read_course_file to fetch just page 12, reads the prof's actual definition, and explains from there — in sync with what I'm actually seeing on the projector.
Right after a lecture. Walking out of class, I open Claude on my phone: "We just finished lecture 4 of ASB, covered pumping lemma, closure properties, and non-regularity of aⁿbⁿ." Claude creates the lecture #4, adds the study topics with proper descriptions linked to lecture #4, marks it attended. couple of seconds. The dashboard is caught up.
Later that day, I drop the slides in. I upload the slides of the lecture to the app. Claude can now fetch and read the slides on demand (Through the MCP) and use them to teach me. (it can also fetch only the pages of the slides it needs to teach me, so it doesn't have to read the whole PDF).
Evening, sitting down to actually study. "Am I falling behind in anything?" Claude pulls the fall-behind list — "3 ASB topics unstudied, next lecture in 7h." I pick the first one:
"Walk me through pumping lemma §2.4. Pull the ASB lecture 4 slides and use the actual definition and example from there. Ask me a check question halfway through."
Claude calls list_study_topics to find the topic row, list_course_files + read_course_file to fetch the slides (pages rendered to PNGs — Claude literally sees them, not OCR text), then teaches from the prof's slide wording. When it hits the check question I answer, it either corrects me or moves on. When I confirm I've got it: "mark §2.4 studied," and Claude calls mark_studied.
Then the next topic. Same loop. The "3 unstudied" count on the dashboard ticks down in real time.
Before bed, planning tomorrow. "What's due this week?" One list, sorted by due date. "Add a task: finish ASB Blatt 3 by Monday 16:00, high priority." Done.
On the dashboard itself. Everything Claude did — the lecture, the topics, the mark-studied, the task — is already there when I open the UI. The falling-behind banner only fires when I have unstudied topics and the next lecture on them is close. The weekly grid shows what's coming. Course cards show per-course progress. I don't have to tell the dashboard what I did because Claude already did.
The dashboard is where I see things. Claude is how I edit them. Same database behind both. (You can also use the dashboard UI to edit things, of course, It does have CRUD operations for everything).
What makes it different
The MCP server ships with 44 tools — anything you can do in the UI, Claude can do too. Create a study topic, mark something studied, upload a file, render a PDF as images, whatever.
- Multi-tenant: every owned table carries a
user_idFK. Data isolation is enforced at the service layer (WHERE filters) and the schema layer (composite FKs + RLS policies). Run it solo or flipSIGNUPS_ENABLED=trueto open registration — same codebase, same deploy.
Plug it into Claude.ai as a custom connector (full OAuth 2.1) and those tools are live in Claude Code on your laptop, claude.ai in your browser, and the Claude iOS app on your phone. Open Claude anywhere and it has the same view of your coursework that you do.
You'll need
Before you start, have:
- Docker + Docker Compose v2.30+ (the stack — Postgres, FastAPI, frontend — all run as containers)
- Node 20+ and pnpm (via corepack) for building the frontend
- A public hostname pointing at your box if you want Claude.ai or the Claude iOS app to reach the MCP endpoint (Claude Code can use
localhost) - ~15 minutes for first-time setup
The whole stack — Postgres, the FastAPI backend, and the static frontend — runs on a single box. Anything that runs Docker works: a €5/mo VPS is plenty.
Quick start
Get the full stack running locally. The frontend is built once and served by Caddy in production; for development, run it with pnpm dev against the dockerised backend.
1. Clone + install frontend deps.
git clone https://github.com/openstudy-dev/OpenStudy
cd OpenStudy
cd web && pnpm install && cd ..
2. Generate secrets and write .env files.
Open .env and fill in the required values:
cp .env.example .env

# Set your login email (this becomes your username):
#   OPERATOR_EMAIL=you@example.com

# Hash a password for first login and paste as APP_PASSWORD_HASH:
uv run python -m app.tools.hashpw
# → paste the resulting $argon2id$... string as APP_PASSWORD_HASH

# Generate a session-cookie signing secret:
python3 -c 'import secrets; print(secrets.token_urlsafe(48))'
# → paste as SESSION_SECRET

# Generate the encryption key for per-user secrets (Telegram tokens, etc.):
python3 -c 'from cryptography.fernet import Fernet; print(Fernet.generate_key().decode())'
# → paste as SECRETS_ENCRYPTION_KEY

# Generate a Postgres password and write the Docker-only env file:
cat > .env.docker <<EOF
POSTGRES_USER=openstudy
POSTGRES_PASSWORD=$(openssl rand -hex 24)
POSTGRES_DB=openstudy
EOF
chmod 600 .env .env.docker
.env holds your application secrets. .env.docker holds the Postgres credentials that compose injects into the postgres container. Both are in .gitignore.
3. Bring up the stack.
./deploy.sh
deploy.sh validates compose, builds the openstudy image, applies any pending migrations against the Postgres container, starts everything, then polls GET /api/health for up to 60 s. If health doesn't go green it auto-rolls back to the previously deployed image.
The backend is now live at http://127.0.0.1:8000. Verify:
curl http://127.0.0.1:8000/api/health
# → {"ok":true,"version":"...","db":"ok","storage":"ok ..."}
4. Use it.
The frontend is also a container — ./deploy.sh brought it up at
http://127.0.0.1:8080. Open that in your browser and log in with the
password you hashed. For a public domain, just point your reverse proxy
(Caddy / nginx / etc.) at 127.0.0.1:8080 — the in-container Caddy
handles routing static assets vs. proxying API/MCP traffic.
For local frontend development with Vite hot-reload:
echo "VITE_API_BASE_URL=http://localhost:8000" > web/.env.local
cd web && pnpm dev   # → http://localhost:5173
Stuck or want the production checklist? Full walkthrough is in INSTALL.md.
What you do inside the app
On first boot, everything's empty. You build it up in the UI (or via Claude through the MCP connector):
- Settings → Profile: name, monogram, institution
- Settings → Semester: label (e.g. "Fall 2026"), start/end dates, timezone, locale
- Courses → +: create each course with a short code (ASB, CS101…), a full name, and an accent color
- Course detail: add schedule slots (weekday / time / room), upcoming deliverables, and the study topics you're expected to cover
- Dashboard: lives here. Greeting, falling-behind banner, metric tiles, weekly grid, course cards, deadlines + tasks.
The MCP connector
Prerequisite: the app needs to be reachable at a public URL. Claude.ai and the iOS app can't talk to
localhost— so put the box behind a domain with TLS (Caddy + Let's Encrypt does this in two lines of config). Claude Code is the exception: it can hithttp://localhost:8000/mcpdirectly.
Once the app is live at https://your-domain.tld, it serves a Streamable HTTP MCP endpoint at /mcp, OAuth-gated. One endpoint, every client:
# Claude.ai (browser + iOS app): Settings → Connectors → Add custom connector
#   paste: https://your-domain.tld/mcp

# Claude Code (local CLI, any directory):
claude mcp add --transport http --scope user \
  openstudy https://your-domain.tld/mcp
Both flows open your dashboard's login in a browser for the one-time OAuth consent. After that, the same 44 tools are live wherever you use Claude:
- "list my courses" / "what's due this week?" / "what did we cover in RN last week?"
- "we just finished lecture 3 of ASB, we covered topics X, Y, Z — create the lecture and topics" → Claude calls
create_lecture+add_lecture_topics - "mark chapter §1.4 as studied" →
list_study_topics+mark_studied - "open the ASB lecture 2 slides and tell me what §0.1.3 is about" →
list_course_files+read_course_file(PDFs are rendered to PNGs and streamed back as vision — Claude literally sees the slides) - "I'm falling behind in AML, help me prioritise" →
get_fall_behind+ plan
Claude.ai Projects get a bigger quality boost when you paste a tailored system prompt alongside the connector. Template: docs/claude-ai-system-prompt.md.
Full walkthrough (including curl-based verification): INSTALL.md#7-connect-an-mcp-client.
What's in here
app/                FastAPI + MCP server (Python, uv-managed)
  routers/          HTTP endpoints
  services/         Database queries + business logic
  mcp_tools.py      The MCP tools
  schemas.py        Pydantic models
migrations/         SQL files run by scripts/run_migrations.py at deploy time
  00000000000000_baseline.sql  Initial schema; new migrations stack on top
web/
  src/              Vite + React 19 + Tailwind + shadcn/ui frontend
scripts/
  run_migrations.py Idempotent migration runner with checksum tracking
docker-compose.yml  Postgres + FastAPI on an internal network
Dockerfile          Builds the openstudy:latest image
deploy.sh           Build → migrate → roll → health-gate → rollback-on-fail
docs/
  claude-ai-system-prompt.md    Template + walkthrough for a Claude.ai Project
  examples/                     Real lived-in versions, including the brief that produced this UI
Stack
Three containers behind a single host-side reverse proxy:
- Frontend: Vite + React 19 + TypeScript + Tailwind + shadcn/ui, built into a Caddy:alpine image that serves the SPA and proxies API traffic to the backend on the internal docker network
- Backend: FastAPI (Python 3.12) running as one uvicorn worker, talking to Postgres directly via
psycopgasync pool - Data: Postgres 16 (internal-network only — never exposed to the host)
- Files: plain filesystem under
STUDY_ROOT(default/opt/courses), bind-mounted into the FastAPI container - MCP: Python
mcpSDK, mounted at/mcpover Streamable HTTP with OAuth 2.1 - Hosting: anywhere Docker runs — bring your own outer reverse proxy (Caddy in INSTALL.md) for TLS termination
Design
The visual design was prototyped in Claude Design. The brief that produced this UI is at docs/examples/design-brief-example.md.
License
MIT — do whatever you like. Credit / a star / a link back is appreciated but not required.
Contributing
Yes, please. If you self-host this and something breaks, something feels off, or you wish it did one more thing — open an issue or a PR. No ceremony. Typo fixes, a clearer sentence in INSTALL.md, a new MCP tool you wrote for your own use, a CSS tweak that makes the mobile layout less cramped — all welcome.
If you're unsure whether a bigger change is in scope, a quick "would you take a PR that does X?" issue is the easy way to find out.
Full contributor notes (setup, style, testing, what's likely in vs. out of scope) live in CONTRIBUTING.md.
Ein self-hostbares, persönliches Studien-Dashboard. Behalte deine Kurse, deinen Stundenplan, Vorlesungen, Lernthemen, Abgaben und Aufgaben an einem Ort im Blick — und lass Claude die App aus deinem Browser, vom Handy, vom Desktop oder aus Claude Code heraus bedienen.
Fünf Themes — such dir das aus, das zu deinem Kopf passt
Terminal — Monospace überall, Türkis auf Schwarz, Hacker-Cockpit:
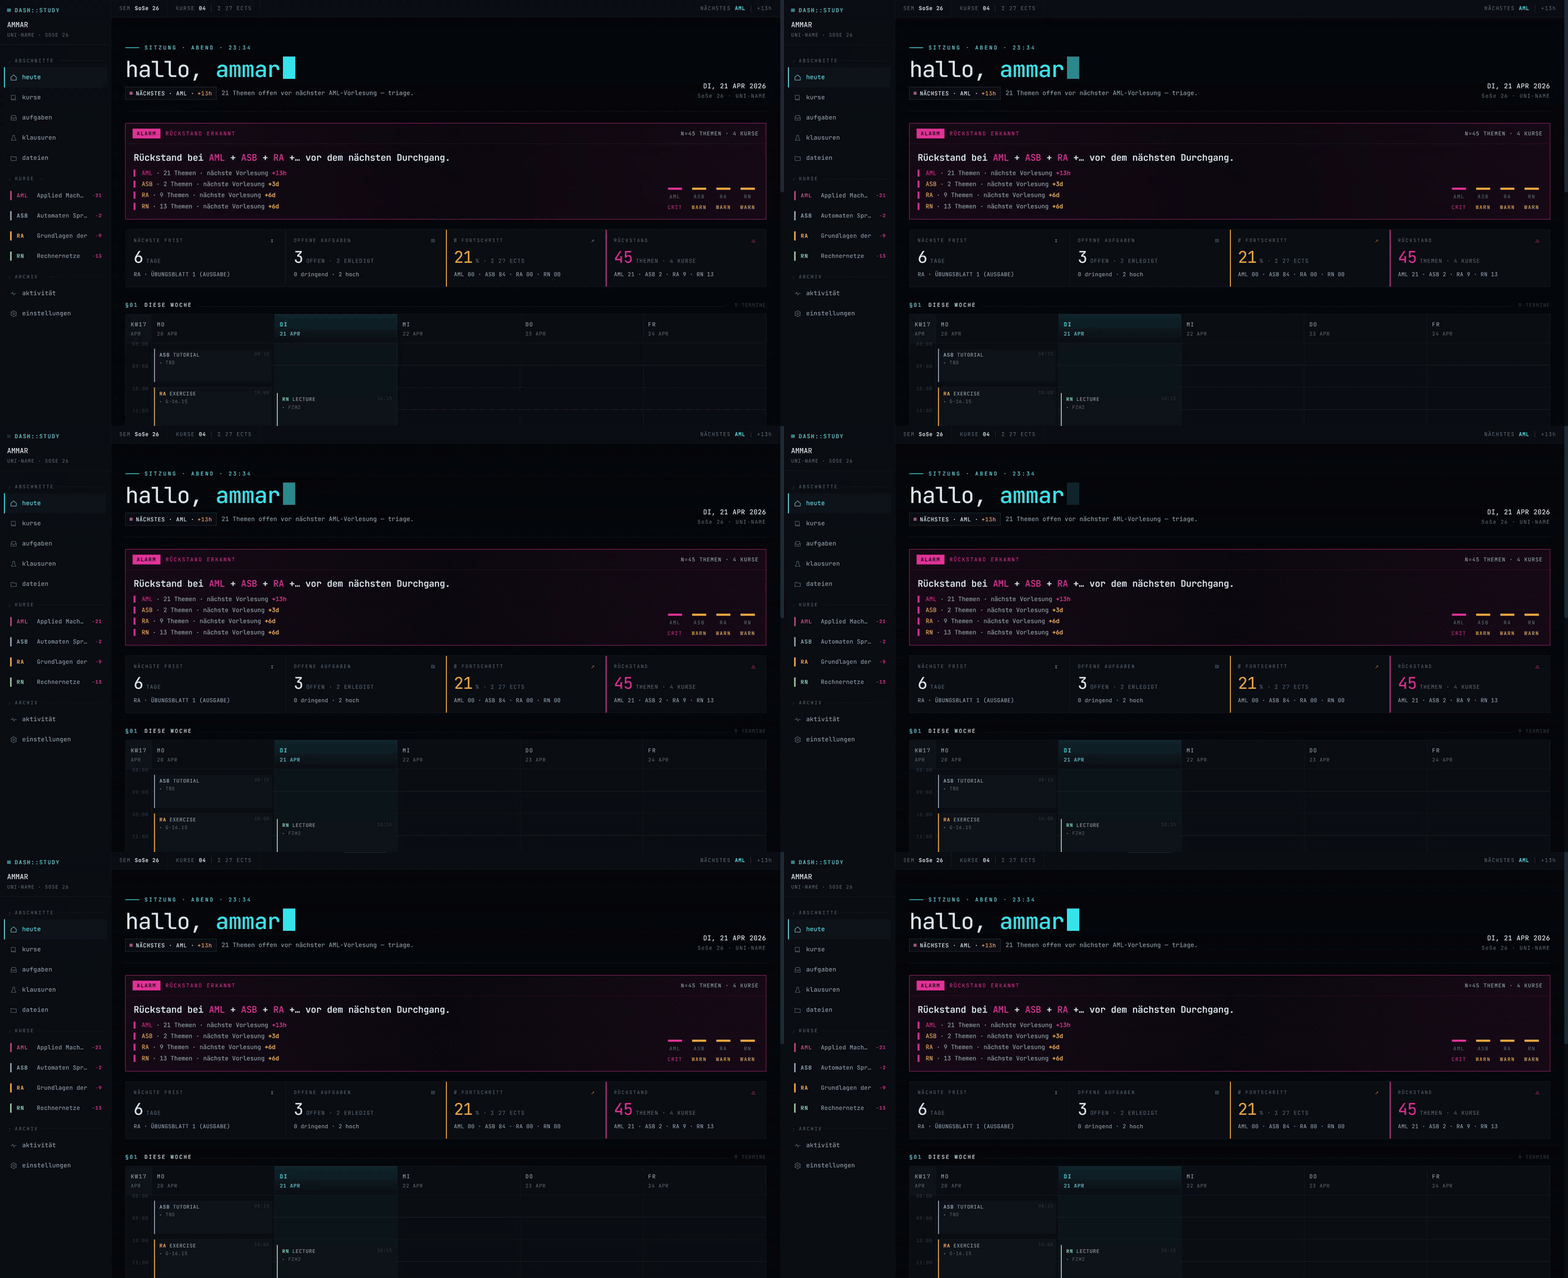
Unter Einstellungen → Theme zwischen allen fünf wechseln. Jedes ist ein vollständiger Reskin von Dashboard, Sidebar und Typografie — nicht bloss eine andere Farbpalette.
Demo — Claude liest ein Vorlesungs-PDF direkt aus OpenStudy
Das ist claude.ai im Browser, mit dem OpenStudy-MCP-Server als Custom Connector angebunden. Es wurde nichts in den Chat hochgeladen — Claude ruft list_course_files auf, um das PDF im Dateispeicher von OpenStudy selbst zu finden, dann rendert read_course_file jede Seite als PNG und schickt sie als Vision-Input zurück. Claude beantwortet Fragen zur Vorlesung, ohne dass das PDF je deine selbst gehostete Instanz verlässt.
Wie ich das benutze
Der einmalige Seed
Bevor der Alltag losgeht, musste ich erst mal ein ganzes Semester an Kursen, Stundenplänen, Prüfungsregeln und Vorlesungsmaterial in die App bekommen. Per Hand hatte ich keine Lust, ein eigenes Import-Skript wollte ich auch nicht schreiben — also hat Claude Code das für mich gemacht:
-
Alles vom LMS der Uni (Moodle, in meinem Fall) in einen lokalen Ordner gezogen. Pro Kurs habe ich die Modulbeschreibung, den Stundenplan, die Organisations-Folien der Professorin, bestehende Übungsblätter und das offizielle Modulhandbuch heruntergeladen. Struktur auf der Platte:
Semester 4/ semester.md # Ein-Zeiler pro Kurs, Semesterdaten, Links schedule.md # Wochenstundenplan (meine Source of Truth) module-catalogue.pdf # (Modulhandbuch) ASB/ course.md # strukturierte Source of Truth (siehe unten) 00_introduction.pdf # Org-Folien der Professorin exercise-sheets/ # (Übungsblätter) Computer-Architecture/ # (Rechnerarchitektur) course.md 1 Intro und History.pdf ... ... -
Claude Code hat pro Kurs eine
course.mdgebaut. Es hat jedes PDF, die LMS-Kopie (Moodle) und den Modulhandbuch-Eintrag gelesen und daraus ein normalisiertes Markdown produziert — mit einerMeta-Tabelle (offizieller Name, Modulcode, ECTS, Dozent:in, Sprache, Prüfungsformat, Versuche, Gewichtung), dem Wochenstundenplan in den eigenen Worten der Professorin und allen Bewertungs- bzw. Anwesenheitsregeln (z. B. „Praktikum-Anwesenheit ≥ 75 % für Klausurzulassung"). Diese Datei wurde pro Kurs zur Source of Truth — alles Weitere zieht daraus. -
Das Dashboard über den MCP-Connector befüllt. Mit Claude Code am laufenden Dashboard angedockt, habe ich es jede
course.mddurchgehen lassen, um:create_coursemit den Metadaten aufzurufen (Kürzel, voller Name, Farbe, ECTS, Dozent:in, Sprache und einfolder_name, der dem lokalen Ordner entspricht — damit der Files-Tab der Kursdetailseite das richtige Präfix im Bucket filtert)create_schedule_slotfür jeden wiederkehrenden Termin ausschedule.md(kindistlecture/exercise/tutorial/lab)update_exammit Prüfungsformat + Versuchszahlcreate_deliverablefür jede bekannte Übungsblatt-/Projekt-Deadline im Semester- jedes PDF aus den Kursordnern in den
course_files-Bucket hochzuladen (damitread_course_filesie Claude später als Vision übergeben kann)
Wenn du den lokalen
Semester 4/-Ordner gar nicht haben willst, kann jedes PDF stattdessen direkt in der App landen — per Drag-and-Drop in die Files-Ansicht. Der lokale Ordner passt für mich nur deshalb, weil ich die Dateien eh schon runterlade. -
Dashboard geöffnet → alles war da. Wochenraster gefüllt, vier Kurse mit eigenen Akzentfarben, Klausur-Infos pro Kurs, jedes Übungsblatt in der Deadline-Liste.
Ab da läuft es inkrementell weiter. Neue Vorlesungen landen auf dem LMS (Moodle), ich lege die PDFs entweder in den passenden Semester 4/<kurs>/-Ordner auf dem Laptop (Claude Code zieht sie rauf) oder schiebe sie direkt per Drag-and-Drop in die Files-Ansicht. Wenn die course.md ein Update braucht (neue Bewertungsregel, fixer Klausurtermin, neues Thema), bearbeitet Claude das Markdown und schickt die Änderung über MCP durch (update_course, update_exam usw.), damit Dashboard und Source of Truth synchron bleiben.
OpenStudy MCP Fragen
Was kann Claude über MCP mit OpenStudy machen?
Der MCP server stellt 44 Tools bereit. Alles, was du in der UI machen kannst, kann Claude also auch, wie zum Beispiel Lernthemen erstellen, sie als gelernt markieren oder Dateien hochladen.
Kann Claude meine Vorlesungs-PDFs lesen?
Ja. Claude kann Kursdateien auflisten, eine PDF im Datei-Speicher von OpenStudy finden und Seiten als Bilder rendern, um sie als Vision-Input zu nutzen.
Wie verbinde ich Claude.ai oder die Claude App mit OpenStudy?
Füge es als Custom Connector unter Verwendung von vollem OAuth 2.1 hinzu; für Claude.ai und die iOS App ist ein öffentlicher Hostname erforderlich, der auf deine Instanz zeigt.
Ist OpenStudy selbst gehostet?
Ja. Der gesamte Stack aus Postgres, FastAPI Backend und statischem Frontend läuft als Container auf einer einzigen Maschine.
Unterstützt OpenStudy mehrere Benutzer?
Ja, es ist Multi-Tenant mit Datentrennung pro Benutzer, und du kannst die Registrierung aktivieren, indem du SIGNUPS_ENABLED=true setzt.