
shellwright MCPサーバー
コミット 2026年9月10日AIエージェントによるターミナルの自動化、スクリーンショットの取得、およびシェルコマンド実行時のビデオやGIFによるセッション記録を可能にします。
別名 dwmkerr/shellwright
- スター
- 44
- ツール
- 2
- ダウンロード数(30日間)
- —
- 最新バージョン
- —
- 最終コミット
- 2026年9月10日
- ライセンス
- —
shellwright MCPとは
shellwrightはMCPサーバーです。 AIエージェントによるターミナルの自動化、スクリーンショットの取得、およびシェルコマンド実行時のビデオやGIFによるセッション記録を可能にします。. 2個のツールを提供しており、one-dark, one-lightなどがあります。
プロジェクトのREADMEから生成された概要
shellwright MCP server について
shellwrightは、AIエージェントに対してターミナルワークフローの自動化と、コマンド実行の視覚的なエビデンスの取得を実現します。Claude CodeやCursorなどのLLMクライアントがPTYセッションと対話する方法を提供し、コマンドの実行、ターミナルバッファの読み取り、Vimやhtopのような対話型アプリケーションの操作を可能にします。
ユーザーはnpx経由でサーバーを構成するか、ローカル開発用にHTTPモードで実行できます。サーバーはdracula、nord、solarized-darkなどのさまざまなターミナルテーマをサポートしており、フォントサイズ、フォントファミリー、ターミナルの寸法をカスタマイズできます。これは、テキストベースのAIによる推論と、コマンドラインインターフェースの視覚的な実態とのギャップを埋めるように設計されています。
単純なコマンド実行にとどまらず、このサーバーには視覚的なドキュメント作成のための専用ツールが含まれています。エージェントは shell_screenshot を使用してPNGやSVGファイルを生成したり、shell_record_start と shell_record_stop を使用してセッション全体のGIF録画を作成したりできます。これらのファイルはローカルの出力ディレクトリに保存されるため、自動化されたタスクの結果を簡単に検証できます。
できること
- 1ターミナルアプリケーションの使用状況の可視化AIエージェントがhtopやk9sなどの対話型ツールの視覚的な状態をキャプチャすることで、その使用方法を実演できます。
- 2ステップバイステップのチュートリアル作成開発者はエージェントに対し、エディタ内での一連のアクションを実行させ、そのプロセスをGIFとして記録するように指示できます。
- 3自動化スクリプト実行のドキュメント化エージェントが特定のデータに対してPythonスクリプトを実行し、検証用にその出力のビデオ録画を提供できます。
- 4スタイリッシュなターミナルスクリーンショットの取得エージェントは、カスタムのウィンドウ境界やテーマを使用して、ターミナル出力の高品質なスクリーンショットを撮影できます。
プロジェクトの README から作成されています。すべてのユースケースは、その引用と照らし合わせて確認されています。
shellwright MCPツール 2
READMEから検出one-darkone-light
| one-dark | — | |
| one-light | — |
自動チェック
実行日 2026年11月14日完全なレポート →まだ検証されていません。サーバーには80点のスコア、重大な問題がないこと、および検証に必要な十分なデータが必要です。 チェックの仕組み · 点数を上げるための改善点

- ソースリポジトリがリンクされており、アクセス可能dwmkerr/shellwright is public and reachablegithub.com/dwmkerr/shellwright ↗合格
- パッケージがこのリポジトリをソースとして指定未チェック
- ビルドの来歴 (Sigstore 証明)未チェック
- オープンソースライセンス (OSI)No license検出事項
- 過去1年以内にコミットまたはリリースありLast commit or release 2026-09-10github.com/dwmkerr/shellwright ↗合格
- OpenSSF Scorecard未チェック
- パッケージ名が有名なパッケージに酷似していない未チェック
- パッケージおよびその依存関係に重大な勧告なし未チェック
- モデルへの隠れた指示がない2 tool descriptions and the README read; no override phrases, credential paths or hidden characters合格
- 破壊的なツールがラベル付けされているNo tool named like delete, drop or exec合格
- リモートエンドポイントが MCP ハンドシェイクに応答未チェック
README
GitHubで見る
Quickstart
Configure your LLM, Claude Code, Cursor or whatever to use the Shellwright MCP server:
{
  "mcpServers": {
    "shellwright": {
      "command": "npx",
      "args": ["-y", "@dwmkerr/shellwright"]
    }
  }
}
Use a prompt such as:
Using shellwright, open Vim. Write a message saying how to close Vim. Close Vim. Give me a screenshot of each step and a GIF recording, save the screenshots and videos to './output'".
A video recording will be saved, as well as screenshots in multiple formats.
Check the Examples or Installation guide for more details. I also use this to create rich recordings for my book Effective Shell.
Running Locally
Run the MCP server in HTTP mode for local development:
npm install
npm run dev:http

# Or add parameters if needed...
npm run dev:http -- --font-size 32
The server runs at http://localhost:7498/mcp.
Testing with the MCP Inspector
Open the MCP Inspector in another terminal and connect to http://localhost:7498/mcp to list and test tools:
# Open MCP inspector in another terminal.
npx @modelcontextprotocol/inspector

# Now connect to:
# http://localhost:7498/mcp
Testing with an Agent
Run the demo.py program to chat to an agent that has the Shellwright tool. Note that you must have the Shellwright MCP sever running in HTTP mode (e.g. npm run dev:http):
# Optionally setup your .env to specify configuration.
# cp ./demo/.env.sample .env && vi .env

# Install requirements and run the agent.
pip install -r ./demo/requirements.txt
python ./demo/demo.py

# Output:
# User (enter message): Show me what the htop tool looks like showing me my resources.

# ...or provide a message directly.
python ./demo/demo.py -- "Run a shell command to show me the names \
of the folders in this directory and take a screenshot and give me its path"
You will see logs from the MCP server and the demo agent:
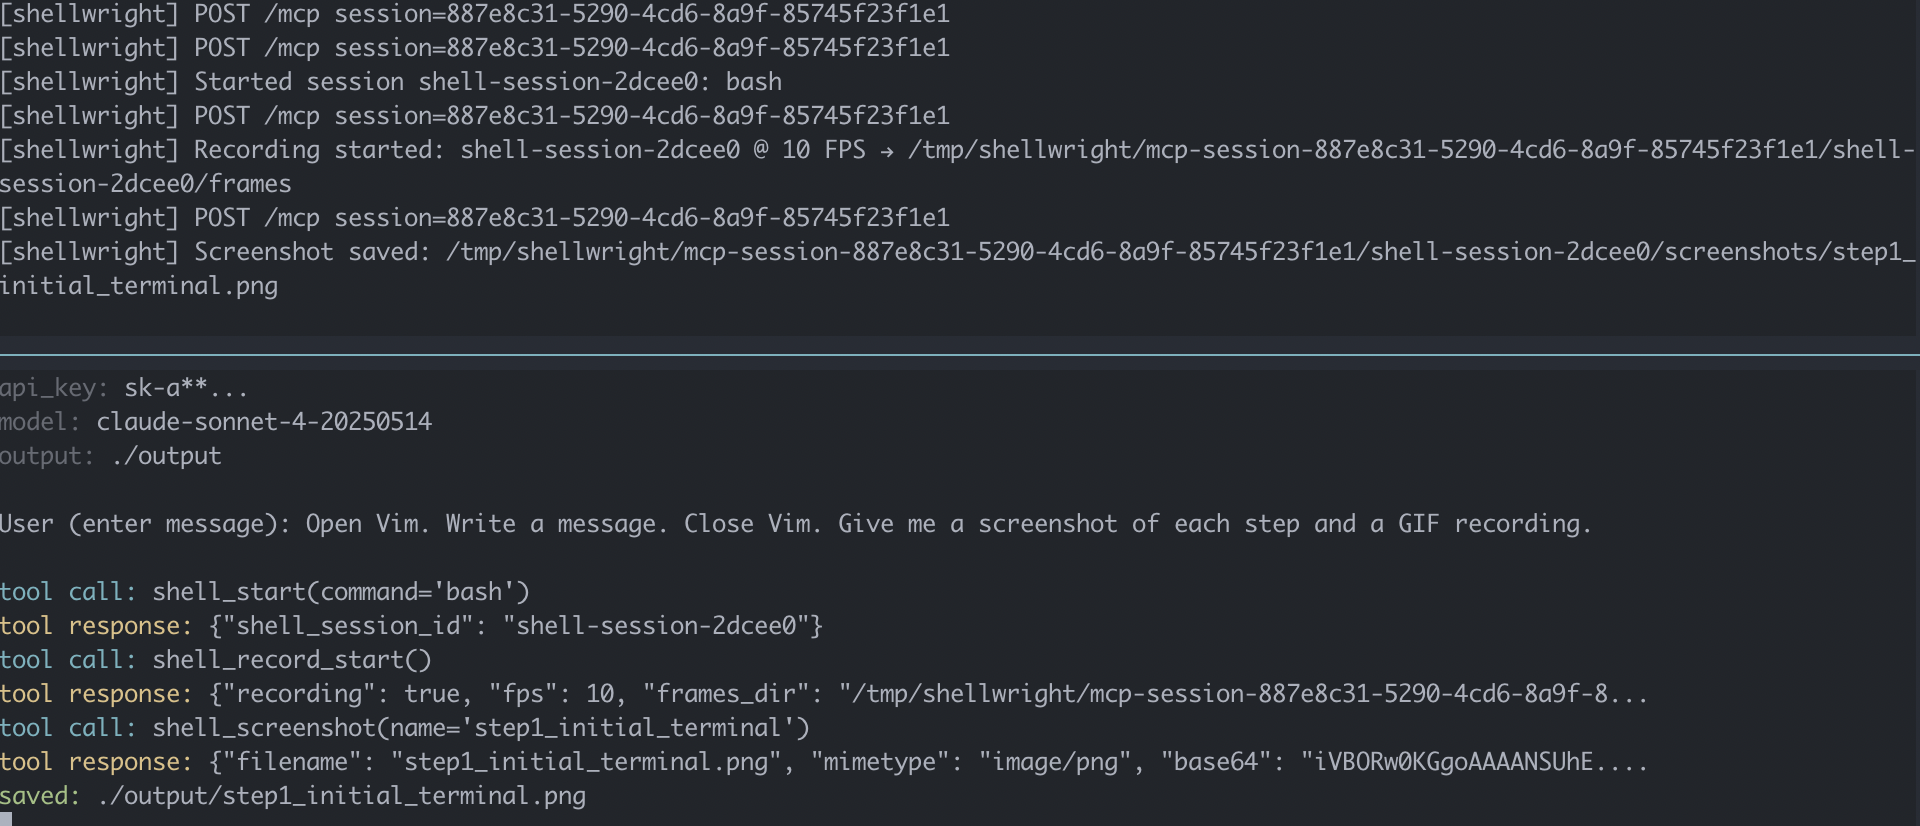
Screenshots and videos by default will be written to ./output.
Examples
Have fun with some prompts.
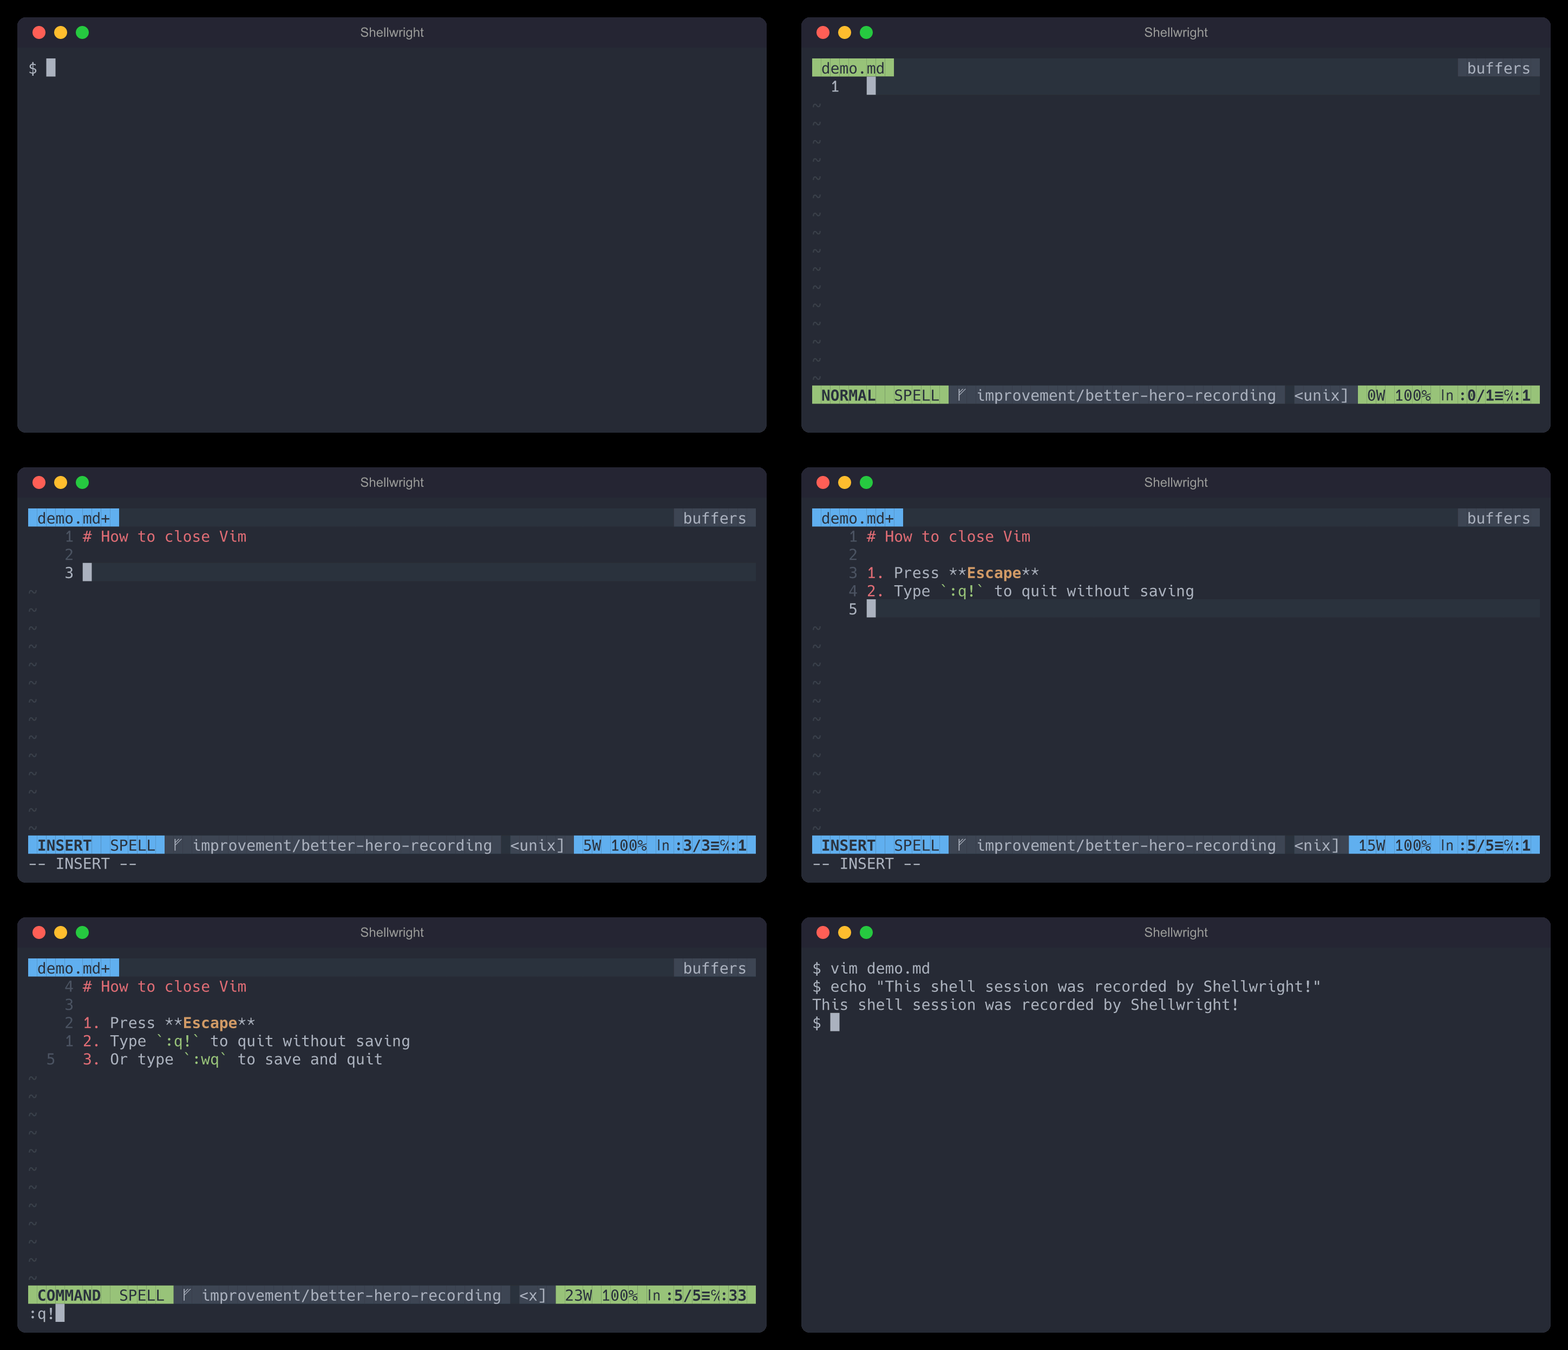
Do some Vim stuff:
Open Vim. Write a message saying how to close Vim. Close Vim. Give me a screenshot of each step and a GIF recording.
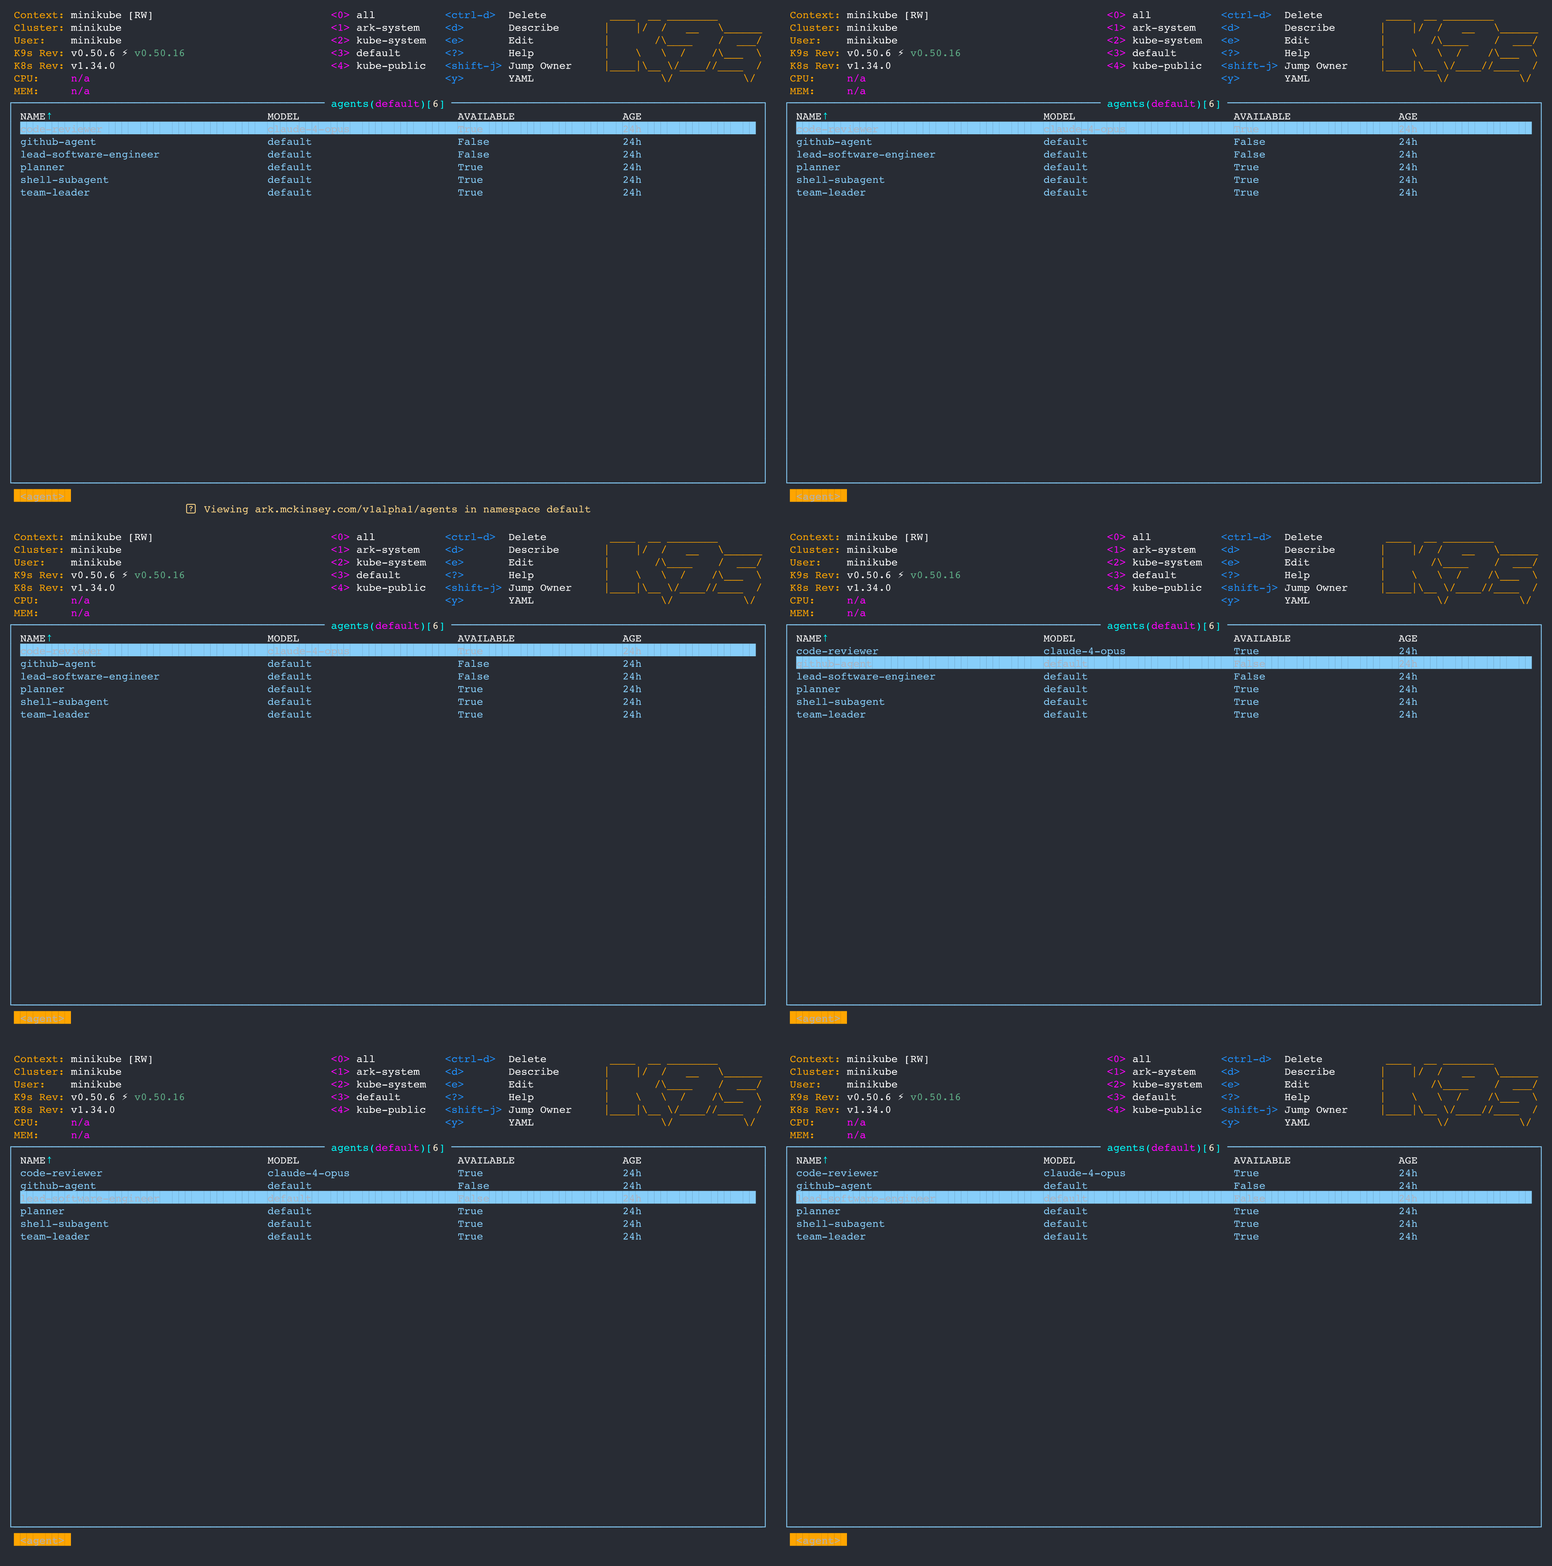
Open K9S. Check for resources of type 'agents'. Give me a GIF recording and take screenshots along the way.
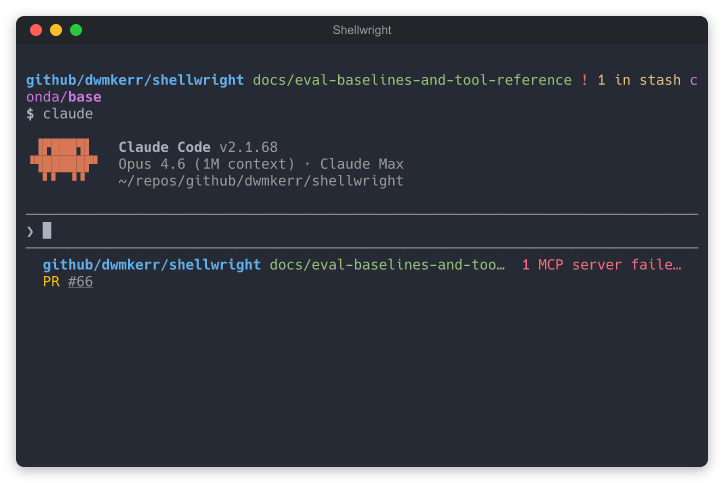
Take a bordered screenshot:
Open Claude Code. Take a screenshot with a macOS window border titled "Shellwright".
Use htop:
Open htop and show the most resource intensive process.
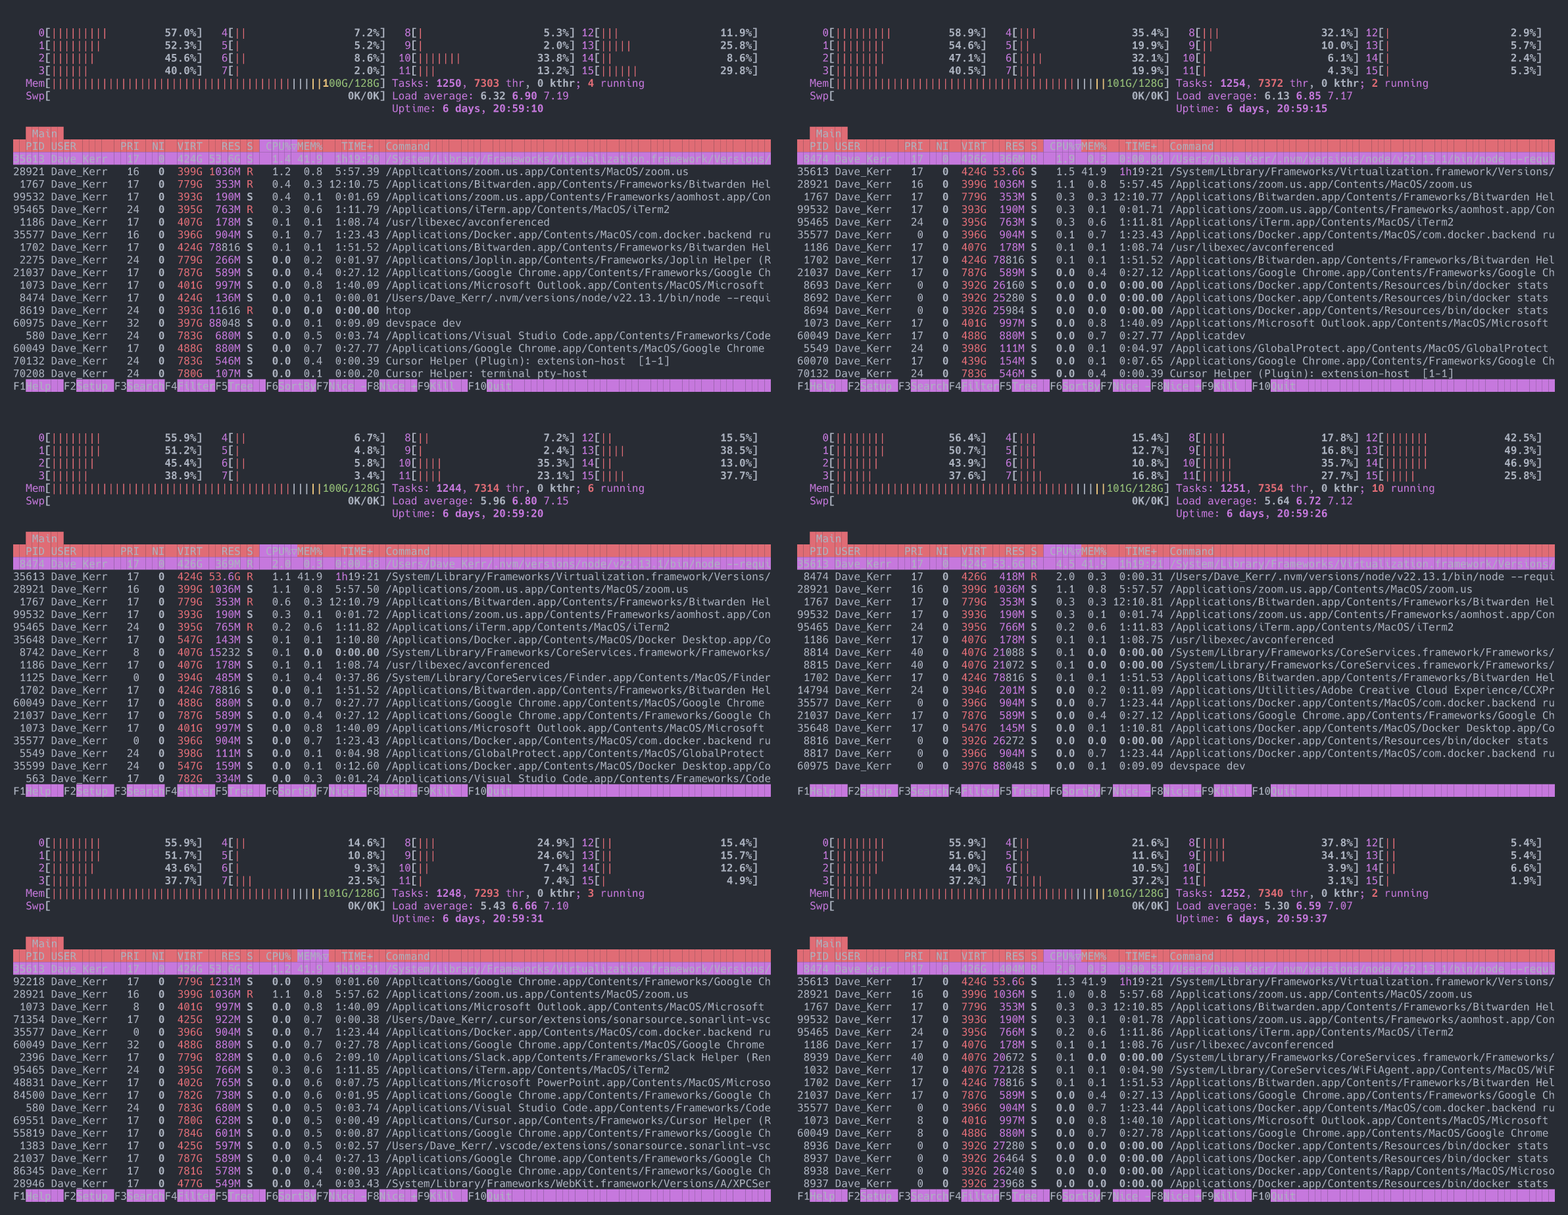
Open vim, create validate.py that checks if arguments are UK postcodes. Print ✓ or ✗ for each. Then run: python3 validate.py on a set of UK postcodes (valid and invalid) such as "SW1A 1AA" "INVALID" "M1 1AA". Record as a video. Take 2-3 screenshots along the way.

Installation
Claude Code
# Install for current project. Use '--scope user' for for user-wide.
claude mcp add --scope project shellwright -- npx -y @dwmkerr/shellwright

# Configure via command line parameters (or env vars) if needed.
claude mcp add --scope project shellwright -- npx -y @dwmkerr/shellwright \
  --log-path /tmp/shellwright/log.jsonl

# Uninstall. Same comment on 'scope'.
claude mcp remove --scope project shellwright
Cursor / VS Code / Other MCP Clients
Add to your MCP configuration file:
{
  "mcpServers": {
    "shellwright": {
      "command": "npx",
      "args": ["-y", "@dwmkerr/shellwright"]
    }
  }
}
Configuration
| Variable | Parameter | Default | Description |
|---|---|---|---|
PORT |
--port, -p |
7498 |
Server port ("SWRT" on a phone keypad) |
THEME |
--theme, -t |
one-dark |
Color theme (one-dark, one-light, dracula, solarized-dark, nord, etc... |
TEMP_DIR |
--temp-dir |
/tmp/shellwright |
Directory for recording frames |
FONT_SIZE |
--font-size |
14 |
Font size in pixels for screenshots/recordings |
FONT_FAMILY |
--font-family |
Hack, Monaco, Courier, monospace |
Font family for screenshots/recordings (use a font with bold variant for bold text support) |
| - | --cols |
120 |
Default terminal columns |
| - | --rows |
40 |
Default terminal rows |
| - | --http |
false |
Use HTTP transport instead of stdio |
| - | --log-path |
- | Log tool calls to JSONL file (one JSON object per line) |
Some configuration can also be provided by the LLM, simply prompt for it:
- Terminal Dimensions: e.g: "Use a terminal that is 80x24 for the recording"
- Theme: e.g: "Use the dracula theme for this recording"
MCP Tools
| Tool | Description |
|---|---|
shell_start |
Start a new PTY session |
shell_send |
Send input to a session |
shell_read |
Read the terminal buffer |
shell_screenshot |
Capture terminal as PNG and SVG |
shell_record_start |
Start recording for GIF export |
shell_record_stop |
Stop recording and save GIF |
shell_stop |
Stop a PTY session |
shell_start
Start a new PTY session with a command. Columns, rows, and theme are optional and the defaults can be set in the Configuration:
Start a shell session running bash:
{
  "command": "bash",
  "cols": 80,
  "rows": 24
}
Start a session with an login mode shell and a specific theme:
{
  "command": "bash",
  "args": ["--login", "-i"],
  "theme": "dracula"
}
Available themes (see Theme Guide for previews):
| Theme | Type | Description |
|---|---|---|
one-dark |
Dark | Muted, balanced colors (default) |
one-light |
Light | Clean, readable colors |
dracula |
Dark | Vibrant purple theme |
solarized-dark |
Dark | Blue-green, easy on eyes |
nord |
Dark | Arctic-inspired, cool blue tones |
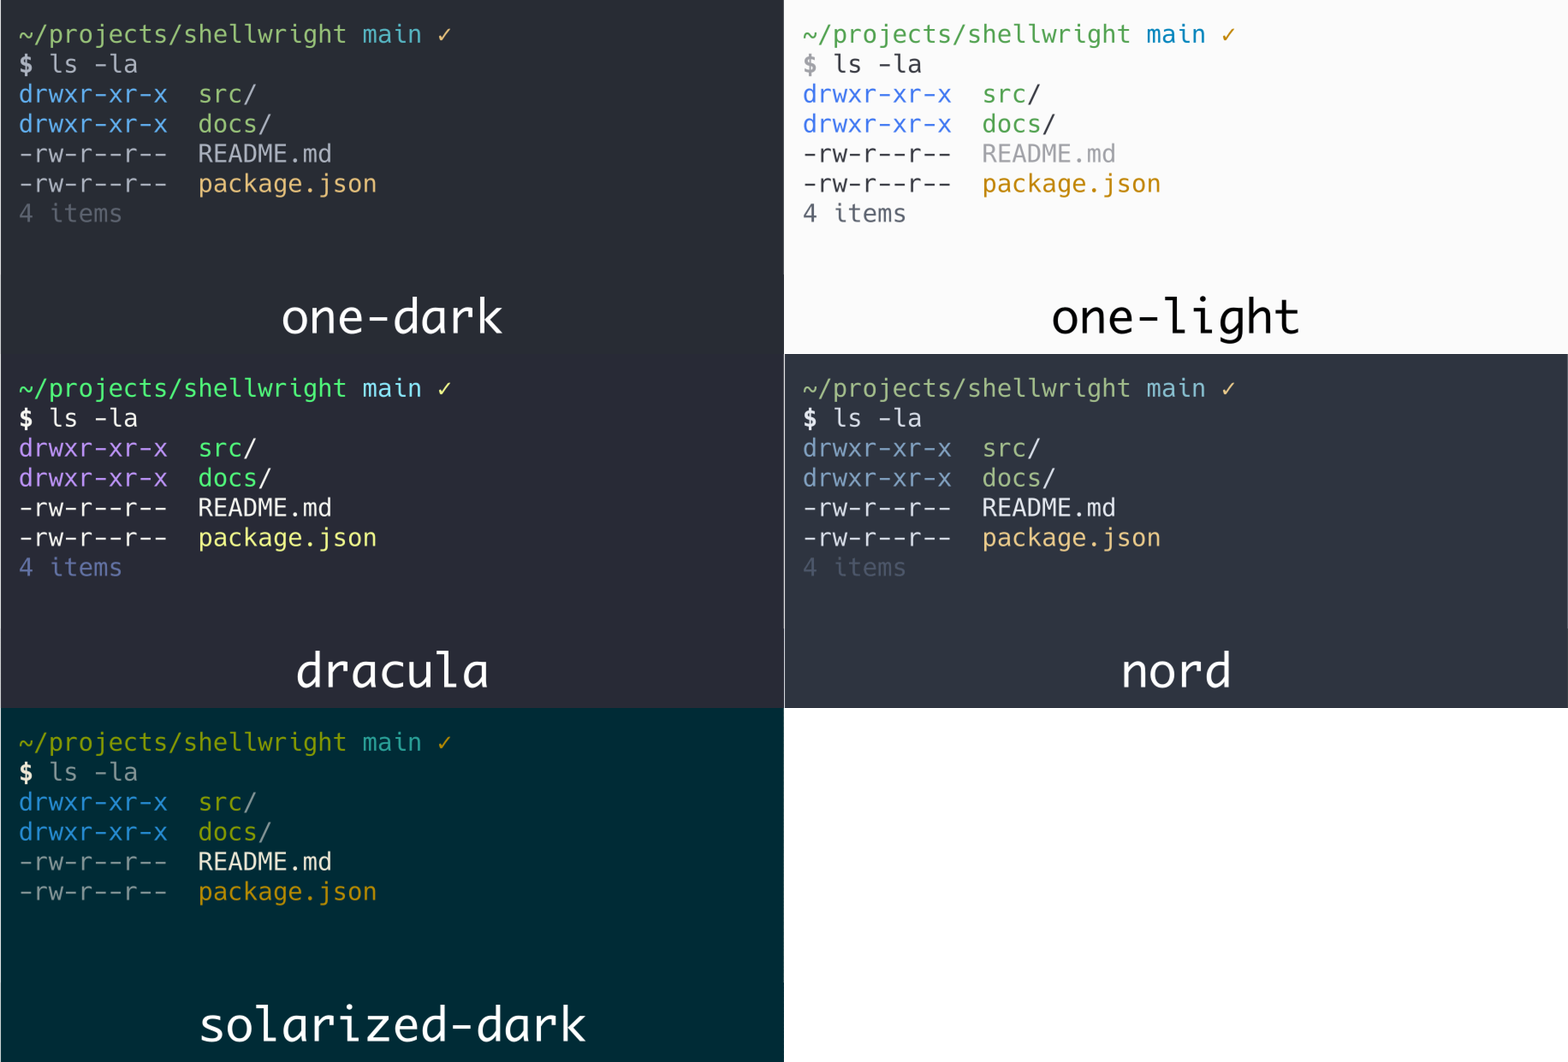
The response contains the shell session ID (as multiple shell sessions can be run) and theme:
{
  "shell_session_id": "shell-session-a1b2c3",
  "theme": "dracula"
}
shell_send
Send input to a PTY session. Returns the full terminal buffer (plain text, no ANSI codes) before and after sending input, so the LLM can see exactly what changed on screen:
{
  "session_id": "shell-session-a1b2c3",
  "input": "ls -la\n",
  "delay_ms": 100
}
The delay_ms parameter controls how long to wait after sending input before capturing bufferAfter (default: 100ms). Increase for slow commands.
The response includes the terminal buffer before and after the input was sent:
{
  "success": true,
  "bufferBefore": "$ _",
  "bufferAfter": "$ ls -la\ntotal 24\ndrwxr-xr-x  5 user staff ...\n$ _"
}
shell_read
Read the terminal contents (scrollback and screen) as plain text. Use raw: true for the raw output stream with ANSI escape codes:
{
  "session_id": "shell-session-a1b2c3",
  "raw": false
}
The response is the terminal content as plain text (truncated to 8KB to avoid context overflow):
total 24
drwxr-xr-x  5 user staff  160 Dec 18 10:00 .
drwxr-xr-x 10 user staff  320 Dec 18 09:00 ..
-rw-r--r--  1 user staff 1234 Dec 18 10:00 README.md
shell_screenshot
Capture terminal as PNG and SVG. Also saves ANSI and plain text versions. Pass name without extension (.png is added automatically). Optionally add a macOS-style window border (off by default):
{
  "session_id": "shell-session-a1b2c3",
  "name": "my-screenshot",
  "border": { "style": "macos", "title": "Terminal" }
}
The response contains download_png_url and download_svg_url for curl to save the files locally:
{
  "filename": "my-screenshot.png",
  "download_png_url": "http://localhost:7498/files/mcp-.../screenshots/my-screenshot.png",
  "download_svg_url": "http://localhost:7498/files/mcp-.../screenshots/my-screenshot.svg",
  "hint": "Use curl -o <filename> <url> to save the file"
}
shell_record_start
Start recording frames for GIF export. Frames are captured at the specified FPS (default 10, max 30, compression occurs by deduplicating identical frames). The optional border parameter (same as shell_screenshot) applies window chrome to every frame:
{
  "session_id": "shell-session-a1b2c3",
  "fps": 10,
  "border": { "style": "macos", "title": "Terminal" }
}
The response confirms recording has started:
{
  "recording": true,
  "fps": 10,
  "frames_dir": "/tmp/shellwright/.../frames"
}
shell_record_stop
Stop recording and render frames to GIF:
{
  "session_id": "shell-session-a1b2c3",
  "name": "my-recording"
}
The response contains a download_gif_url for curl to save the file locally:
{
  "filename": "my-recording.gif",
  "download_gif_url": "http://localhost:7498/files/mcp-.../recordings/my-recording.gif",
  "hint": "Use curl -o <filename> <url> to save the file",
  "frame_count": 42,
  "duration_ms": 4200
}
shell_stop
Stop a PTY session and clean up resources:
{
  "session_id": "shell-session-a1b2c3"
}
The response confirms the session was stopped:
{
  "success": true
}
MCP Prompts are also available for common workflows like vim editing and recording sessions. See src/prompts.ts.
Troubleshooting
The MCP server by default will write screenshots, video frames and the GIF (if requested) to a temporary location. This location includes the MCP session ID and the Shell session ID (one MCP session can have many shell sessions):
# Show the contents of an MCP and shell session.
tree /tmp/shellwright/mcp-session-16281bdf-7881-458a-8bee-475b02d000d2/shell-session-c66b8a

# Output:
# .
# ├── frames                         # Frames for the GIF recording. These are
# │   └── frame000000.png            # cleaned up at the end of the session.
# ├── recordings
# │   └── vim_tutorial_complete.gif  # The GIF recording (if requested).
# └── screenshots
# ├── step1_initial_terminal.ansi    # Individual screenshot w/ ansi color etc.
# ├── step1_initial_terminal.png     # Screenshot as PNG (ANSI->SVG->PNG).
# └── step1_initial_terminal.svg     # The SVG intermediate.
# └── step1_initial_terminal.txt     # Screenshot as plain text.
You can check raw txt files to troubleshoot the contents of screenshots. You can see the ansi content which contains formatting and color codes. Finally, you can open the png files - these are generated by converting the ansi to SVG (using themes defined in code) and then SVG is converted PNG. Check the plain text contents of a buffer, or raw ansi, or formatted like so:
# Show plain text. Make sure you are in the shell session temp directory.
cat ./k9s_initial_view.txt

# Show formatted ANSI. Good for troubleshooting color codes.
cat ./k9s_initial_view.ansi
Developer Guide
To test local changes with Cursor, VS Code, or other MCP clients, first build the project then configure them to use your local build:
npm run build
{
  "mcpServers": {
    "shellwright-dev": {
      "command": "node",
      "args": ["/path/to/shellwright/dist/index.js"]
    }
  }
}
Run npm run build after making changes, then restart your MCP client.
For HTTP mode development with hot-reload:
npm run dev:http
Claude Code
To test local development changes with Claude Code, add the local build as an MCP server:
# From the shellwright repo root - build first!
npm run build
claude mcp add shellwright-dev --scope project -- node "${PWD}/dist/index.js"
This registers your local build so you can test changes before publishing.
Contributors
Thanks to all contributors!
This project follows the all-contributors specification. Contributions of any kind welcome!
License
MIT
openspec-flow
This repo uses openspec-flow to drive spec-driven development from GitHub issues.
- Open an issue describing the feature, fix, or task.
- Add the
openspec:golabel. - openspec-flow opens a spec PR (
openspec:spec). Review, comment, iterate (addopenspec:goto the PR to re-run). Merge when happy. - openspec-flow opens an impl PR (
openspec:impl). Review, iterate, merge. The originating issue closes automatically.
Required Actions secret: ANTHROPIC_API_KEY.
shellwright MCPのよくある質問
shellwright MCPが提供するツールは
2個のツールを提供しており、one-dark, one-lightなどがあります。
shellwrightはAIエージェントにどのような機能を提供しますか?
AIエージェントによるターミナルの自動化、PNGおよびSVG形式でのスクリーンショット撮影、そしてシェルセッションのGIF録画を可能にします。
スクリーンショットやビデオはどこに保存されますか?
デフォルトでは、スクリーンショットとビデオは ./output ディレクトリに書き込まれます。
Claude Codeでshellwrightを使用できますか?
はい、claude mcp add コマンドを使用してClaude Codeにインストールできます。