
Appwrite'ın veritabanları, kullanıcılar, fonksiyonlar, ekipler ve depolama dahil olmak üzere API'sini AI istemcileri için araç olarak sunar.
Ayrıca bilinen adı appwrite/mcp-for-api, mcp-server-appwrite
- Yıldızlar
- 72
- Araçlar
- —
- İndirmeler, 30 gün
- 334.841
- En son sürüm
- 0.2.8
- Son commit
- 13 Kas 2026
- Lisans
- MIT
Appwrite MCP nedir?
Appwrite bir MCP sunucusudur. Appwrite'ın veritabanları, kullanıcılar, fonksiyonlar, ekipler ve depolama dahil olmak üzere API'sini AI istemcileri için araç olarak sunar.
Özet, projenin README dosyasından oluşturuldu
Appwrite MCP sunucusu hakkında
Bu server, geliştiricilerin Appwrite backend servislerini bir AI istemcisi aracılığıyla yönetmesini sağlar. Veritabanları, kullanıcılar, fonksiyonlar, ekipler ve depolama gibi temel Appwrite API işlevlerini uygulanabilir araçlar olarak sunar. Bu server'ı bağlayarak, bir AI agent projenizle doğrudan etkileşime geçebilir, yönetimsel veya geliştirme odaklı görevleri yerine getirebilir.
Kullanıcılar, hosted Appwrite Cloud server'ına uzak bir URL üzerinden bağlanabilir ve tarayıcı tabanlı OAuth akışını kullanarak kimlik doğrulaması yapabilirler; bu da API key'leri manuel olarak kopyalama ihtiyacını ortadan kaldırır. Kendi sunucusunda Appwrite kullananlar için server, bir proje API key kullanılarak stdio üzerinden yerel olarak çalıştırılabilir. Claude Desktop, Cursor, VS Code, Windsurf ve Zed gibi geniş bir istemci yelpazesiyle uyumludur. Agent tarafından yapılan her değişiklik, kolay inceleme için Appwrite denetim günlüğüne bir neden ile birlikte kaydedilir.
Neler yapabilirsiniz
- 1Backend kaynaklarını yönetinBir AI agent; veritabanlarınız, kullanıcılarınız, fonksiyonlarınız, ekipleriniz ve depolama biriminizle doğrudan etkileşime girebilir.
- 2Agent faaliyetlerini denetleyinProje etkinlik günlüğünü inceleyerek bir AI'ın neden belirli değişiklikler yaptığını takip edebilirsiniz.
- 3Farklı ortamlar arasında operasyon yürütünAgent, staging gibi belirli proje ortamları içinde işlemler gerçekleştirebilir.
- 4Teknik dokümantasyonda arama yapınGeliştiriciler, Appwrite dokümantasyonu içinde bilgi bulmak için agent'ı kullanabilirler.
Projenin README dosyasından alınmıştır. Her kullanım durumu, oradaki bir alıntı ile kontrol edilir.
Appwrite MCP nasıl yüklenir
Biçimler 10 Kas 2026 tarihinde doğrulandıCursor'a ekleGoose'a ekleAppwrite MCP'yi Claude Code içine yükleyin
$ claude mcp add mcp-for-api -- uvx mcp-server-appwriteAppwrite MCP'yi Cursor içine yükleyin
~/.cursor/mcp.json
{
  "mcpServers": {
    "mcp-for-api": {
      "command": "uvx",
      "args": [
        "mcp-server-appwrite"
      ]
    }
  }
}Appwrite MCP'yi VS Code içine yükleyin
.vscode/mcp.json
{
  "servers": {
    "mcp-for-api": {
      "type": "stdio",
      "command": "uvx",
      "args": [
        "mcp-server-appwrite"
      ]
    }
  }
}Appwrite MCP'yi VS Code CLI içine yükleyin
$ code --add-mcp '{"name":"mcp-for-api","type":"stdio","command":"uvx","args":["mcp-server-appwrite"]}'Appwrite MCP'yi Claude Desktop içine yükleyin
claude_desktop_config.json
{
  "mcpServers": {
    "mcp-for-api": {
      "command": "uvx",
      "args": [
        "mcp-server-appwrite"
      ]
    }
  }
}Appwrite MCP'yi Codex içine yükleyin
$ codex mcp add mcp-for-api -- uvx mcp-server-appwriteAppwrite MCP'yi Codex config.toml içine yükleyin
~/.codex/config.toml
[mcp_servers.mcp-for-api]
command = "uvx"
args = ["mcp-server-appwrite"]
Appwrite MCP'yi Gemini CLI içine yükleyin
$ gemini mcp add -s user mcp-for-api uvx -- mcp-server-appwriteAppwrite MCP'yi Gemini settings.json içine yükleyin
~/.gemini/settings.json
{
  "mcpServers": {
    "mcp-for-api": {
      "command": "uvx",
      "args": [
        "mcp-server-appwrite"
      ]
    }
  }
}Otomatik kontroller
Çalıştırıldı 12 Kas 2026Tam rapor →Otomatik kontrollerimizden geçti. Bu bir güvenlik denetimi değildir: kodu okuyun ve sunucuya ihtiyaç duyduğu en dar erişimi verin. Kontroller nasıl çalışır

- Kaynak deposu bağlantılı ve erişilebilirGeçti
- Açık kaynak lisansı (OSI)Geçti
- Son bir yıl içinde commit veya sürüm mevcutGeçti
- Paket adı popüler bir pakete yakın değilGeçti
- Uzak uç nokta HTTPS kullanıyorKontrol edilmedi
- Yıkıcı araçlar etiketlenmişKontrol edilmedi
- Modele yönelik gizli talimat yokGeçti
- Pakette veya bağımlılıklarında kritik uyarı yokGeçti
Appwrite MCP server

A Model Context Protocol server for Appwrite. It exposes Appwrite's API — databases, users, functions, teams, storage, and more — as tools your MCP client can call.
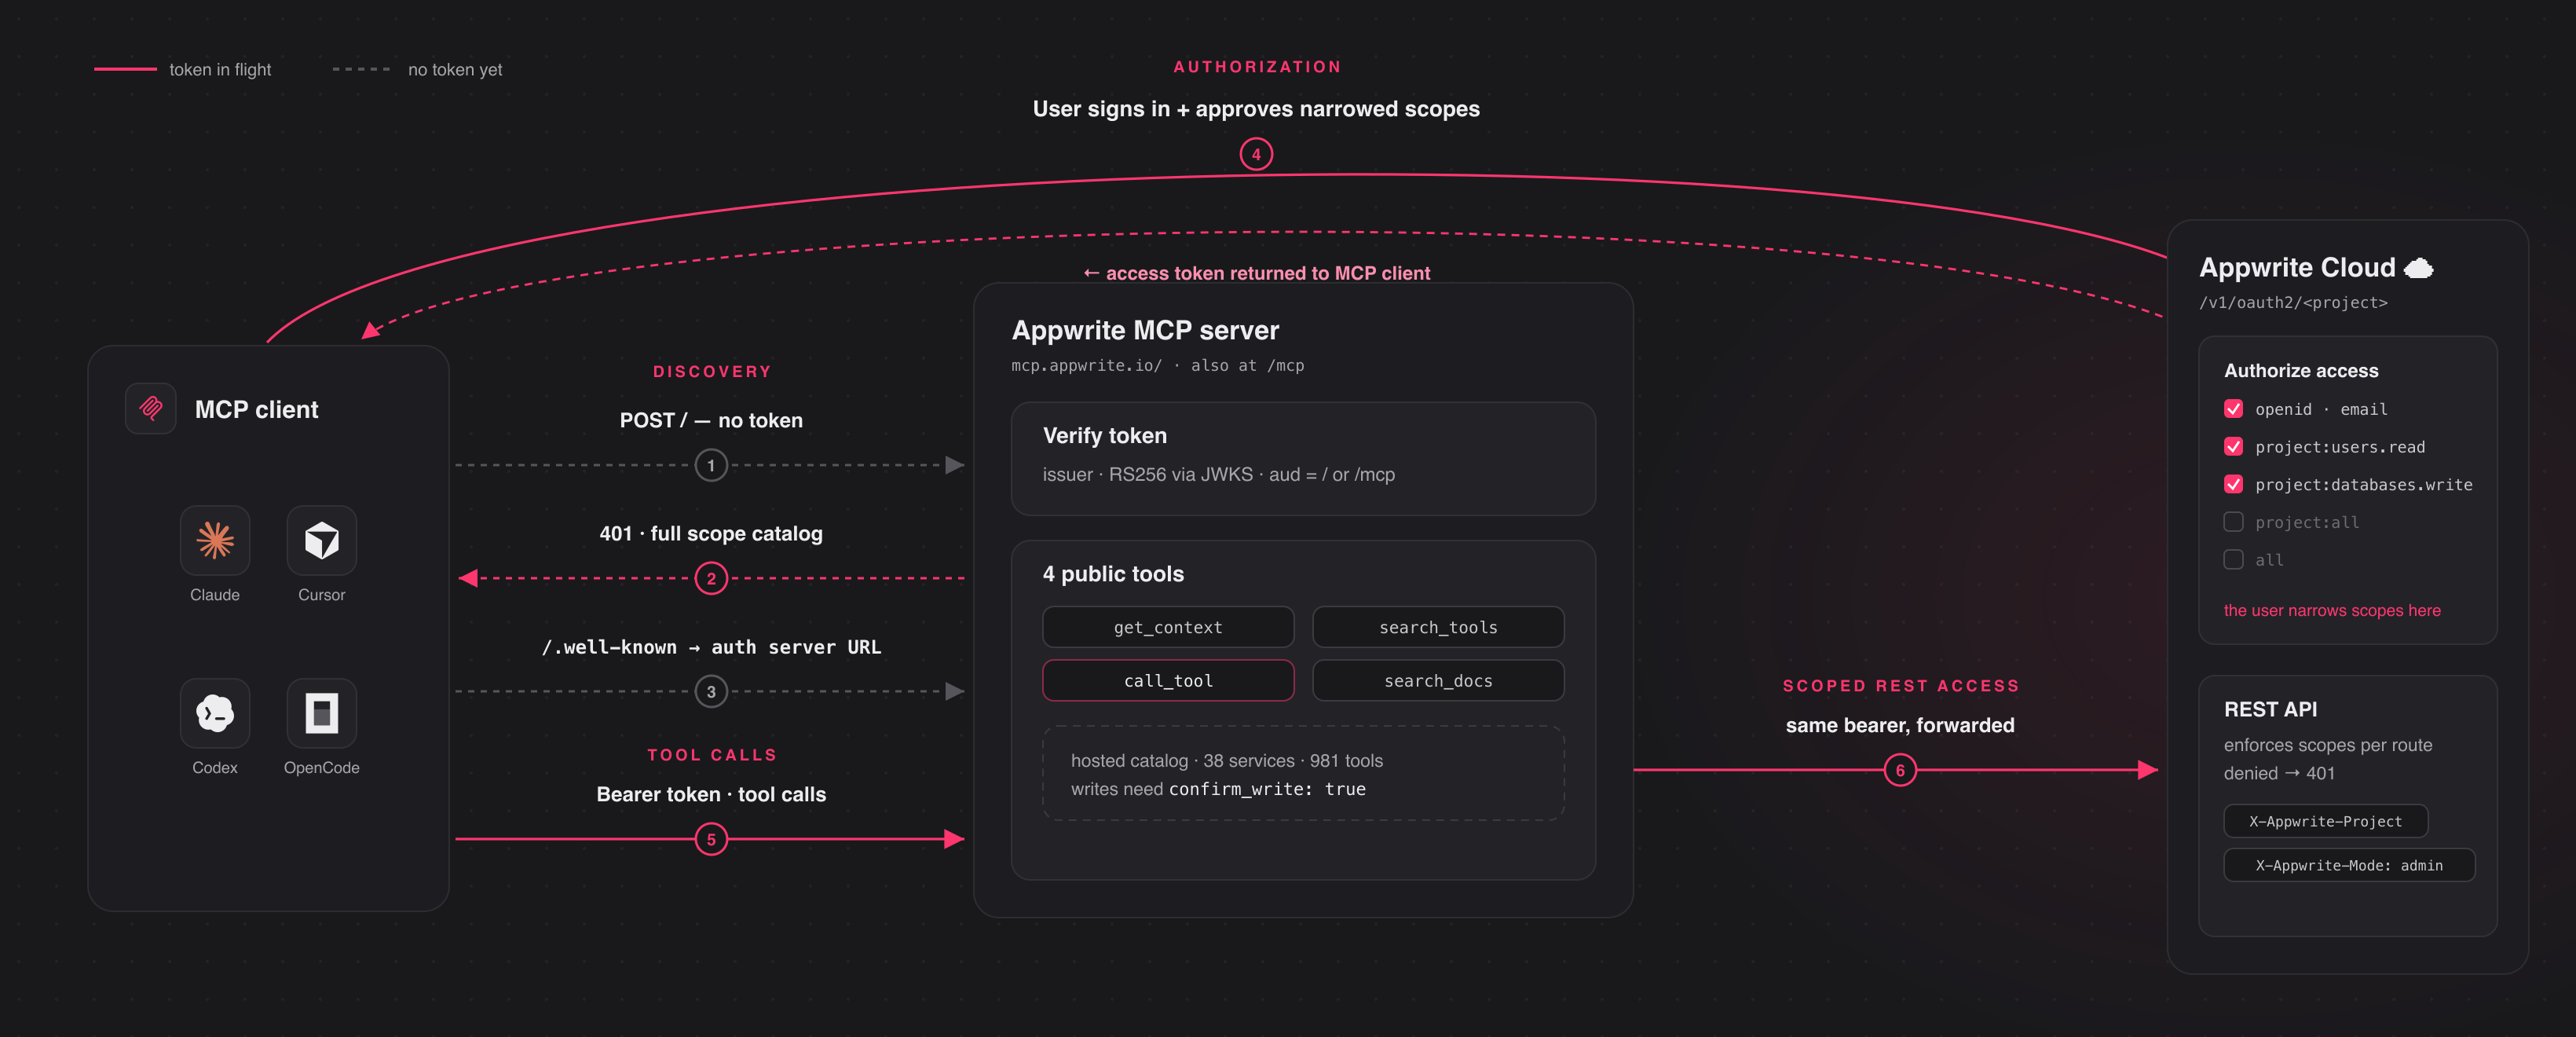
Connect to the hosted server at https://mcp.appwrite.io/ and authenticate
through your browser. The first time you connect, your client opens an Appwrite
consent screen; approve the scopes and you're connected. There are no keys to
copy. The conventional https://mcp.appwrite.io/mcp URL is also supported and
connects to the same server.
Connect your client
Pick your client below. Each adds the hosted Appwrite Cloud server.
claude mcp add --transport http appwrite https://mcp.appwrite.io/
Then, inside a Claude Code session, run /mcp, select appwrite, and follow
the browser prompt to authenticate.
Go to Settings → Connectors → Add custom connector and paste
https://mcp.appwrite.io/. Available on Pro and Max plans; on Team and
Enterprise plans only an organization Owner can add custom connectors.
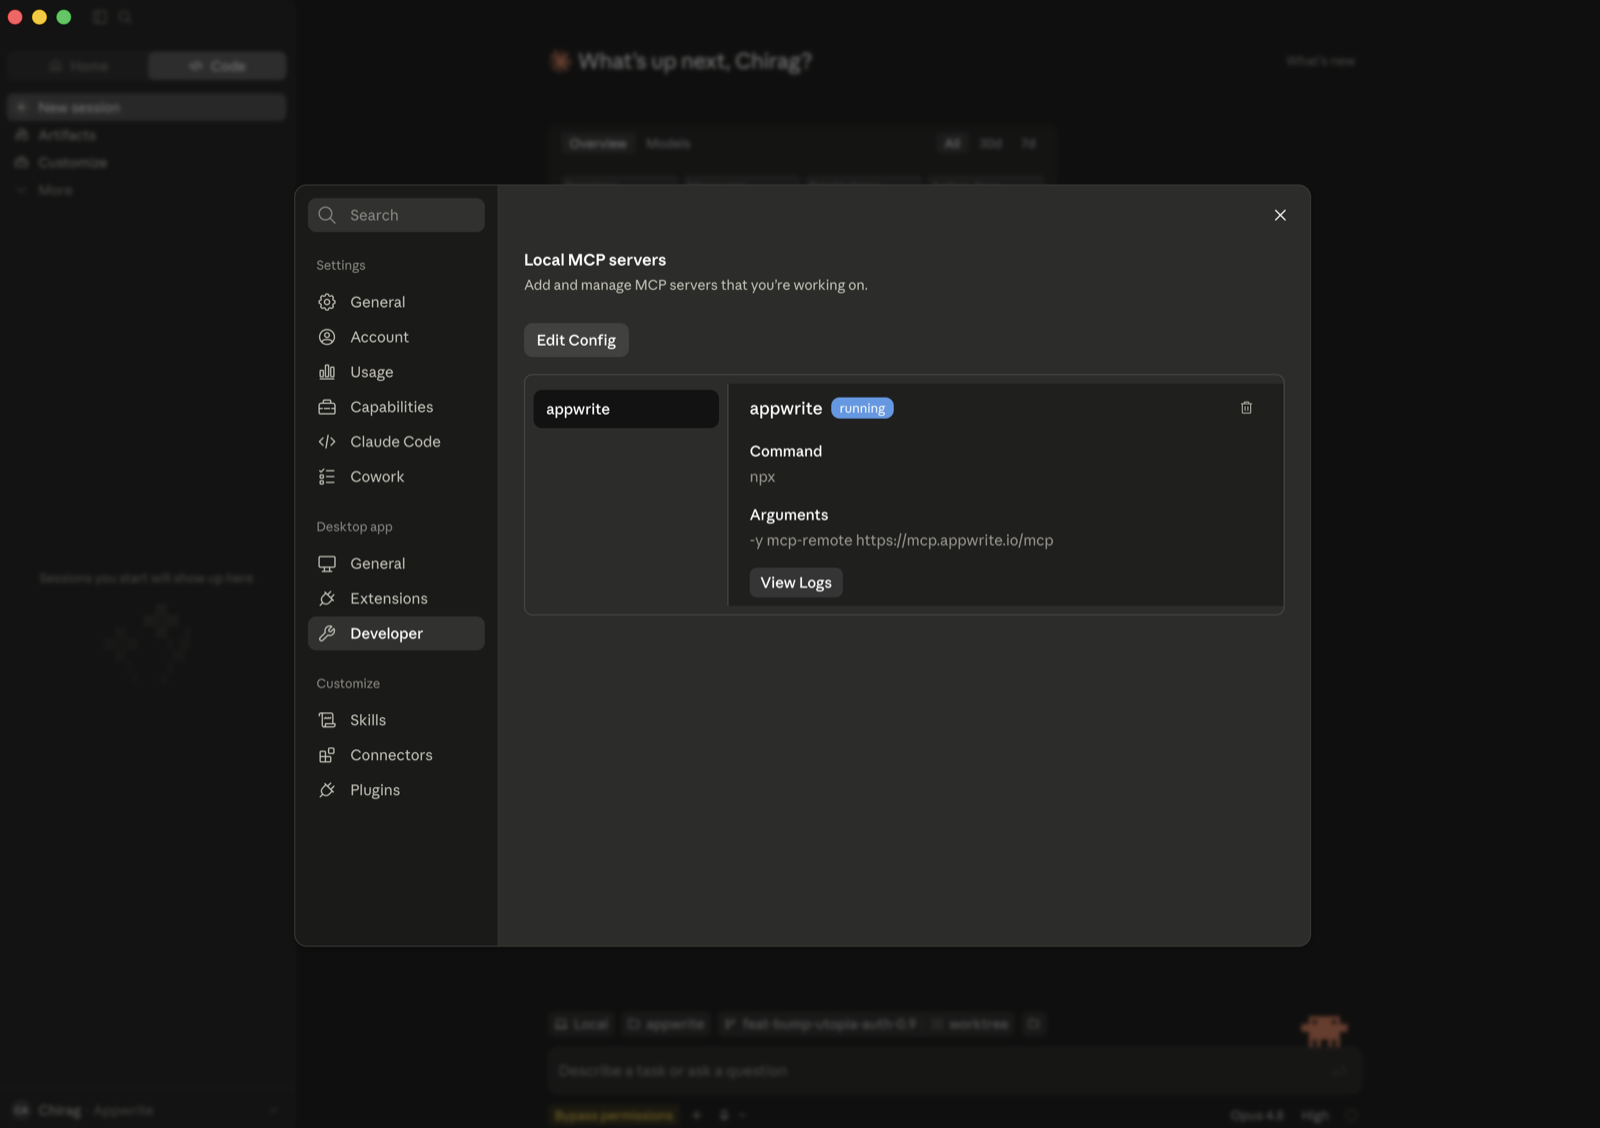
If you don't see that option (free plan, or a Team/Enterprise member), bridge the remote server through stdio instead (requires Node.js). Go to Settings → Developer → Local MCP servers, click Edit Config, and add:
{
  "mcpServers": {
    "appwrite": {
      "command": "npx",
      "args": ["-y", "mcp-remote", "https://mcp.appwrite.io/"]
    }
  }
}
Restart Claude Desktop; the server appears under Local MCP servers and a browser window opens to authenticate.
Edit ~/.cursor/mcp.json (global) or .cursor/mcp.json (project).
{
  "mcpServers": {
    "appwrite": {
      "url": "https://mcp.appwrite.io/"
    }
  }
}
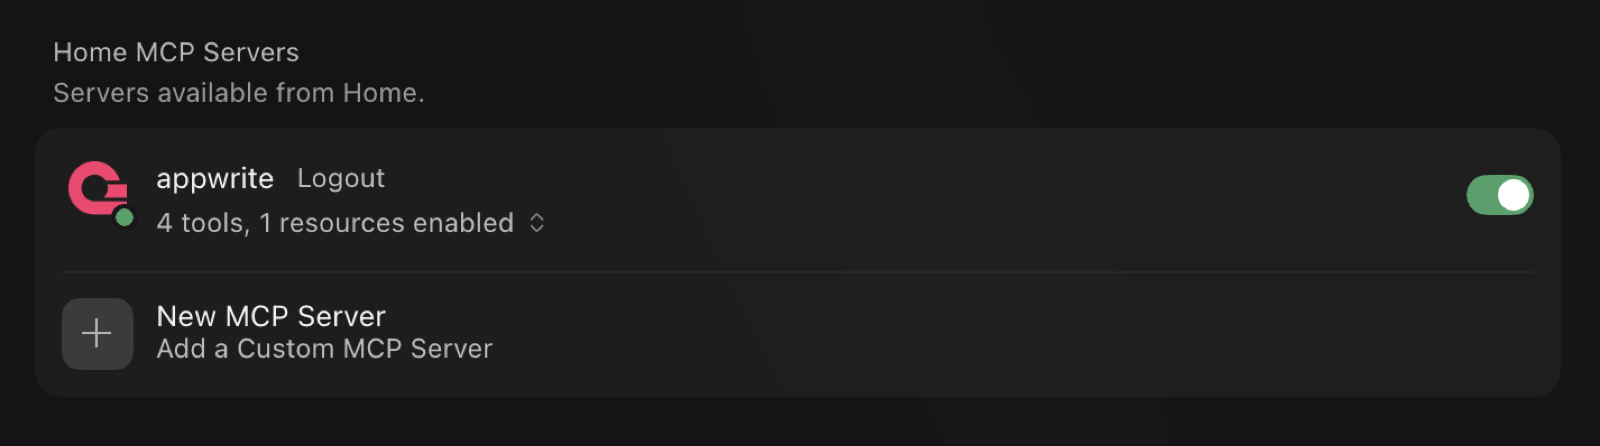
Cursor prompts you to log in through the browser; the server then shows up under Settings → MCP with its tools enabled.
Edit .vscode/mcp.json (workspace) or your user configuration via the Command
Palette → MCP: Open User Configuration.
{
  "servers": {
    "appwrite": {
      "type": "http",
      "url": "https://mcp.appwrite.io/"
    }
  }
}
Edit ~/.codex/config.toml.
[mcp_servers.appwrite]
url = "https://mcp.appwrite.io/"
Then authenticate from the terminal:
codex mcp login appwrite
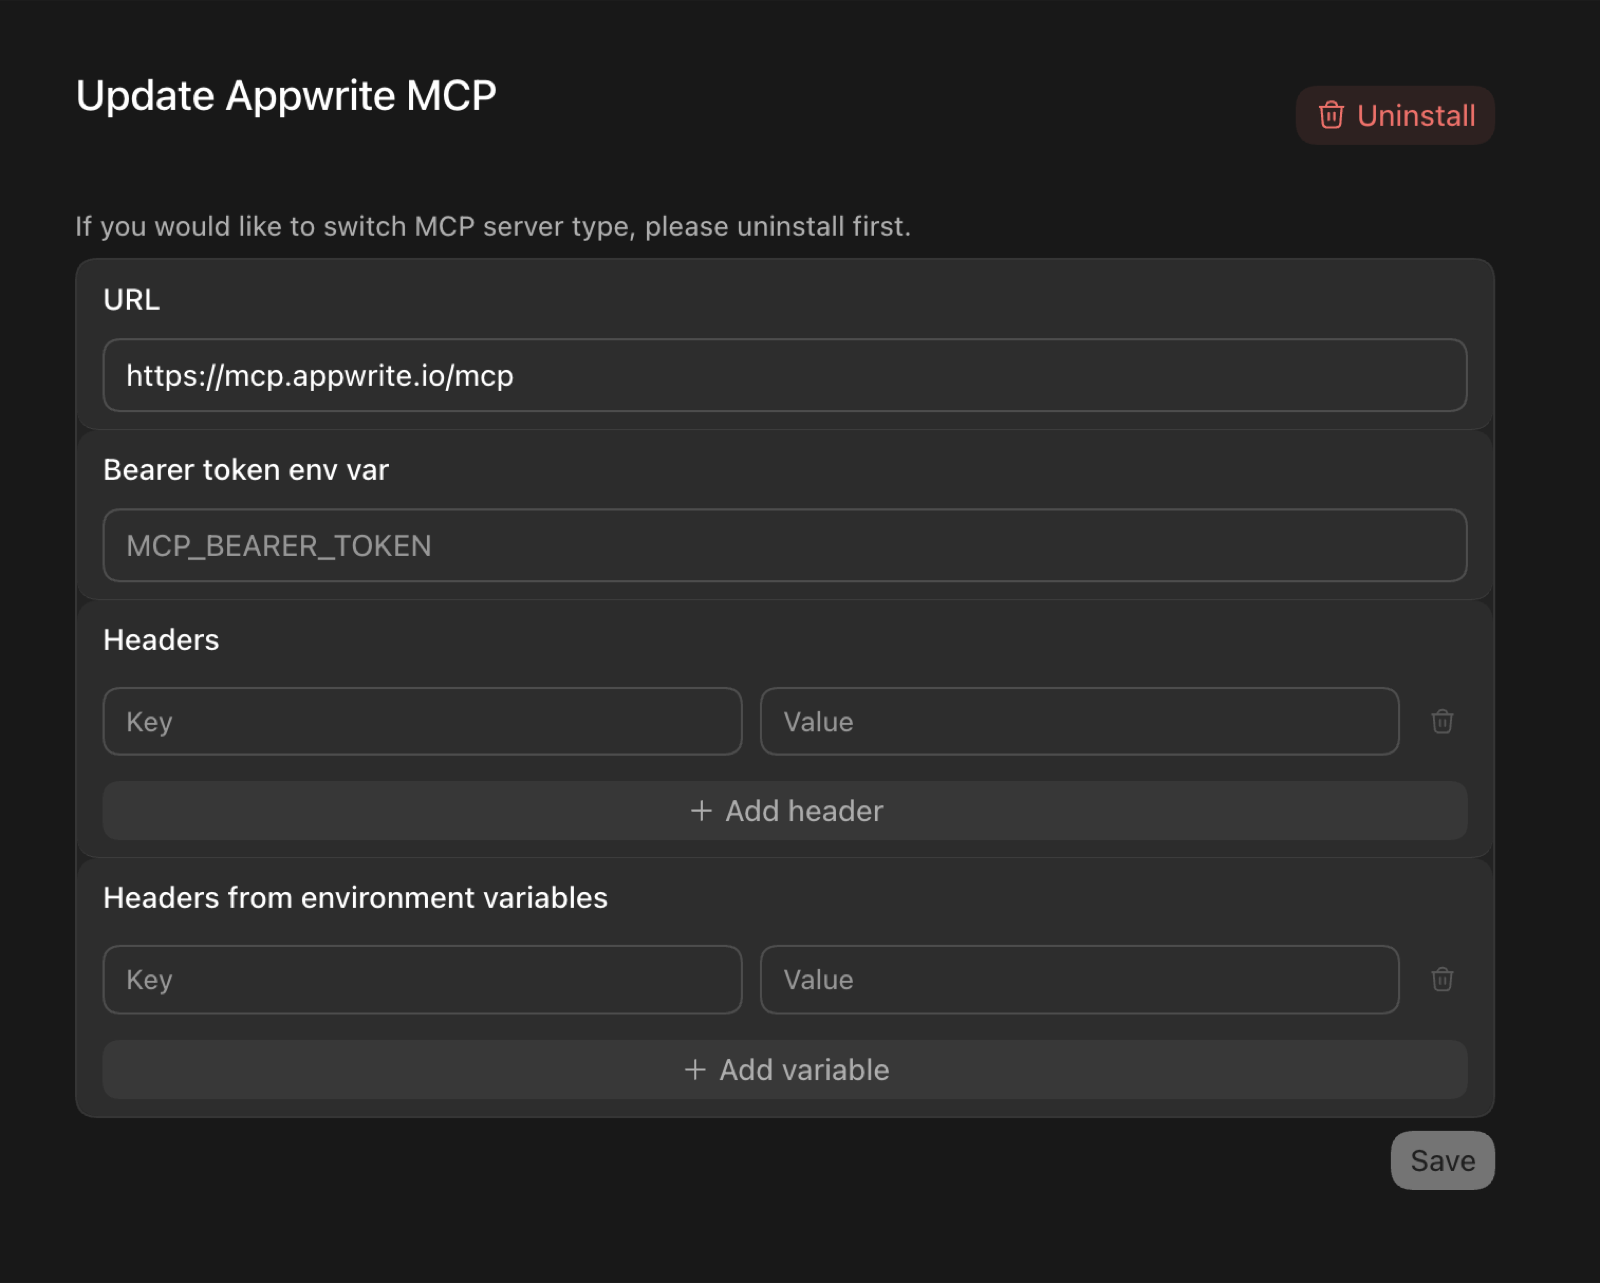
In the Codex GUI, you can instead add the server from the MCP settings —
set the URL to https://mcp.appwrite.io/ and leave the token and header
fields empty (authentication happens through the browser):
Edit opencode.json (project) or ~/.config/opencode/opencode.json (global).
{
  "$schema": "https://opencode.ai/config.json",
  "mcp": {
    "appwrite": {
      "type": "remote",
      "url": "https://mcp.appwrite.io/",
      "enabled": true
    }
  }
}
Edit ~/.codeium/windsurf/mcp_config.json.
{
  "mcpServers": {
    "appwrite": {
      "serverUrl": "https://mcp.appwrite.io/"
    }
  }
}
gemini mcp add --transport http appwrite https://mcp.appwrite.io/
Or edit ~/.gemini/settings.json (note the key is httpUrl, not url):
{
  "mcpServers": {
    "appwrite": {
      "httpUrl": "https://mcp.appwrite.io/"
    }
  }
}
Gemini CLI opens the browser OAuth flow automatically on first connect. To
re-authenticate, run /mcp auth appwrite inside a session.
Edit ~/.gemini/config/mcp_config.json (global) or .agents/mcp_config.json (project workspace).
{
  "mcpServers": {
    "appwrite": {
      "serverUrl": "https://mcp.appwrite.io/"
    }
  }
}
⚠️ Note: Antigravity strictly requires the
serverUrlkey for remote transport. Using legacy fields likeurlorhttpUrlwill cause tool registration to fail silently.
Antigravity opens the browser OAuth flow automatically on first connect. If you manually edit the JSON file, navigate to Settings → Customizations → Installed MCP Servers and click Refresh to reload the tool definitions.
copilot mcp add --transport http appwrite https://mcp.appwrite.io/
Or run /mcp add inside a session, or edit ~/.copilot/mcp-config.json:
{
  "mcpServers": {
    "appwrite": {
      "type": "http",
      "url": "https://mcp.appwrite.io/"
    }
  }
}
A browser window opens to authenticate on first connect. Check status with
/mcp.
Go to Settings → AI → MCP Servers → Add Server → Add Remote Server, or add
to your settings.json (zed: open settings):
{
  "context_servers": {
    "appwrite": {
      "url": "https://mcp.appwrite.io/"
    }
  }
}
Zed prompts you to authenticate through the browser on first connect.
Go to Settings → Agents → MCP servers → + Add, choose the URL-based
server type, and enter https://mcp.appwrite.io/.
Warp opens a browser window to authenticate on first connect.
JetBrains IDEs don't yet support OAuth for remote MCP servers, so bridge through stdio (requires Node.js). Go to Settings → Tools → AI Assistant → Model Context Protocol (MCP) → Add, switch to the JSON view, and paste:
{
  "mcpServers": {
    "appwrite": {
      "command": "npx",
      "args": ["-y", "mcp-remote", "https://mcp.appwrite.io/"]
    }
  }
}
A browser window opens to authenticate on first connect.
Cline doesn't yet support OAuth for remote MCP servers, so bridge through stdio (requires Node.js). In the Cline panel, open the MCP Servers icon → Configure tab → Configure MCP Servers, and add:
{
  "mcpServers": {
    "appwrite": {
      "command": "npx",
      "args": ["-y", "mcp-remote", "https://mcp.appwrite.io/"]
    }
  }
}
A browser window opens to authenticate on first connect.
Reasons and environments
Every write the agent makes carries a short reason (why it made the change).
Appwrite records it on the project's audit log, so you can review what your
agent changed, and why, in the project's Activity tab.
On Appwrite Cloud, the agent can act in a project's environments (for example
staging): appwrite_get_context lists them, and each call takes the
environment's ID as environment_id next to the project's project_id. See
Tool surface.
Self-hosted Appwrite
Running your own Appwrite instance? Run the MCP server locally over stdio and
authenticate with a project API key. See docs/self-hosted.md
for per-client setup.
Documentation
- Tool surface — the tools exposed to the model and the internal Appwrite catalog.
- How Cloud authentication works — the OAuth 2.1 flow.
- Documentation search — the in-process
appwrite_search_docstool and how to rebuild its index. - Events — MCP Events: webhook subscriptions to changes in your Appwrite project (in development, not available yet).
- Self-hosted Appwrite — run the server locally with a project API key.
- Local development — running, testing, and debugging the server locally.
- AGENTS.md — full contributor guide and pre-PR checklist.
License
This MCP server is licensed under the MIT License. See the LICENSE file for details.
Appwrite MCP soruları
Appwrite MCP'yi Claude Code'a nasıl eklerim?
Terminalinizde claude mcp add mcp-for-api -- uvx mcp-server-appwrite komutunu çalıştırın. Her projede kullanılabilir olması için --scope user ekleyin.
Appwrite MCP'yi Cursor'a nasıl eklerim?
~/.cursor/mcp.json dosyasını açın ve yukarıdaki yükleme bölümünde gösterilen Cursor yapılandırmasını kullanarak sunucuyu mcpServers altına ekleyin.
Appwrite MCP server ile nasıl kimlik doğrulaması yapabilirim?
Tarayıcınız üzerinden bir Appwrite onay ekranı aracılığıyla kimlik doğrulaması yaparsınız. Hosted sürüm için kopyalanacak bir anahtar bulunmamaktadır.
Bunu kendi sunucumda barındırdığım (self-hosted) bir Appwrite örneği ile kullanabilir miyim?
Evet, MCP server'ı yerel olarak stdio üzerinden çalıştırabilir ve bir proje API key kullanarak kimlik doğrulaması yapabilirsiniz.
AI agent tarafından yapılan değişiklikleri nasıl takip edebilirim?
Her yazma işlemi, Activity sekmesinden incelenmek üzere projenin Appwrite denetim günlüğüne (audit log) kaydedilen kısa bir neden içerir.