
AI 클라이언트가 이메일을 보내고, 공인 IP를 조회하며, 로컬 문서를 Markdown으로 변환할 수 있도록 지원합니다.
다른 이름 sendsoon/ai, @sendsoon/ai
- 스타
- 6
- Tools
- —
- 다운로드, 30일
- —
- 최신 버전
- 0.1.2
- 마지막 커밋
- 2026년 10월 12일
- 라이선스
- MIT
SendSoon MCP란?
SendSoon은(는) MCP server입니다. AI 클라이언트가 이메일을 보내고, 공인 IP를 조회하며, 로컬 문서를 Markdown으로 변환할 수 있도록 지원합니다.
프로젝트 README에서 생성된 요약
SendSoon MCP server 정보
SendSoon MCP는 Claude Desktop, Codex, WorkBuddy와 같은 AI 클라이언트가 외부 서비스와 상호작용할 수 있는 가교 역할을 합니다. 이 MCP server를 통해 에이전트는 이메일 발송, 공인 IP 정보 조회, 로컬 파일의 Markdown 형식 변환과 같은 특정 작업을 수행할 수 있습니다. 사용자는 필요한 command와 환경 변수를 JSON 또는 TOML 파일로 설정하여 기존 워크플로우에 이 서버를 통합할 수 있습니다.
일부 제한 사항을 해제하려면 SendSoon의 API key가 필요합니다. 익명 체험판을 사용할 수 있지만, 단일 공인 IP를 통해 하루에 3통의 무료 테스트 이메일만 발송할 수 있도록 제한됩니다. 모든 기능을 사용하려면 개발자는 SendSoon 웹사이트에서 key를 생성하여 설정에 추가해야 합니다. 이 서버는 npx를 사용하여 @sendsoon/mcp 패키지를 실행하므로 다양한 운영 체제에서 쉽게 배포할 수 있습니다.
활용 사례
- 1이메일 발송 자동화AI 에이전트에게 수신자와 제목을 지정하여 특정 메시지를 보내라고 요청합니다.
- 2네트워크 정보 조회특정 IP 주소와 관련된 위치 또는 서비스 제공업체에 대한 상세 정보를 요청합니다.
- 3문서 형식 변환AI에게 로컬 PDF 파일을 더 쉬운 처리를 위해 Markdown으로 변환하도록 지시합니다.
프로젝트의 README를 바탕으로 작성되었습니다. 모든 활용 사례는 해당 내용의 인용문과 대조하여 확인합니다.
SendSoon MCP 설치 방법
형식 확인: 2026년 11월 10일Cursor에 추가Goose에 추가Claude Code에 SendSoon MCP 설치
$ claude mcp add --env 'SENDSOON_EMAIL_RECIPIENT=<SENDSOON_EMAIL_RECIPIENT>' --env 'SENDSOON_API_KEY=<YOUR_SENDSOON_API_KEY>' ai -- npx -y @sendsoon/aiCursor에 SendSoon MCP 설치
~/.cursor/mcp.json
{
  "mcpServers": {
    "ai": {
      "command": "npx",
      "args": [
        "-y",
        "@sendsoon/ai"
      ],
      "env": {
        "SENDSOON_EMAIL_RECIPIENT": "<SENDSOON_EMAIL_RECIPIENT>",
        "SENDSOON_API_KEY": "<YOUR_SENDSOON_API_KEY>"
      }
    }
  }
}VS Code에 SendSoon MCP 설치
.vscode/mcp.json
{
  "servers": {
    "ai": {
      "type": "stdio",
      "command": "npx",
      "args": [
        "-y",
        "@sendsoon/ai"
      ],
      "env": {
        "SENDSOON_EMAIL_RECIPIENT": "<SENDSOON_EMAIL_RECIPIENT>",
        "SENDSOON_API_KEY": "<YOUR_SENDSOON_API_KEY>"
      }
    }
  }
}VS Code CLI에 SendSoon MCP 설치
$ code --add-mcp '{"name":"ai","type":"stdio","command":"npx","args":["-y","@sendsoon/ai"],"env":{"SENDSOON_EMAIL_RECIPIENT":"<SENDSOON_EMAIL_RECIPIENT>","SENDSOON_API_KEY":"<YOUR_SENDSOON_API_KEY>"}}'Claude Desktop에 SendSoon MCP 설치
claude_desktop_config.json
{
  "mcpServers": {
    "ai": {
      "command": "npx",
      "args": [
        "-y",
        "@sendsoon/ai"
      ],
      "env": {
        "SENDSOON_EMAIL_RECIPIENT": "<SENDSOON_EMAIL_RECIPIENT>",
        "SENDSOON_API_KEY": "<YOUR_SENDSOON_API_KEY>"
      }
    }
  }
}Codex에 SendSoon MCP 설치
$ codex mcp add ai --env 'SENDSOON_EMAIL_RECIPIENT=<SENDSOON_EMAIL_RECIPIENT>' --env 'SENDSOON_API_KEY=<YOUR_SENDSOON_API_KEY>' -- npx -y @sendsoon/aiCodex config.toml에 SendSoon MCP 설치
~/.codex/config.toml
[mcp_servers.ai]
command = "npx"
args = ["-y", "@sendsoon/ai"]

[mcp_servers.ai.env]
SENDSOON_EMAIL_RECIPIENT = "<SENDSOON_EMAIL_RECIPIENT>"
SENDSOON_API_KEY = "<YOUR_SENDSOON_API_KEY>"
Gemini CLI에 SendSoon MCP 설치
$ gemini mcp add -s user -e 'SENDSOON_EMAIL_RECIPIENT=<SENDSOON_EMAIL_RECIPIENT>' -e 'SENDSOON_API_KEY=<YOUR_SENDSOON_API_KEY>' ai npx -- -y @sendsoon/aiGemini settings.json에 SendSoon MCP 설치
~/.gemini/settings.json
{
  "mcpServers": {
    "ai": {
      "command": "npx",
      "args": [
        "-y",
        "@sendsoon/ai"
      ],
      "env": {
        "SENDSOON_EMAIL_RECIPIENT": "<SENDSOON_EMAIL_RECIPIENT>",
        "SENDSOON_API_KEY": "<YOUR_SENDSOON_API_KEY>"
      }
    }
  }
}구성
SENDSOON_EMAIL_RECIPIENT필수Recipient address allowed for test sends.
SENDSOON_API_KEY비밀SendSoon API Key (ssk_live_...). Leave empty for the anonymous trial of three sends per public IP per day.
SENDSOON_API_BASE_URLOverride the SendSoon API base URL. Defaults to https://www.sendsoonai.com.
| 이름 | 설명 | 유형 |
|---|---|---|
| SENDSOON_EMAIL_RECIPIENT | Recipient address allowed for test sends. | 필수 |
| SENDSOON_API_KEY | SendSoon API Key (ssk_live_...). Leave empty for the anonymous trial of three sends per public IP per day. | 비밀 |
| SENDSOON_API_BASE_URL | Override the SendSoon API base URL. Defaults to https://www.sendsoonai.com. |
자동 검사
2026년 11월 14일에 실행됨전체 보고서 →자동 검사를 통과했습니다. 이는 보안 감사가 아닙니다. 코드를 직접 읽고 서버에 필요한 최소한의 권한만 부여하십시오. 검사 방식

- 소스 저장소 연결 및 접근 가능sendsoon/ai is public and reachablegithub.com/sendsoon/ai ↗통과
- 패키지가 이 저장소를 소스로 명시@sendsoon/ai names sendsoon/ai as sourcenpmjs.com/package/@sendsoon/ai ↗통과
- 빌드 출처(Sigstore 증명)No build attestation published for this release검사되지 않음
- 오픈 소스 라이선스 (OSI)MITspdx.org/licenses/MIT.html ↗통과
- 최근 1년 내 커밋 또는 릴리스Last commit or release 2026-10-12github.com/sendsoon/ai ↗통과
- OpenSSF Scorecard검사되지 않음
- 패키지 이름이 인기 패키지와 유사하지 않음No popular package one edit away from @sendsoon/ai통과
- 패키지 및 해당 종속성에 중요한 보안 권고 없음99 resolved dependencies checked; no critical advisoryosv.dev ↗통과
- 모델에 대한 숨겨진 지침 없음0 tool descriptions and the README read; no override phrases, credential paths or hidden characters통과
- 파괴적인 도구에 라벨 표시됨검사되지 않음
- 원격 엔드포인트가 MCP 핸드셰이크에 응답검사되지 않음
README
GitHub에서 보기SendSoon AI MCP
SendSoon MCP is a Model Context Protocol (MCP) server that lets Codex, Claude, and WorkBuddy use SendSoon capabilities: send email, look up public IPs, and convert local documents to Markdown.
Configure it once, then describe tasks in natural language. You usually do not need to mention SendSoon in every prompt.
What you can do
| Tool | Purpose | Example |
|---|---|---|
send_email |
Send a single email | “Send me a test email” |
ip_lookup |
Look up public IP information | “Look up the location of 8.8.8.8” |
markitdown_convert |
Convert a local document to Markdown | “Convert this PDF to Markdown” |
Everyday examples
Send an email to user@example.com with the subject “Meeting reminder” and the body “The meeting starts at 3 PM today.”
Look up the location and ISP for 8.8.8.8.
Convert /path/to/report.pdf to Markdown and summarize the key points.
If the agent does not select a tool automatically, say:
Use the sendsoon MCP to complete this task.
Install in your AI client
The instructions below cover Codex, Claude Desktop, and WorkBuddy.
Codex
Config file: user-level ~/.codex/config.toml (macOS / Linux) or %USERPROFILE%\.codex\config.toml (Windows).
[mcp_servers.sendsoon]
command = "npx"
args = ["-y", "@sendsoon/mcp"]

[mcp_servers.sendsoon.env]
SENDSOON_API_KEY = ""
Verify: Save the file, restart Codex, and run /mcp in a chat. You should see sendsoon connected. In the desktop app, also check Settings > MCP servers.
First use: Start a new conversation and ask for a simple task (e.g. “Look up 8.8.8.8”). Approve the tool if Codex asks for permission.
Claude Desktop
Config file:
| OS | Path |
|---|---|
| macOS | ~/Library/Application Support/Claude/claude_desktop_config.json |
| Windows | %APPDATA%\Claude\claude_desktop_config.json |
You can also open Settings > Developer > Edit Config inside Claude Desktop.
{
  "mcpServers": {
    "sendsoon": {
      "command": "npx",
      "args": ["-y", "@sendsoon/mcp"],
      "env": {
        "SENDSOON_API_KEY": ""
      }
    }
  }
}
Verify: Save the file, fully quit Claude Desktop (including the system tray), then relaunch. Start a new chat and confirm sendsoon tools appear in the tools menu or settings.
First use: Claude may ask to approve tool access on the first invocation; allow it to continue.
WorkBuddy
WorkBuddy can add SendSoon by pasting the connector JSON directly in MCP Server Management.
Config file: %USERPROFILE%\.workbuddy-ai\mcp.json (Windows) or ~/.workbuddy-ai/mcp.json (macOS / Linux).
- Open WorkBuddy and go to MCP Server Management.
- Click Add MCP.
- Paste the JSON below into the editor. Fill in
SENDSOON_API_KEYif you have a Key; leave it empty for the anonymous trial. - Click Save.
{
  "mcpServers": {
    "sendsoon": {
      "command": "npx",
      "args": [
        "-y",
        "@sendsoon/mcp"
      ],
      "env": {
        "SENDSOON_API_KEY": ""
      }
    }
  }
}
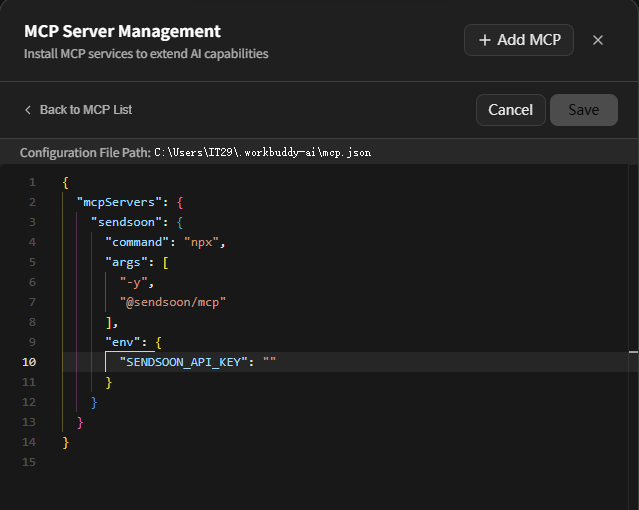
The screenshot shows the WorkBuddy connector editor: the configuration file path is at the top, and the sendsoon JSON is pasted into the editor. After saving, return to the MCP list and confirm sendsoon is connected.
Verify: Start a new conversation and ask for a simple task (e.g. “Look up 8.8.8.8”). Approve the tool if WorkBuddy asks for permission.
Prepare the configuration
Optional environment variable:
| Setting | Required | What to enter |
|---|---|---|
SENDSOON_API_KEY |
No | Leave empty for an unregistered trial. One public IP can send up to three free test emails per day. Enter your generated Key for continued use |
Never commit a real Key to Git or share it with anyone.
Get an API Key
- Sign up or sign in on the SendSoon registration page.
- Open Profile and generate a Key in the API Key section.
- Copy the one-time
ssk_live_...Key immediately and enter it asSENDSOON_API_KEYin your MCP configuration. - Save the configuration and restart your MCP client. Requests with a valid Key do not use the anonymous IP daily quota.
If the anonymous quota is exhausted, send_email will tell you to register and configure a Key. An invalid or revoked Key is rejected and does not fall back to the anonymous quota.
Try it in Google Colab
Skip local setup and try ip_lookup, markitdown_convert, and send_email in the browser.

The notebook calls the same SendSoon HTTP APIs used by these MCP tools.
Visual local testing (MCP Inspector)
To see all three tools in a browser and click through them manually before installing into an AI client, use the MCP Inspector.
Requires Node.js 20+. Run the command below in a terminal; Inspector opens a web UI automatically:
npx @modelcontextprotocol/inspector npx -y @sendsoon/mcp
How to test
- Wait for
MCP Inspector Web is up and runningin the terminal. If the browser does not open, paste thehttp://127.0.0.1:6274?...URL from the terminal. - Confirm the page header shows Connected.
- Open the Tools tab in the top-right area of the page.
- Select a tool from the list on the left, fill in the parameters, and click Execute Tool.
- Read the response in the Results panel on the right. On failure, inspect
error.codeanderror.message.
License
See LICENSE.
SendSoon MCP 질문
SendSoon MCP를 Claude Code에 추가하려면 어떻게 하나요?
터미널에서 claude mcp add --env 'SENDSOON_EMAIL_RECIPIENT=<SENDSOON_EMAIL_RECIPIENT>' --env 'SENDSOON_API_KEY=<YOUR_SENDSOON_API_KEY>' ai -- npx -y @sendsoon/ai를 실행합니다. 모든 프로젝트에서 사용할 수 있게 하려면 --scope user를 추가합니다.
SendSoon MCP를 Cursor에 추가하려면 어떻게 하나요?
~/.cursor/mcp.json를 열고 mcpServers 아래에 서버를 추가합니다. 위 설치 섹션에 표시된 Cursor 구성을 사용합니다.
SendSoon을 사용하려면 API key가 필요한가요?
아니요, 등록되지 않은 체험판의 경우 API key는 선택 사항입니다. 익명 체험판을 통해 단일 공인 IP당 하루 최대 3통의 무료 테스트 이메일을 보낼 수 있습니다.
설치하기 전에 브라우저에서 도구를 테스트할 수 있나요?
MCP Inspector를 사용하면 브라우저에서 세 가지 도구를 모두 확인하고 수동으로 실행할 수 있습니다.