
개발 서버를 실행하지 않고도 소스 코드에서 React, Next.js, Vue, Svelte 컴포넌트를 직접 렌더링하여 미리 보고 검사할 수 있습니다.
다른 이름 DarkWorldCoder/arguseye, @ayushniroula/arguseye
- 스타
- 7
- Tools
- —
- 다운로드, 30일
- 3,116
- 최신 버전
- —
- 마지막 커밋
- 2026년 11월 10일
- 라이선스
- MIT
arguseye MCP란?
arguseye은(는) MCP server입니다. 개발 서버를 실행하지 않고도 소스 코드에서 React, Next.js, Vue, Svelte 컴포넌트를 직접 렌더링하여 미리 보고 검사할 수 있습니다.
프로젝트 README에서 생성된 요약
arguseye MCP server 정보
코딩 에이전트가 소스 코드에서 렌더링된 컴포넌트를 직접 검사함으로써 코드 변경에 따른 시각적 결과를 확인할 수 있습니다. Arguseye는 실행 중인 개발 서버나 수동 스토리 생성 없이도 AI 클라이언트가 React, Next.js, Vue, Svelte, Preact, Solid 컴포넌트를 미리 볼 수 있는 방법을 제공합니다. 기존 프로젝트 의존성, 발견된 사용 props, 레이아웃 컨텍스트를 활용하여 컴포넌트의 시각적 표현을 생성합니다.
개발자는 이 도구를 Claude Code, Cursor, Windsurf, Gemini, VS Code를 포함한 다양한 클라이언트에 통합할 수 있습니다. 설정은 간단한 CLI 설치를 통해 이루어지며, 선택한 에이전트에 맞는 특정 MCP 설정을 구성합니다. 렌더링을 수행하려면 Node.js 22 이상과 Google Chrome 같은 Chromium 기반 브라우저가 필요합니다.
각 렌더링 작업은 접근성 텍스트 및 구조화된 증거와 함께 크롭된 PNG 이미지를 생성합니다. 이 증거 데이터에는 경고, 에러, 해결되지 않은 입력값이 포함되어 있어, 에이전트가 컴포넌트가 왜 잘못 보이거나 동작하는지 정확히 이해할 수 있도록 돕습니다. 또한 특정 DOM 노드에 대한 집중 검사와 시각적 편집을 검증하기 위한 저장된 베이스라인 대비 픽셀 기반 디프(diffing) 기능도 지원합니다.
활용 사례
- 1시각적 컴포넌트 편집 검증에이전트가 수정된 컴포넌트를 저장된 베이스라인과 비교하여 픽셀 차이 및 접근성 변경 사항을 확인할 수 있습니다.
- 2특정 DOM 요소 검사개발자가 에이전트에게 특정 헤딩이나 버튼을 확인하도록 지시하여 해당 요소의 속성과 글꼴을 점검할 수 있습니다.
- 3네이티브 템플릿 미리 보기명시적인 JSON 컨텍스트를 사용하여 Jinja2, Handlebars, LiquidJS와 같은 엔진으로 구축된 컴포넌트를 미리 볼 수 있습니다.
- 4컴포넌트 렌더링 에러 디버깅컴포넌트 렌더링 과정에서 발생하는 경고 및 에러에 대한 구조화된 데이터를 제공합니다.
프로젝트의 README를 바탕으로 작성되었습니다. 모든 활용 사례는 해당 내용의 인용문과 대조하여 확인합니다.
arguseye MCP 설치 방법
형식 확인: 2026년 11월 10일Cursor에 추가Goose에 추가Claude Code에 arguseye MCP 설치
$ claude mcp add arguseye -- npx -y @ayushniroula/arguseyeCursor에 arguseye MCP 설치
~/.cursor/mcp.json
{
  "mcpServers": {
    "arguseye": {
      "command": "npx",
      "args": [
        "-y",
        "@ayushniroula/arguseye"
      ]
    }
  }
}VS Code에 arguseye MCP 설치
.vscode/mcp.json
{
  "servers": {
    "arguseye": {
      "type": "stdio",
      "command": "npx",
      "args": [
        "-y",
        "@ayushniroula/arguseye"
      ]
    }
  }
}VS Code CLI에 arguseye MCP 설치
$ code --add-mcp '{"name":"arguseye","type":"stdio","command":"npx","args":["-y","@ayushniroula/arguseye"]}'Claude Desktop에 arguseye MCP 설치
claude_desktop_config.json
{
  "mcpServers": {
    "arguseye": {
      "command": "npx",
      "args": [
        "-y",
        "@ayushniroula/arguseye"
      ]
    }
  }
}Codex에 arguseye MCP 설치
$ codex mcp add arguseye -- npx -y @ayushniroula/arguseyeCodex config.toml에 arguseye MCP 설치
~/.codex/config.toml
[mcp_servers.arguseye]
command = "npx"
args = ["-y", "@ayushniroula/arguseye"]
Gemini CLI에 arguseye MCP 설치
$ gemini mcp add -s user arguseye npx -- -y @ayushniroula/arguseyeGemini settings.json에 arguseye MCP 설치
~/.gemini/settings.json
{
  "mcpServers": {
    "arguseye": {
      "command": "npx",
      "args": [
        "-y",
        "@ayushniroula/arguseye"
      ]
    }
  }
}자동 검사
2026년 11월 13일에 실행됨전체 보고서 →자동 검사를 통과했습니다. 이는 보안 감사가 아닙니다. 코드를 직접 읽고 서버에 필요한 최소한의 권한만 부여하십시오. 검사 방식

- 소스 저장소 연결 및 접근 가능통과
- 오픈 소스 라이선스 (OSI)통과
- 최근 1년 내 커밋 또는 릴리스통과
- 패키지 이름이 인기 패키지와 유사하지 않음통과
- 원격 엔드포인트가 HTTPS 사용검사되지 않음
- 파괴적인 도구에 라벨 표시됨검사되지 않음
- 모델에 대한 숨겨진 지침 없음통과
- 패키지 및 해당 종속성에 중요한 보안 권고 없음검사되지 않음
README
GitHub에서 보기Arguseye — component previews for agents and VS Code
See your component. Change it. Inspect the consequences.
Watch the 58-second film · Claude Code setup guide · Agent setup and downloadable skill · VS Code extension
Arguseye gives coding agents eyes on real React (React Router and Remix included), Next.js, Vue 3 and Nuxt, Svelte 5 and SvelteKit, Preact and Solid components, without starting your app or writing stories. It uses your source, installed packages, discovered usage props, and supported layout context. Each render returns a cropped PNG, accessibility text, and structured evidence—including unresolved inputs, warnings, and errors.
npx @ayushniroula/arguseye install claude
Requires Node.js 22+, installed project dependencies, and Chromium or Google Chrome. Run this in your project, then restart your agent. Replace claude with codex, cursor, gemini, windsurf, vscode, antigravity, or copilot.
If Arguseye saves you a dev-server restart, a star helps other developers find it.
In development
Version 0.0.21 fixes Smarty compilation across clock boundaries and supports project-owned Smarty configuration, including unsaved helper and partial edits. See the native template setup contract.
Version 0.0.20 adds focused DOM/source/font inspection, portal-root font fixes, capture-environment compatibility checks and faster byte-identical image comparisons. It retains 0.0.19’s real progress, recovery diagnostics, audit completeness and opt-in scroll capture. See the rendering contracts and limits.
Focused inspection and baseline compatibility (0.0.20+)
Inspect a specific heading or button with inspection: {selector: "h2", fonts: true, sources: true} in MCP, or shot app/page.tsx --inspect-selector 'h2' --fonts --sources --json in the CLI. Results cover up to 100 matching nodes inside the captured component, including targets after the first 100 page nodes. Missing targets keep the PNG and report incomplete inspection. Shadow trees and iframe documents remain excluded; accessibility checks retain the full captured scope.
Saved captures record the browser version, platform/architecture, OS release, pixel ratio and Arguseye version. Comparisons expose environmentChanges and stay incomplete across changed identities or legacy baselines without this metadata. Capture a fresh baseline in the current environment. Font, GPU and external-resource differences are not fully fingerprinted.
Native template previews
Preview Django, Jinja2, Handlebars, Mustache, EJS, Pug, Nunjucks, LiquidJS and other native Node/Python/PHP/Ruby templates with explicit JSON context and your own installed engines. Right-click a template in VS Code, select Preview Component, choose its engine/data profile and compare unsaved edits against a baseline. No app server or stories are needed.
Native template previews require 0.0.16 or later. See the engine matrix, configuration and native-adapter protocol for exact scopes and limits. “All engines” means an extensible native bridge, not a claim that every framework runs automatically.
Choose your setup
Expand your client for a copyable recipe. These controls work directly on GitHub; the website has the live demo and installation tabs.
npx @ayushniroula/arguseye install claude
Writes the project's .mcp.json and the skill in ~/.claude/skills/arguseye. Restart Claude Code, then ask it to preview the component you are editing.
npx @ayushniroula/arguseye install codex --project /path/to/app
Adds the MCP entry to ~/.codex/config.toml and the skill to ~/.agents/skills/arguseye. Restart Codex to load them.
Choose one command:
npx @ayushniroula/arguseye install cursor
npx @ayushniroula/arguseye install windsurf
npx @ayushniroula/arguseye install gemini
npx @ayushniroula/arguseye install antigravity
The installer merges into the chosen client's existing configuration. See the installation guide for the exact file locations and verification status of each client.
For the visual editor panel, install Arguseye from the VS Code Marketplace and run Preview Component on a .tsx, .jsx, .vue, or .svelte file.
For Copilot's MCP tools:
npx @ayushniroula/arguseye install vscode
This writes .vscode/mcp.json. The visual extension and MCP server are two views of the same rendering engine.
# Inspect a component without MCP.
npx @ayushniroula/arguseye shot src/Card.tsx --export Card --out card.png --json

# Print MCP configuration without changing files.
npx @ayushniroula/arguseye install print

# Preview exactly what an installer would change.
npx @ayushniroula/arguseye install codex --project /path/to/app --dry-run
Requirements: Node.js 22+, installed project dependencies, and a Playwright-compatible Chromium browser or Google Chrome. If no browser is available, install one with npx playwright install chromium. Vue projects also need their own vue/compiler-sfc.
The bundled skill teaches agents when to render, how to interpret evidence, and how to fall back to the CLI. All installation options →
Verify an edit
Capture the component, edit its source, then compare against the saved baseline. The export, resolved props, and viewport stay fixed for the comparison.
Render
src/Card.tsxusing its real usage props and save the capture ID. After my edit, compare against that baseline. Show the before, after, and pixel diff; report accessibility changes, new errors, and any incomplete context.
The agent uses render_component followed by render_diff({ baselineId }). MCP sessions retain the latest 64 captures; expired IDs require a new baseline.
npx @ayushniroula/arguseye shot src/Card.tsx --export Card \
  --capture-dir .arguseye/baseline --out .arguseye/before.png --json

# Edit src/Card.tsx, then compare its current source.
npx @ayushniroula/arguseye diff --baseline .arguseye/baseline \
  --out .arguseye/comparison --json
The comparison directory contains before, after, and highlighted diff images plus JSON evidence. CLI captures persist in the directory you choose.
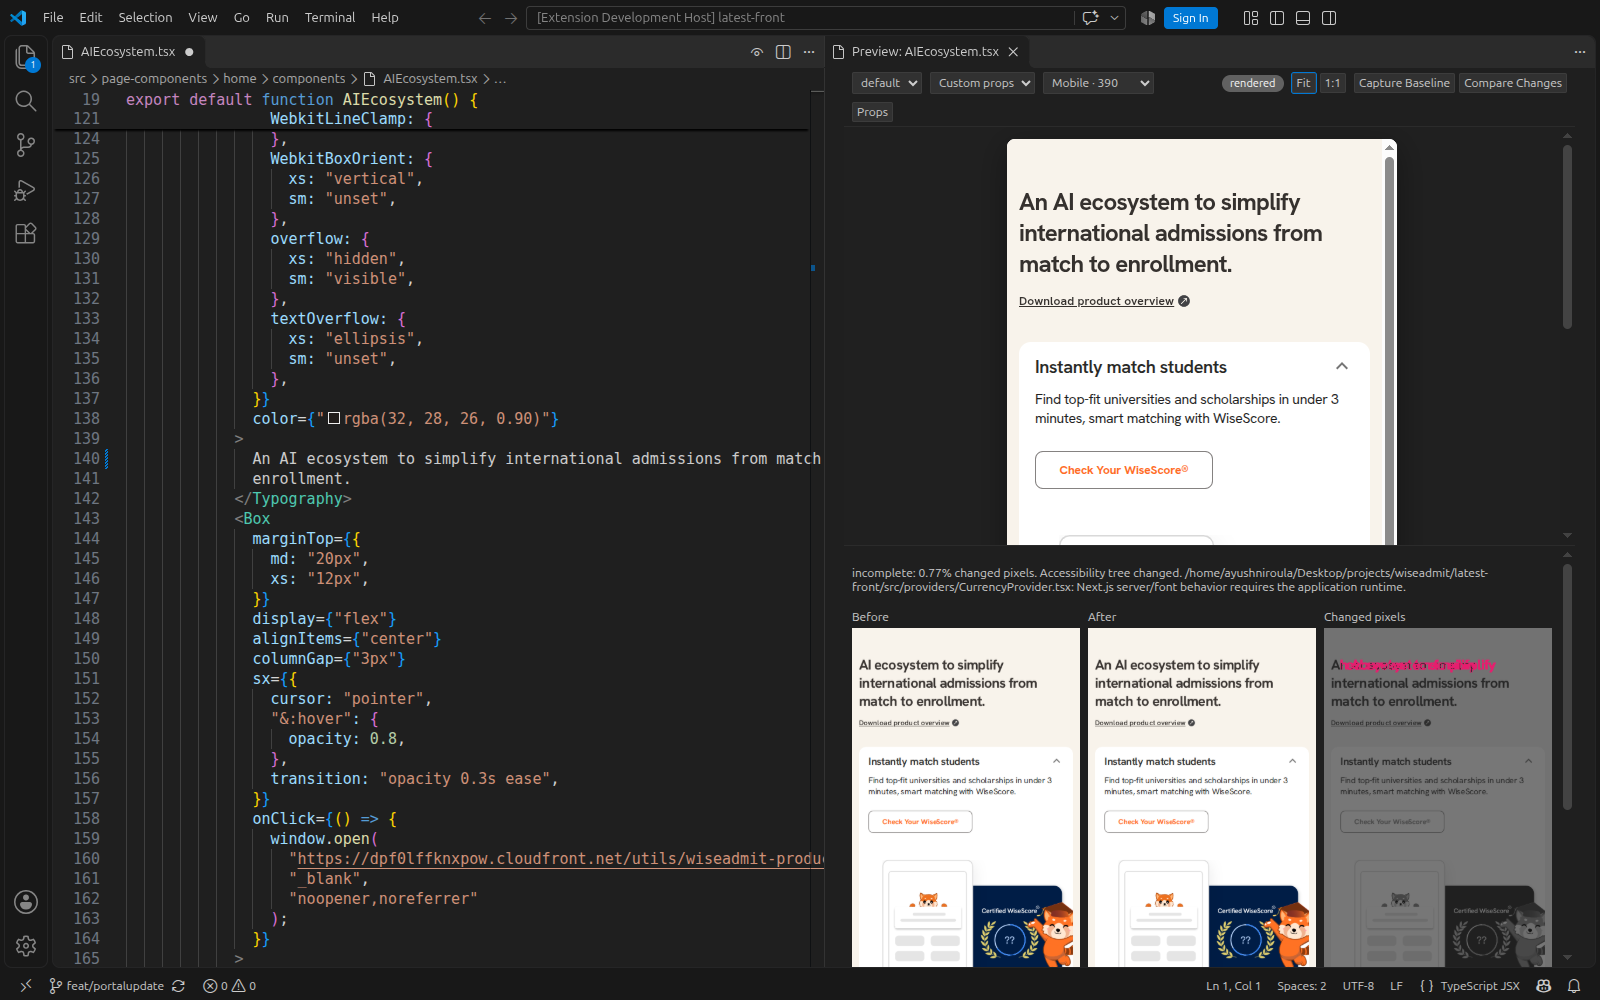
A real result. On the demo app in this repository, the edit made a boarding pass's gate, seat and boarding values bigger (text-lg to text-3xl). The diff reported changed: 3.83% changed pixels and marked two areas: the bigger values, which were asked for, and the tear line and barcode, which moved down 8 px because the card grew from 338 to 346 px.
Results are unchanged, changed, or incomplete. A visual difference is evidence for review; it does not establish correctness. Runtime props, missing providers, unsupported framework behavior, and assets that did not settle remain visible in warnings and unresolved inputs.
Why an agent needs eyes
A source diff cannot show clipped text, missing padding, or a theme that failed to apply. Arguseye lets the agent inspect rendered output close to the component it changed.
| Task | Arguseye returns |
|---|---|
| Inspect a component | Cropped PNG, accessibility tree, errors, warnings, and timings |
| Reuse real inputs | Discovered literal props, with runtime expressions reported as unresolved |
| Inspect an edit | Pixel differences, dimension changes, accessibility changes, and new/resolved errors |
| Check other usages | Paginated isolated renders, up to 12 per batch, with individual capture IDs |
| Reproduce a state | Component actions, storage inputs, usage ancestors, or a stand-in parent frame |
| Work in the editor | Unsaved-buffer previews, viewport presets, a light/dark toggle, props controls, and baseline comparison |
These are isolated component renders using discovered props, not full-page integration tests. Browser automation and stories remain useful for complete application journeys and explicitly curated states.
What it looks like
A real Next.js 14 app (MUI, Emotion, Redux, next-auth, 1,197 files), rendered from source with no server running, inside the app's own theme and nested layouts:
Tools (MCP server arguseye)
If a preview cannot start, call inspect_project {} or run npx @ayushniroula/arguseye doctor --root . --json. It reports the selected application directory, installed framework versions and recovery steps without starting Chromium or executing project configuration. The native compiler reads supported Vite settings statically; it does not run arbitrary Vite plugins. A successful isolated render still requires reviewing warnings and unresolved inputs.
Project inspection and explicit setup require 0.0.14 or later; older 0.0.12 installations do not expose them.
Version 0.0.14 also adds opt-in project Vite plugins, replayable browser/network fixtures, cancellation and bounded sessions, resumable audits, optional accessibility/source inspection, Svelte context setup, and an independent HTML/Web Components adapter. See the rendering contracts, setup guide and capability/validation matrix.
For context that cannot be inferred, supply an explicit provider or Vue setup. Render evidence identifies the setup file; its code uses your project's packages and executes only during previewing.
| Tool | What the agent gets back |
|---|---|
inspect_project {} |
Selected project root, installed framework versions, explicit setup paths and recovery diagnostics; available before browser startup. |
render_component {file, export?, usage?, props?, viewport?, theme?, in_context?, frame?, actions?, storage?} |
PNG cropped to the component, accessibility tree, errors[], warnings[], timings, changes since the previous render of the same target. usage takes the props of a real call site; in_context renders inside that call site's parent elements; frame is a stand-in parent box; actions and storage set the state first; theme forces light or dark (the dark class on <html>, color-scheme and prefers-color-scheme). Function props: {"$fn": "(x) => …"}. |
list_usages {file, export?} |
Every call site with its literal props, the props that depend on runtime values, and the JSX ancestors. |
render_usages {file, export?, viewport?, theme?, cursor?, limit?, output?} |
Paginated isolated call-site renders, up to 12 per batch, with per-usage evidence and capture IDs. |
describe_props {file, export?} |
The props schema from the TypeScript type, with sample values. |
render_diff {baselineId, output?} |
Before, after, highlighted pixel differences, accessibility changes, errors, and completeness against a captureId. |
CLI for agents without MCP: npx @ayushniroula/arguseye shot src/Card.tsx --export Card --usage app/page.tsx:12 --in-context --out card.png, npx @ayushniroula/arguseye usages …, npx @ayushniroula/arguseye serve … (live page with hot reload).
VS Code
Open a .tsx, .jsx or .vue file and run Preview Component (the eye icon in the editor title, or Ctrl+Alt+P). The panel shows the component with the props from its first real usage, follows the file you edit, updates unsaved edits while preserving state during ordinary React refreshes and Vue template/style edits, scales the preview to fit (or 1:1), and has a props form built from the component's type. Install it from the Marketplace (id ayushniroula.arguseye, Linux, macOS and Windows builds), or grab the VSIX from the releases for Cursor, Windsurf and VSCodium.
Build targets: Linux x64, Windows x64, and macOS Apple Silicon. The following screenshots were captured in the real extension host on Linux, using existing production components from WiseAdmit and CSCA.ai.
WiseAdmit — desktop and mobile. The same existing AIEcosystem.tsx component uses its own responsive layout and assets.
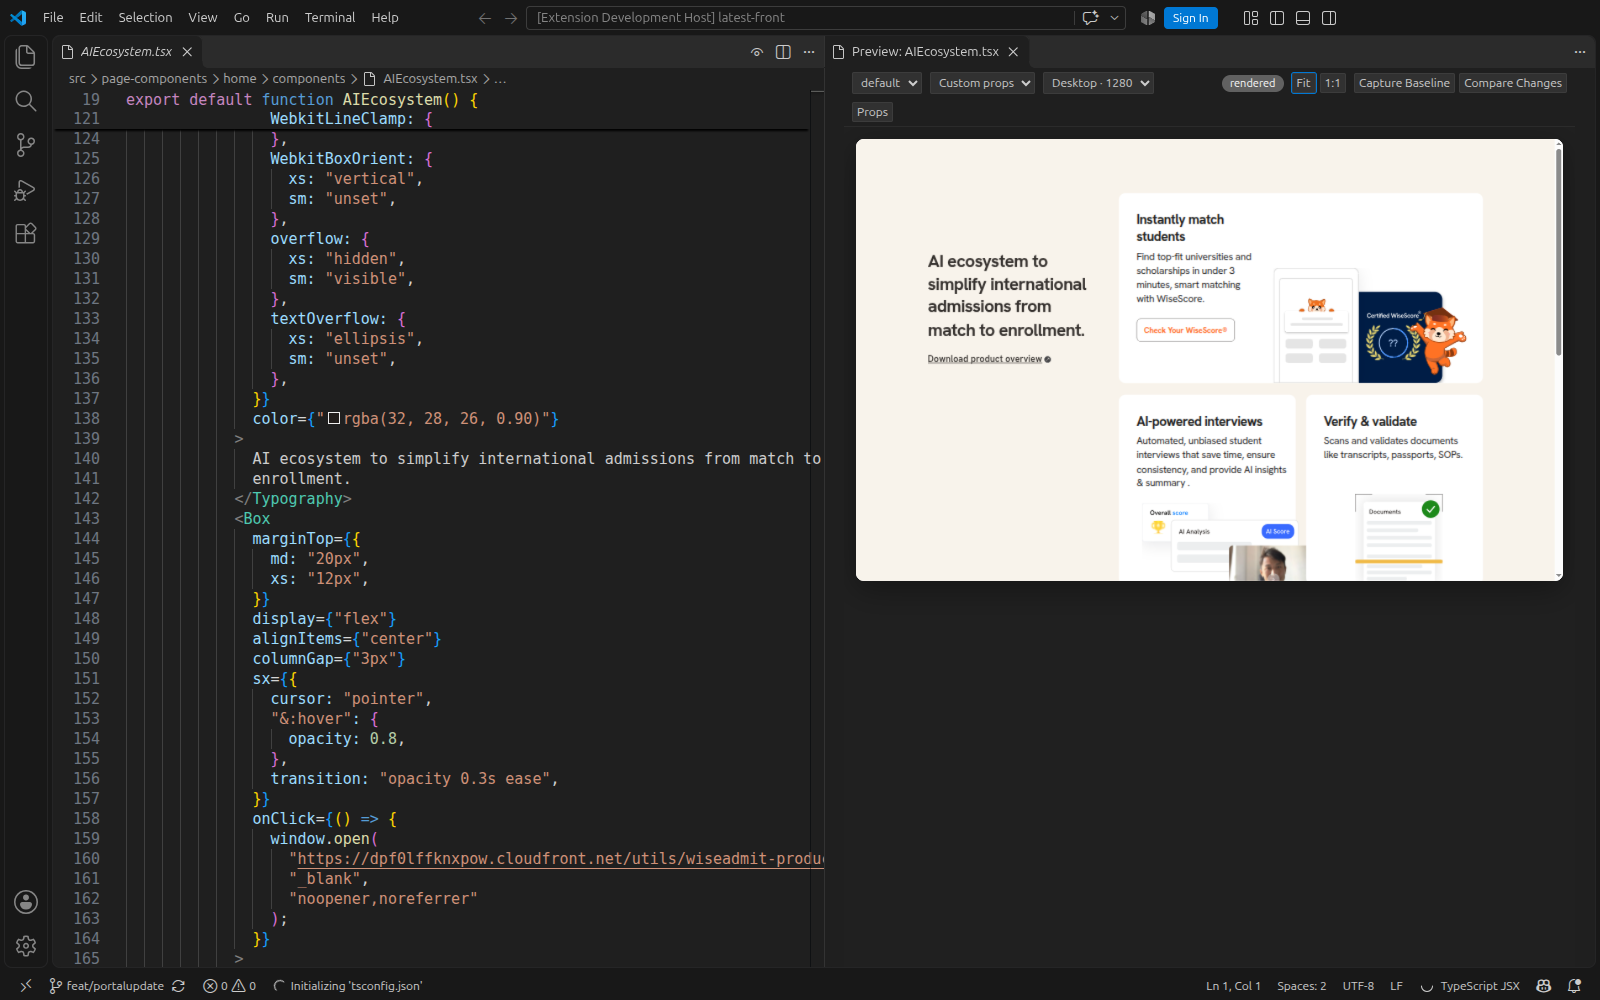
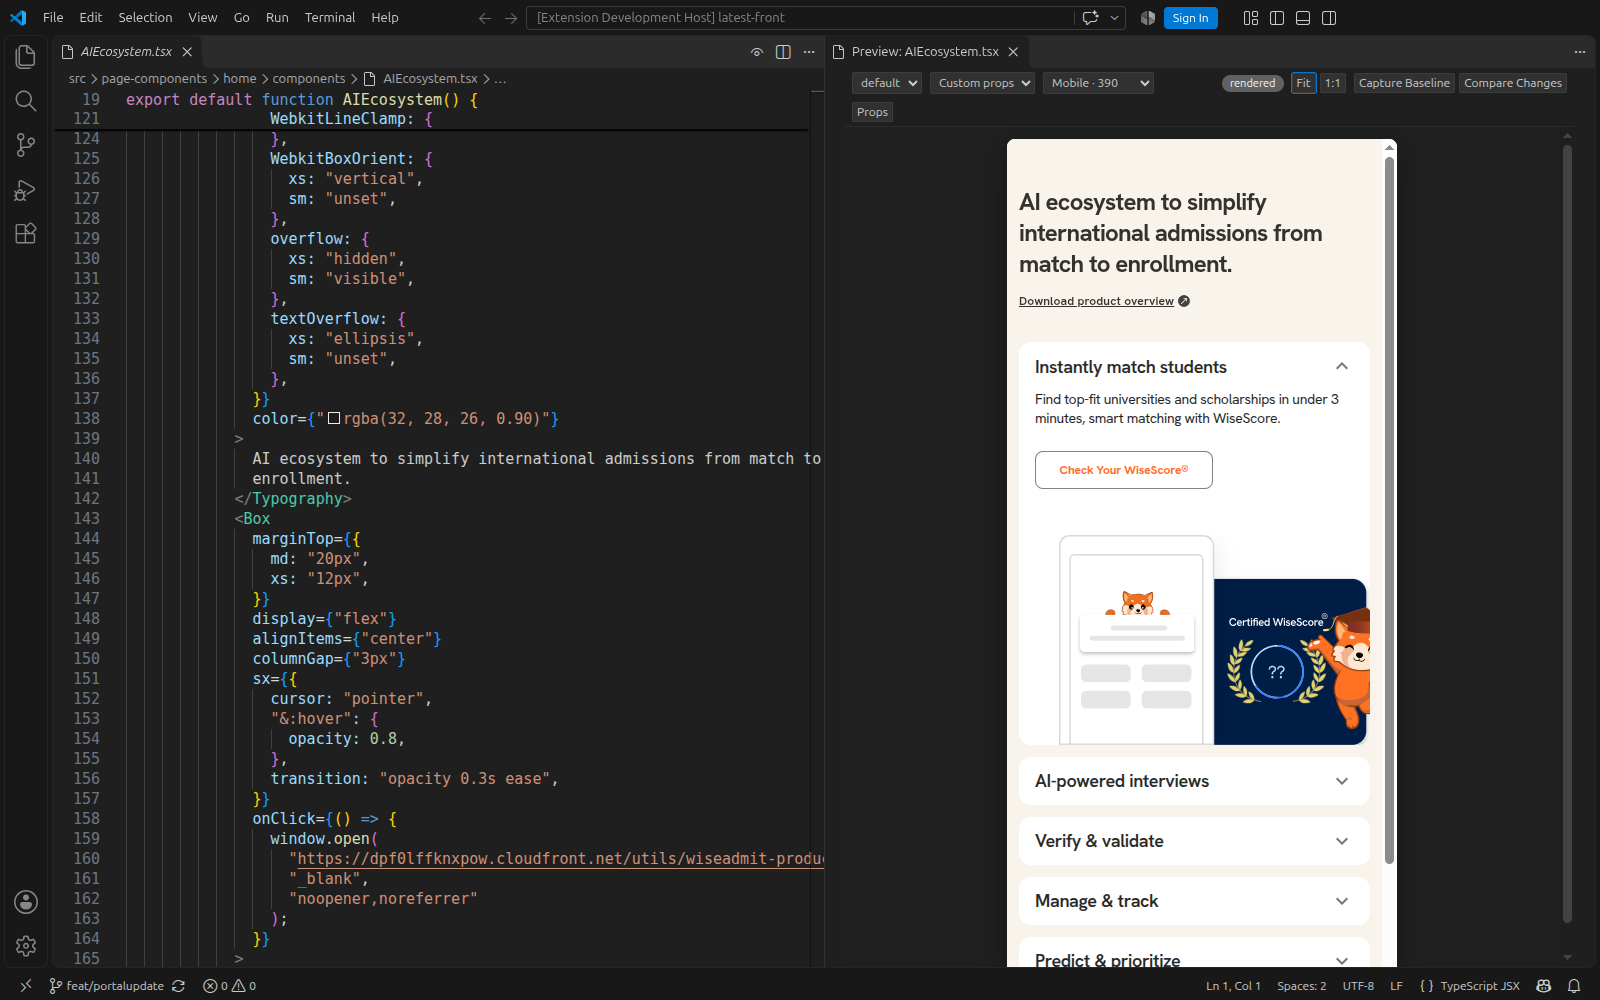
Before and after an unsaved edit. The comparison retains an incomplete-context warning for unsupported Next.js provider behavior.
CSCA.ai — existing hero, feature cards, and exam-information grid. These are the actual HeroSection.tsx, CscaProvide.tsx, and ExamEssentials.tsx from cscanew/csca, rendered with their own assets and cached Next font faces.
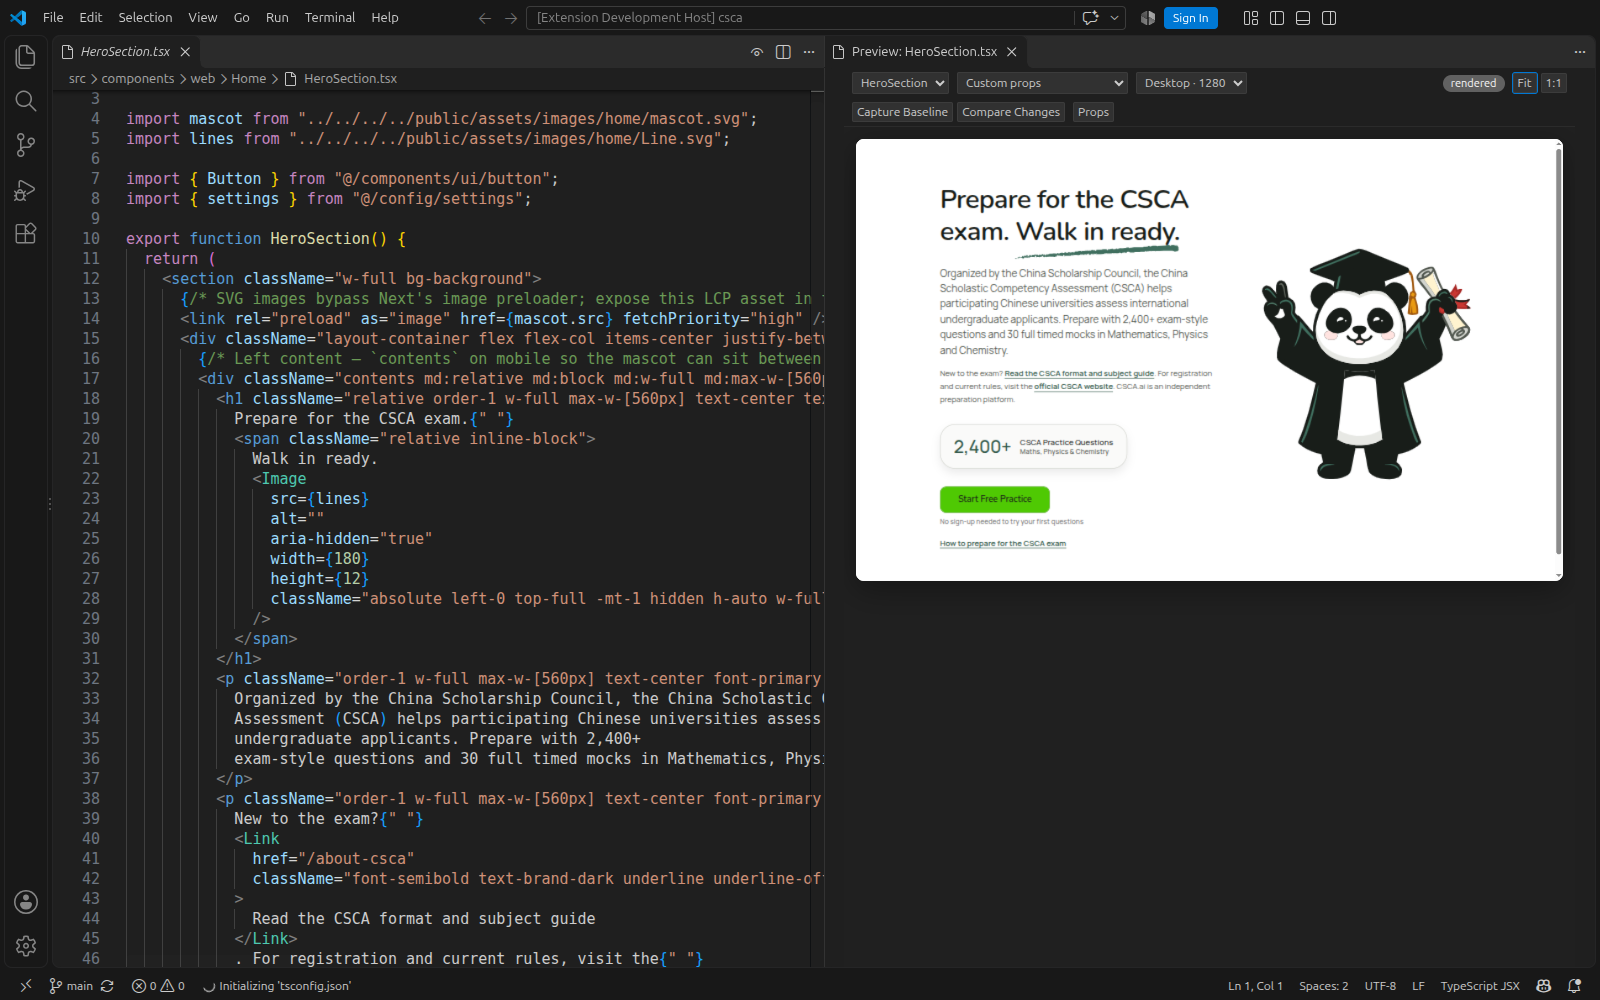
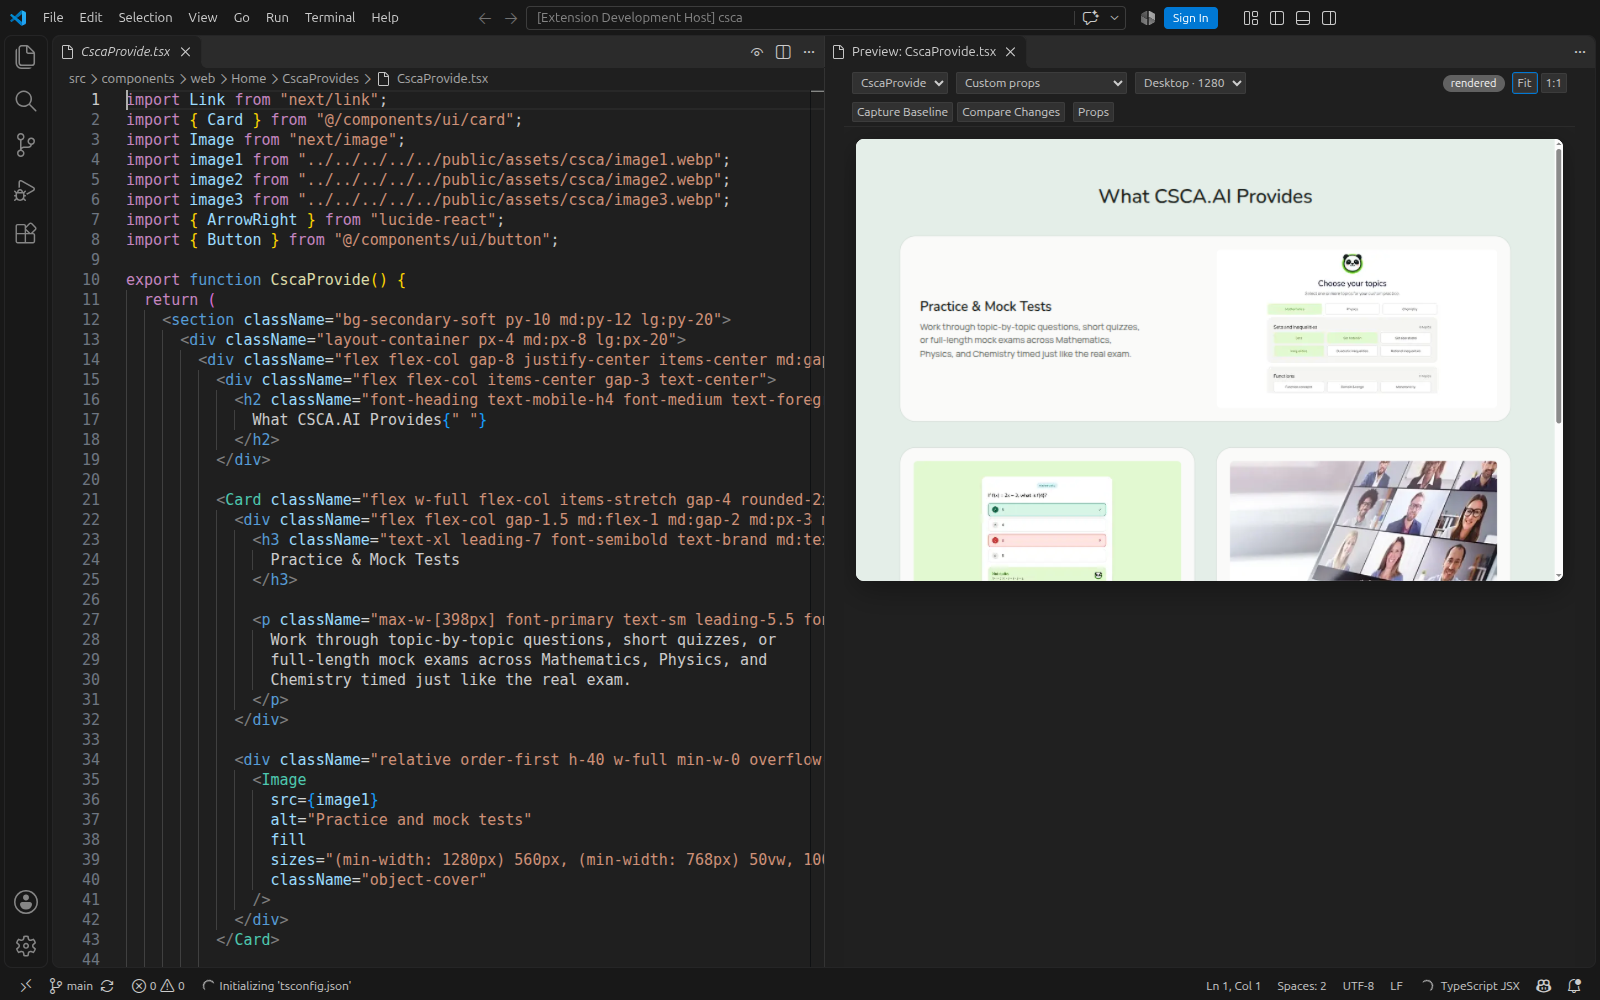
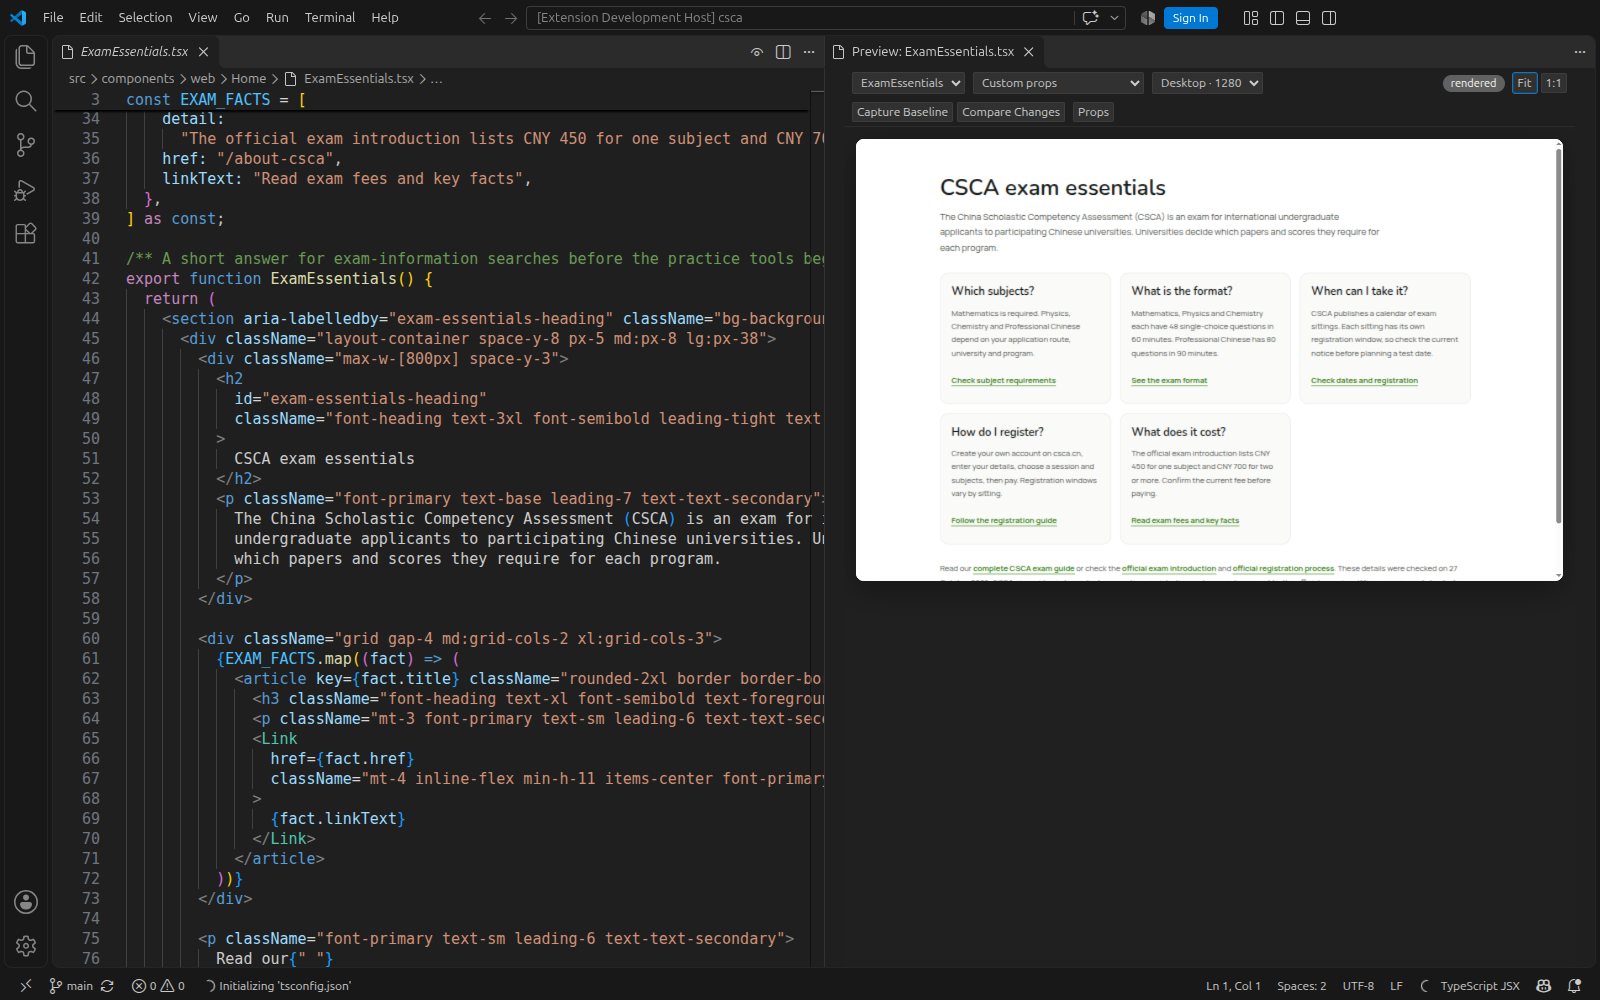
These are isolated frontend previews, not full application journeys. Next Google font variables can reuse matching font assets from an existing .next/static build. Without those assets, root font classes remain unresolved and the render reports incomplete context.
How rendering works
- Your files run through oxc one module at a time; your packages are pre-bundled once by Rolldown from your own
node_modulesin a worker process and cached by lockfile, so React, MUI and Tailwind are the versions your app uses. Next.js app-router projects run on Next's vendored React, like the app itself. - Supported root and nested layouts and templates supply context: global CSS,
<html>/<body>classes, providers with their props (theme={theme}is re-imported),CssBaseline-style siblings. Tailwind v4 compiles with your theme, Tailwind v3 through your PostCSS config, plus Sass, CSS modules,public/assets, image imports andNEXT_PUBLIC_*env. - Framework shims handle browser-compatible
next/link,next/image, andnext/navigationbehavior; Chromium draws the pixels. Server-only Next.js behavior is outside this isolated runtime. - Edits are hot-swapped with React Fast Refresh, from the editor or from disk. A target's whole import graph is preloaded in one batch; barrel imports of icon packages are rewritten per member; lazy images load eagerly so the frame settles in milliseconds.
Performance and boundaries
The recorded benchmark used Linux x64, an Intel Core i5-1235U, and Node v24.21.0 on 2026-10-27. Twenty warm renders of the small React fixture measured p95 50 ms, against a ≤100 ms gate. Edit-to-pixels has a separate 50 ms target; it is not a universal latency guarantee.
| Recorded component-edit workflow | Calls | Elapsed | Response size |
|---|---|---|---|
| Arguseye, warm | 2 | 145 ms | 48,669 bytes |
| Playwright MCP + Vite, warm | 4 | 217 ms | 27,298 bytes |
| Arguseye, cold | 2 | 2,105 ms | 49,076 bytes |
| Playwright MCP + Vite, cold | 6 | 1,704 ms | 28,006 bytes |
Arguseye returned a larger evidence bundle, including a pixel diff. This fixture run shows fewer calls and a faster warm workflow, alongside a slower cold path and larger responses. It is not a general performance ranking. Method, machine, caveats, and raw samples →
The separate 1,197-file Next.js example above measured server readiness at 2–11 s, first render at 1.5 s, a section at 0.9 s, and the same target again at 0.3 s, with roughly 500–750 MB server memory. These are different workloads. See the rendering technique.
Runtime-only props, arbitrary provider values, authenticated or backend-dependent states, Next.js server execution, and Nuxt features may require explicit inputs or remain unsupported. Successful pixels can still have incomplete context; inspect warnings and unresolved inputs. Vue script changes remount the component and report the state reset. Verification renders start from fresh component state.
Roadmap
What an agent would ask for next, in order: layout facts as text (boxes, overflow, clipping, contrast) with refs; element → source file and line; a frozen clock and seeded randomness for diffs you can trust; next/font and more framework shims; lower server memory. The full list, with reasoning, is in docs/agent-wishlist.md.
Contributing
Issues and pull requests are welcome: CONTRIBUTING.md has the setup and the rules, AGENTS.md the engineering rules every change follows (humans and agents alike), SECURITY.md how to report a vulnerability.
npm install && for d in test/fixtures/*/; do (cd "$d" && npm install); done
npm test            # unit + headless browser tests
npm run test:vscode # integration test in a real VS Code
MIT licensed. Made by Ayush Niroula.
arguseye MCP 질문
arguseye MCP를 Claude Code에 추가하려면 어떻게 하나요?
터미널에서 claude mcp add arguseye -- npx -y @ayushniroula/arguseye를 실행합니다. 모든 프로젝트에서 사용할 수 있게 하려면 --scope user를 추가합니다.
arguseye MCP를 Cursor에 추가하려면 어떻게 하나요?
~/.cursor/mcp.json를 열고 mcpServers 아래에 서버를 추가합니다. 위 설치 섹션에 표시된 Cursor 구성을 사용합니다.
지원하는 프레임워크는 무엇인가요?
React (React Router 및 Remix 포함), Next.js, Vue 3, Nuxt, Svelte 5, SvelteKit, Preact, Solid를 지원합니다.
컴포넌트 렌더링 시 어떤 정보가 반환되나요?
각 렌더링 시 크롭된 PNG 이미지, 접근성 텍스트, 그리고 해결되지 않은 입력값, 경고, 에러를 포함한 구조화된 증거 데이터가 제공됩니다.
시스템 요구 사항은 무엇인가요?
Node.js 22 이상, 설치된 프로젝트 의존성, 그리고 Chromium 또는 Google Chrome이 필요합니다.