
Предоставляет API Appwrite, включая базы данных, пользователей, функции, команды и хранилище, в качестве инструментов для AI-клиентов.
Также известен как appwrite/mcp-for-api, mcp-server-appwrite
- Звёзды
- 72
- Инструменты
- —
- Загрузки, 30 дней
- 334 841
- Последняя версия
- 0.2.8
- Последний коммит
- 13 нояб. 2026 г.
- Лицензия
- MIT
Что такое Appwrite MCP?
Appwrite — это MCP server. Предоставляет API Appwrite, включая базы данных, пользователей, функции, команды и хранилище, в качестве инструментов для AI-клиентов.
Сводка сгенерирована из README проекта
О Appwrite MCP server
Этот сервер позволяет разработчикам управлять бэкенд-сервисами Appwrite через AI-клиенты. Он предоставляет основные возможности Appwrite API, включая базы данных, пользователей, функции, команды и хранилище, в виде готовых к использованию инструментов. Подключив этот сервер, AI-агент сможет напрямую взаимодействовать с вашим проектом Appwrite для выполнения административных или девелоперских задач.
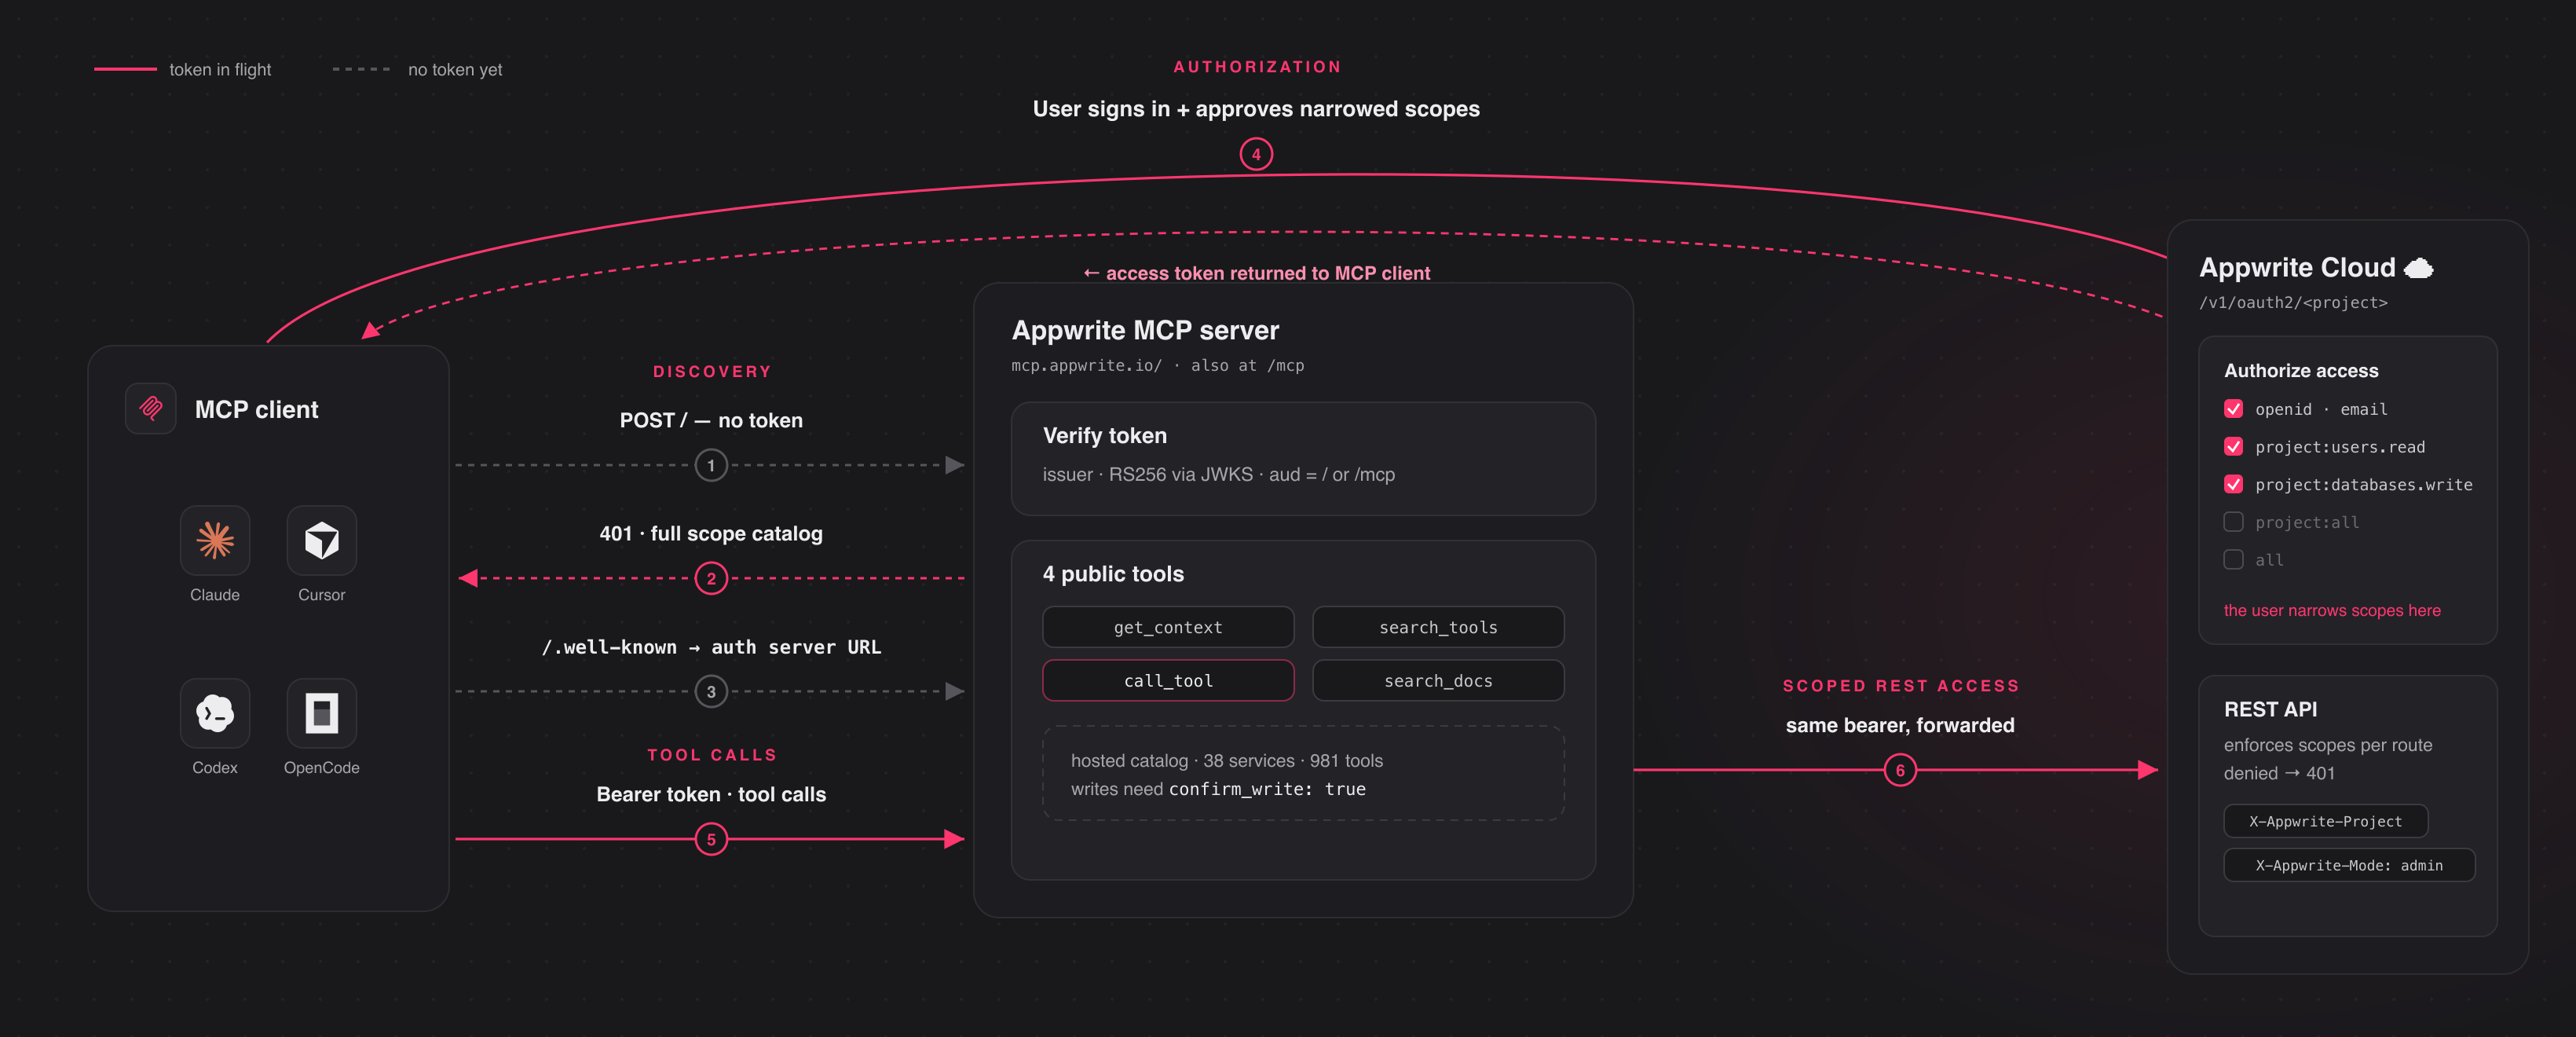
Пользователи могут подключаться к хостинг-серверу Appwrite Cloud через удаленный URL и проходить аутентификацию с помощью OAuth через браузер, что избавляет от необходимости вручную копировать API keys. Для тех, кто использует self-hosted экземпляры Appwrite, сервер можно запустить локально через stdio, используя API key проекта. Он совместим с широким спектром клиентов, таких как Claude Desktop, Cursor, VS Code, Windsurf и Zed. Каждое изменение, внесенное агентом, записывается вместе с обоснованием в журнал аудита Appwrite для удобства проверки.
Что вы можете с ним делать
- 1Управление бэкенд-ресурсамиAI-агент может напрямую взаимодействовать с вашими базами данных, пользователями, функциями, командами и хранилищем.
- 2Аудит активности агентаВы можете отследить, почему AI внес конкретные изменения, изучив журнал активности проекта.
- 3Работа в различных окруженияхАгент может выполнять действия в рамках определенных окружений проекта, например, в staging.
- 4Поиск по технической документацииРазработчики могут использовать агента для поиска информации в документации Appwrite.
Взято из README проекта. Каждый вариант использования проверен на соответствие цитате из него.
Как установить Appwrite MCP
Форматы проверены 10 ноя 2026Добавить в CursorДобавить в GooseУстановка Appwrite MCP в Claude Code
$ claude mcp add mcp-for-api -- uvx mcp-server-appwriteУстановка Appwrite MCP в Cursor
~/.cursor/mcp.json
{
  "mcpServers": {
    "mcp-for-api": {
      "command": "uvx",
      "args": [
        "mcp-server-appwrite"
      ]
    }
  }
}Установка Appwrite MCP в VS Code
.vscode/mcp.json
{
  "servers": {
    "mcp-for-api": {
      "type": "stdio",
      "command": "uvx",
      "args": [
        "mcp-server-appwrite"
      ]
    }
  }
}Установка Appwrite MCP в VS Code CLI
$ code --add-mcp '{"name":"mcp-for-api","type":"stdio","command":"uvx","args":["mcp-server-appwrite"]}'Установка Appwrite MCP в Claude Desktop
claude_desktop_config.json
{
  "mcpServers": {
    "mcp-for-api": {
      "command": "uvx",
      "args": [
        "mcp-server-appwrite"
      ]
    }
  }
}Установка Appwrite MCP в Codex
$ codex mcp add mcp-for-api -- uvx mcp-server-appwriteУстановка Appwrite MCP в Codex config.toml
~/.codex/config.toml
[mcp_servers.mcp-for-api]
command = "uvx"
args = ["mcp-server-appwrite"]
Установка Appwrite MCP в Gemini CLI
$ gemini mcp add -s user mcp-for-api uvx -- mcp-server-appwriteУстановка Appwrite MCP в Gemini settings.json
~/.gemini/settings.json
{
  "mcpServers": {
    "mcp-for-api": {
      "command": "uvx",
      "args": [
        "mcp-server-appwrite"
      ]
    }
  }
}Автоматические проверки
Запущено 12 нояб. 2026 г.Полный отчёт →Прошло наши автоматизированные проверки. Это не аудит безопасности: изучите код и предоставьте серверу минимально необходимый доступ. Как работают проверки

- Связанный и доступный исходный репозиторийПройдено
- Open source лицензия (OSI)Пройдено
- Коммит или релиз за последний годПройдено
- Имя пакета не похоже на популярный пакетПройдено
- Удаленная конечная точка использует HTTPSНе проверялось
- Деструктивные инструменты помеченыНе проверялось
- Нет скрытых инструкций для моделиПройдено
- Нет критических предупреждений в пакете или его зависимостяхПройдено
README
Открыть на GitHubAppwrite MCP server

A Model Context Protocol server for Appwrite. It exposes Appwrite's API — databases, users, functions, teams, storage, and more — as tools your MCP client can call.
Connect to the hosted server at https://mcp.appwrite.io/ and authenticate
through your browser. The first time you connect, your client opens an Appwrite
consent screen; approve the scopes and you're connected. There are no keys to
copy. The conventional https://mcp.appwrite.io/mcp URL is also supported and
connects to the same server.
Connect your client
Pick your client below. Each adds the hosted Appwrite Cloud server.
claude mcp add --transport http appwrite https://mcp.appwrite.io/
Then, inside a Claude Code session, run /mcp, select appwrite, and follow
the browser prompt to authenticate.
Go to Settings → Connectors → Add custom connector and paste
https://mcp.appwrite.io/. Available on Pro and Max plans; on Team and
Enterprise plans only an organization Owner can add custom connectors.
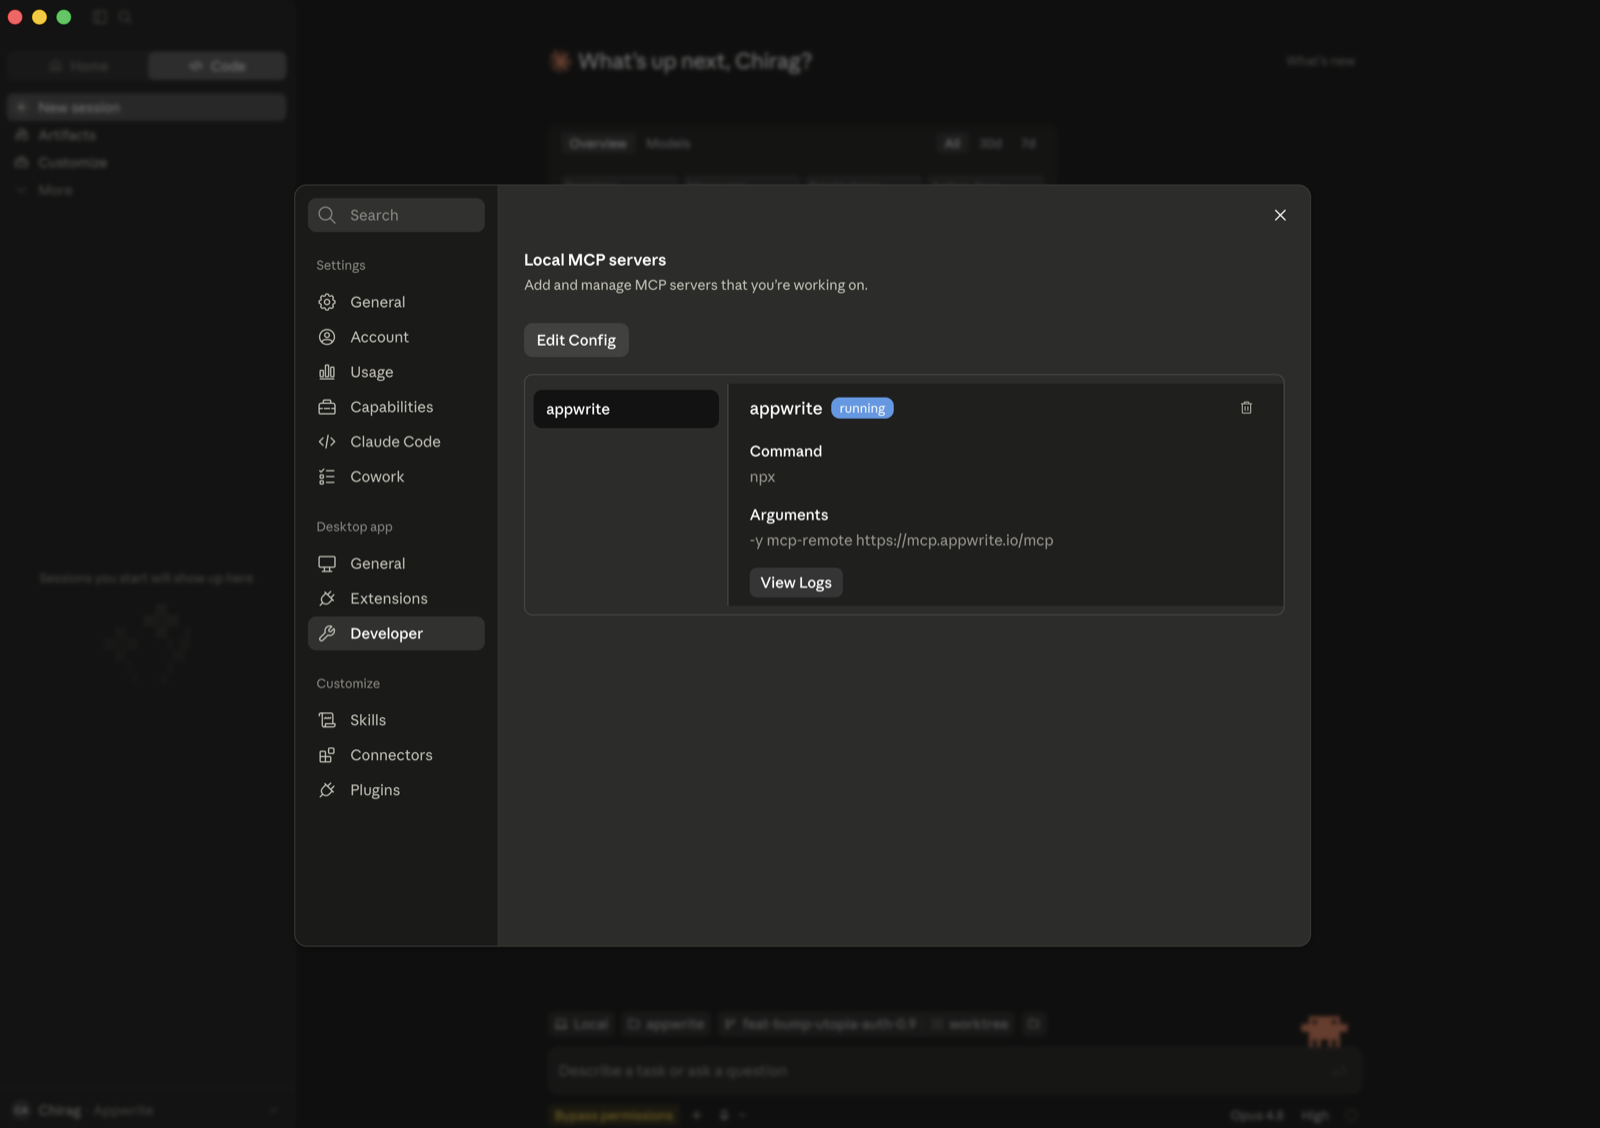
If you don't see that option (free plan, or a Team/Enterprise member), bridge the remote server through stdio instead (requires Node.js). Go to Settings → Developer → Local MCP servers, click Edit Config, and add:
{
  "mcpServers": {
    "appwrite": {
      "command": "npx",
      "args": ["-y", "mcp-remote", "https://mcp.appwrite.io/"]
    }
  }
}
Restart Claude Desktop; the server appears under Local MCP servers and a browser window opens to authenticate.
Edit ~/.cursor/mcp.json (global) or .cursor/mcp.json (project).
{
  "mcpServers": {
    "appwrite": {
      "url": "https://mcp.appwrite.io/"
    }
  }
}
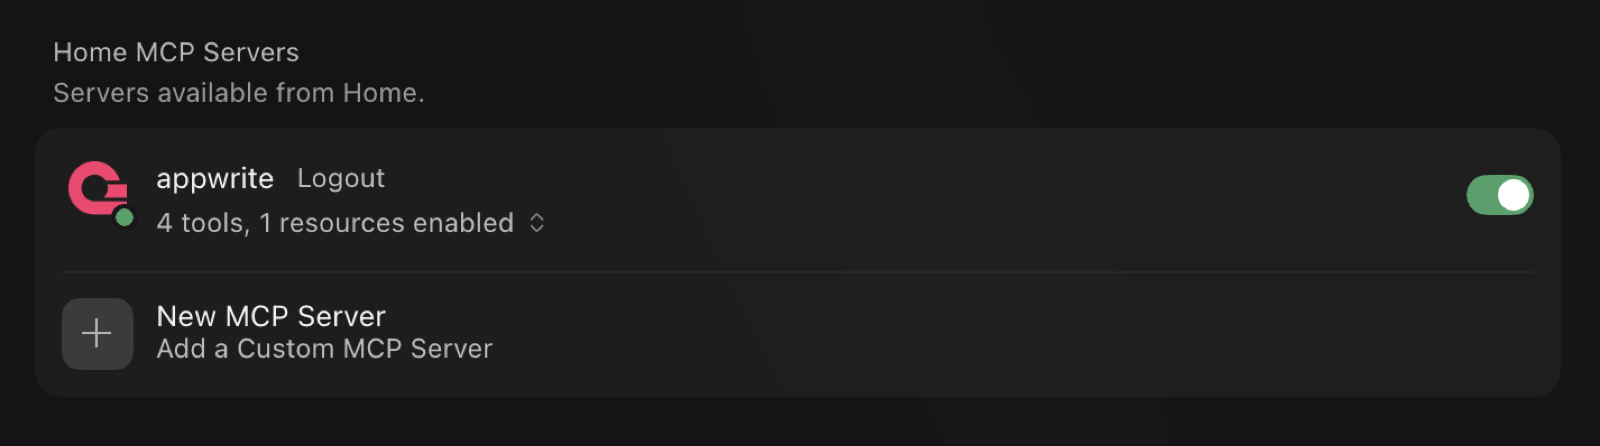
Cursor prompts you to log in through the browser; the server then shows up under Settings → MCP with its tools enabled.
Edit .vscode/mcp.json (workspace) or your user configuration via the Command
Palette → MCP: Open User Configuration.
{
  "servers": {
    "appwrite": {
      "type": "http",
      "url": "https://mcp.appwrite.io/"
    }
  }
}
Edit ~/.codex/config.toml.
[mcp_servers.appwrite]
url = "https://mcp.appwrite.io/"
Then authenticate from the terminal:
codex mcp login appwrite
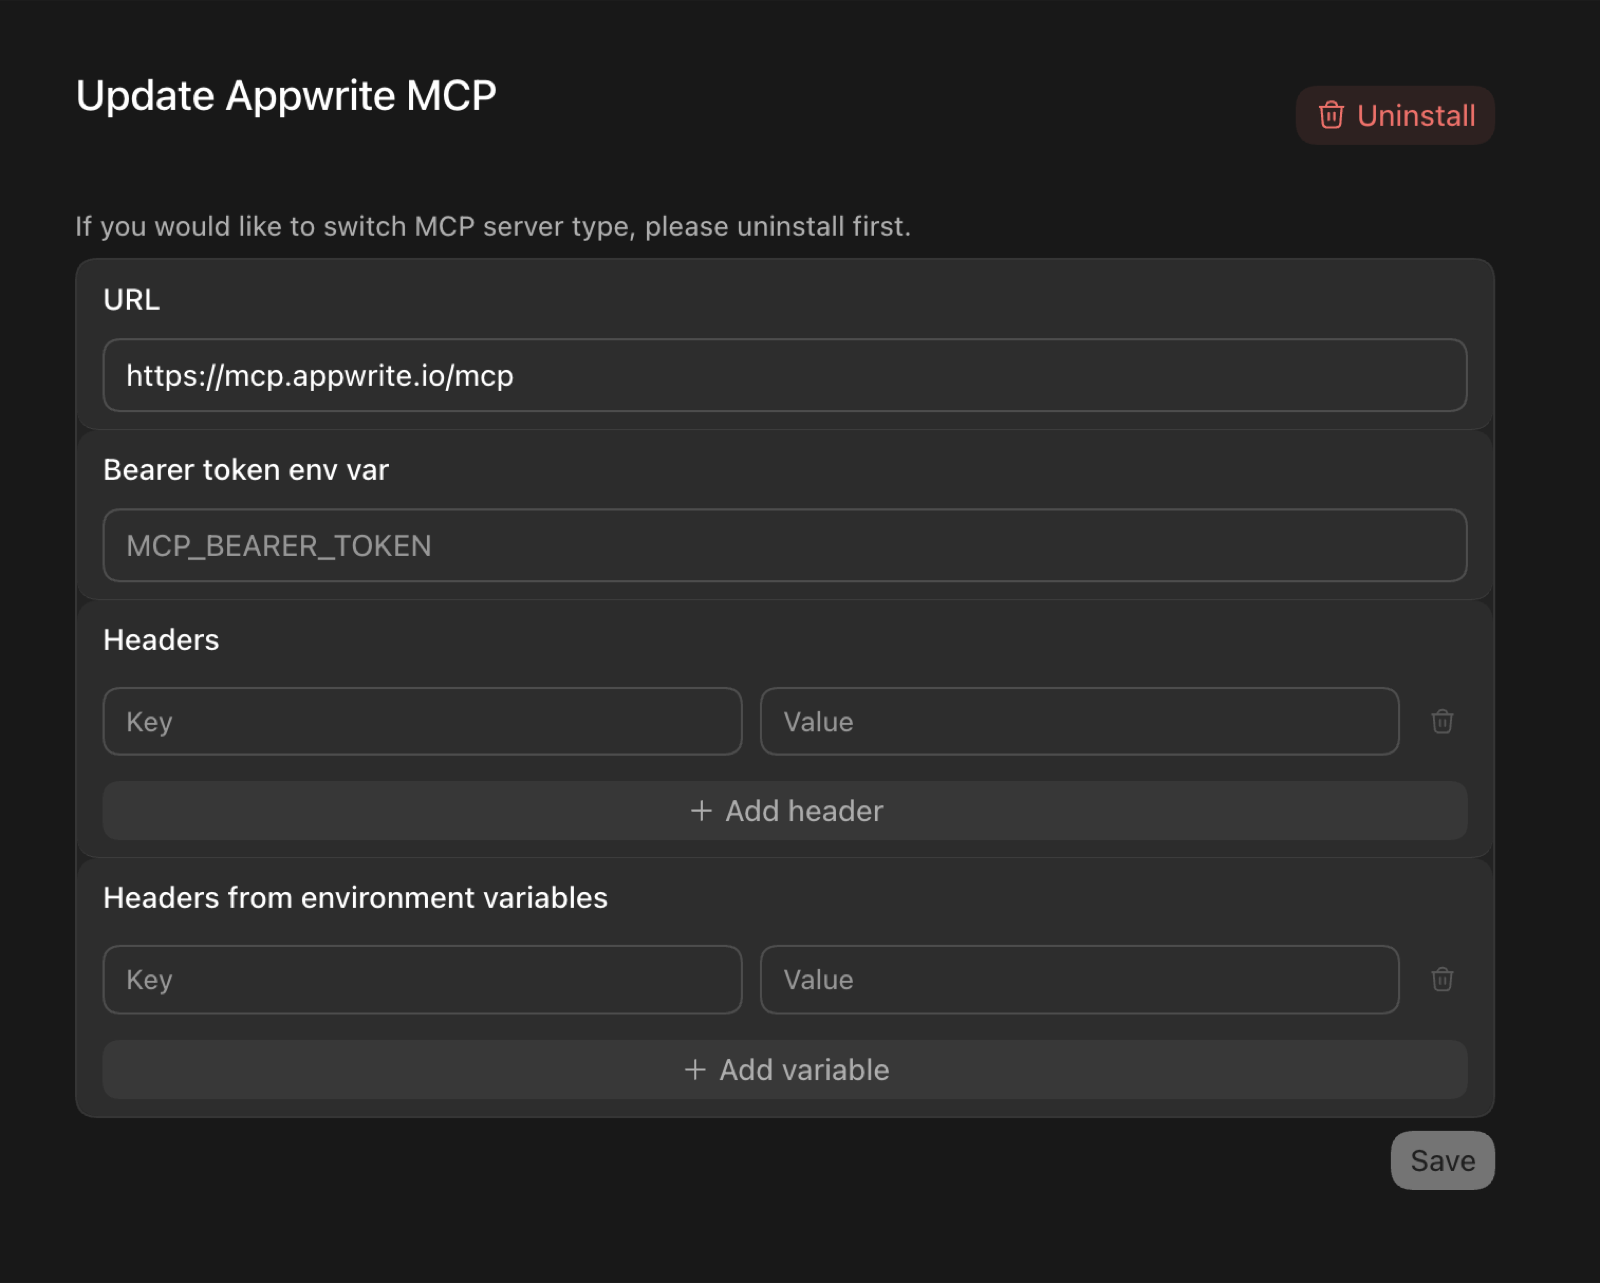
In the Codex GUI, you can instead add the server from the MCP settings —
set the URL to https://mcp.appwrite.io/ and leave the token and header
fields empty (authentication happens through the browser):
Edit opencode.json (project) or ~/.config/opencode/opencode.json (global).
{
  "$schema": "https://opencode.ai/config.json",
  "mcp": {
    "appwrite": {
      "type": "remote",
      "url": "https://mcp.appwrite.io/",
      "enabled": true
    }
  }
}
Edit ~/.codeium/windsurf/mcp_config.json.
{
  "mcpServers": {
    "appwrite": {
      "serverUrl": "https://mcp.appwrite.io/"
    }
  }
}
gemini mcp add --transport http appwrite https://mcp.appwrite.io/
Or edit ~/.gemini/settings.json (note the key is httpUrl, not url):
{
  "mcpServers": {
    "appwrite": {
      "httpUrl": "https://mcp.appwrite.io/"
    }
  }
}
Gemini CLI opens the browser OAuth flow automatically on first connect. To
re-authenticate, run /mcp auth appwrite inside a session.
Edit ~/.gemini/config/mcp_config.json (global) or .agents/mcp_config.json (project workspace).
{
  "mcpServers": {
    "appwrite": {
      "serverUrl": "https://mcp.appwrite.io/"
    }
  }
}
⚠️ Note: Antigravity strictly requires the
serverUrlkey for remote transport. Using legacy fields likeurlorhttpUrlwill cause tool registration to fail silently.
Antigravity opens the browser OAuth flow automatically on first connect. If you manually edit the JSON file, navigate to Settings → Customizations → Installed MCP Servers and click Refresh to reload the tool definitions.
copilot mcp add --transport http appwrite https://mcp.appwrite.io/
Or run /mcp add inside a session, or edit ~/.copilot/mcp-config.json:
{
  "mcpServers": {
    "appwrite": {
      "type": "http",
      "url": "https://mcp.appwrite.io/"
    }
  }
}
A browser window opens to authenticate on first connect. Check status with
/mcp.
Go to Settings → AI → MCP Servers → Add Server → Add Remote Server, or add
to your settings.json (zed: open settings):
{
  "context_servers": {
    "appwrite": {
      "url": "https://mcp.appwrite.io/"
    }
  }
}
Zed prompts you to authenticate through the browser on first connect.
Go to Settings → Agents → MCP servers → + Add, choose the URL-based
server type, and enter https://mcp.appwrite.io/.
Warp opens a browser window to authenticate on first connect.
JetBrains IDEs don't yet support OAuth for remote MCP servers, so bridge through stdio (requires Node.js). Go to Settings → Tools → AI Assistant → Model Context Protocol (MCP) → Add, switch to the JSON view, and paste:
{
  "mcpServers": {
    "appwrite": {
      "command": "npx",
      "args": ["-y", "mcp-remote", "https://mcp.appwrite.io/"]
    }
  }
}
A browser window opens to authenticate on first connect.
Cline doesn't yet support OAuth for remote MCP servers, so bridge through stdio (requires Node.js). In the Cline panel, open the MCP Servers icon → Configure tab → Configure MCP Servers, and add:
{
  "mcpServers": {
    "appwrite": {
      "command": "npx",
      "args": ["-y", "mcp-remote", "https://mcp.appwrite.io/"]
    }
  }
}
A browser window opens to authenticate on first connect.
Reasons and environments
Every write the agent makes carries a short reason (why it made the change).
Appwrite records it on the project's audit log, so you can review what your
agent changed, and why, in the project's Activity tab.
On Appwrite Cloud, the agent can act in a project's environments (for example
staging): appwrite_get_context lists them, and each call takes the
environment's ID as environment_id next to the project's project_id. See
Tool surface.
Self-hosted Appwrite
Running your own Appwrite instance? Run the MCP server locally over stdio and
authenticate with a project API key. See docs/self-hosted.md
for per-client setup.
Documentation
- Tool surface — the tools exposed to the model and the internal Appwrite catalog.
- How Cloud authentication works — the OAuth 2.1 flow.
- Documentation search — the in-process
appwrite_search_docstool and how to rebuild its index. - Events — MCP Events: webhook subscriptions to changes in your Appwrite project (in development, not available yet).
- Self-hosted Appwrite — run the server locally with a project API key.
- Local development — running, testing, and debugging the server locally.
- AGENTS.md — full contributor guide and pre-PR checklist.
License
This MCP server is licensed under the MIT License. See the LICENSE file for details.
Вопросы о Appwrite MCP
Как добавить Appwrite MCP в Claude Code?
Выполните claude mcp add mcp-for-api -- uvx mcp-server-appwrite в терминале. Добавьте --scope user, чтобы сервер был доступен во всех проектах.
Как добавить Appwrite MCP в Cursor?
Откройте ~/.cursor/mcp.json и добавьте сервер в mcpServers, используя конфигурацию Cursor из раздела установки выше.
Как пройти аутентификацию в Appwrite MCP server?
Вы проходите аутентификацию через браузер с помощью экрана подтверждения Appwrite. Для хостинг-версии не нужно копировать ключи.
Можно ли использовать это с self-hosted экземпляром Appwrite?
Да, вы можете запустить MCP server локально через stdio и пройти аутентификацию, используя API key проекта.
Как отслеживать изменения, внесенные AI-агентом?
Каждое действие по записи включает краткое обоснование, которое фиксируется в журнале аудита Appwrite проекта и доступно для проверки во вкладке Activity.