
Appwriteのデータベース、ユーザー、関数、チーム、ストレージのAPIをツールとして公開し、AIクライアントによるバックエンド管理を可能にします。
別名 appwrite/mcp, mcp-server-appwrite
- スター
- 72
- ツール
- —
- ダウンロード数(30日間)
- 334,841
- 最新バージョン
- 2.6.2
- 最終コミット
- 2026年11月13日
- ライセンス
- MIT
Appwrite MCPとは
AppwriteはMCPサーバーです。 Appwriteのデータベース、ユーザー、関数、チーム、ストレージのAPIをツールとして公開し、AIクライアントによるバックエンド管理を可能にします。.
プロジェクトのREADMEから生成された概要
Appwrite MCP server について
このサーバーはAppwrite APIをツールセットとして公開することで、AIクライアントを通じたバックエンドインフラの管理を実現します。開発者は、Claude Desktop、Cursor、VS Code、Zed、Windsurfなどの幅広いクライアントから、データベース、ユーザー、関数、チーム、ストレージに直接アクセスして操作できます。
ホスト版のAppwrite Cloudサーバーに接続する場合は、ブラウザベースのOAuthフローを使用するため、開始時にAPI keyをコピー&ペーストする必要はありません。セルフホストのAppwriteインスタンスを使用している場合は、stdioを介してローカルでMCP serverを実行し、プロジェクトのAPI keyを使用できます。エージェントが行ったすべての操作は理由とともにAppwriteプロジェクトの監査ログに記録されるため、Activityタブから変更内容を確認できます。
この統合機能は、特定の環境IDを使用することで、ステージングなどの異なる環境にわたる複雑なワークフローをサポートします。また、モデルが特定のセットアップを理解しやすくするためのドキュメント検索ツールも含まれています。
できること
- 1バックエンドリソースの管理AIエージェントがプロジェクト内のデータベース、ユーザー、ストレージ設定の作成や変更を行うことができます。
- 2エージェントのアクション監査プロジェクトのアクティビティログを確認することで、AIがなぜバックエンドに特定の変更を加えたのかを追跡できます。
- 3環境をまたいだ作業開発者はAIに対し、ステージング環境や本番環境など、特定の環境内でのみタスクを実行するよう指示できます。
- 4技術ドキュメントの検索AIは内部検索ツールを使用して、Appwriteのセットアップに関する情報を調べることができます。
プロジェクトの README から作成されています。すべてのユースケースは、その引用と照らし合わせて確認されています。
Appwrite MCPのインストール方法
フォーマット検証日 2026年11月10日Claude CodeにAppwrite MCPをインストール
$ claude mcp add mcp -- uvx mcp-server-appwriteCursorにAppwrite MCPをインストール
~/.cursor/mcp.json
{
  "mcpServers": {
    "mcp": {
      "command": "uvx",
      "args": [
        "mcp-server-appwrite"
      ]
    }
  }
}VS CodeにAppwrite MCPをインストール
.vscode/mcp.json
{
  "servers": {
    "mcp": {
      "type": "stdio",
      "command": "uvx",
      "args": [
        "mcp-server-appwrite"
      ]
    }
  }
}Claude DesktopにAppwrite MCPをインストール
claude_desktop_config.json
{
  "mcpServers": {
    "mcp": {
      "command": "uvx",
      "args": [
        "mcp-server-appwrite"
      ]
    }
  }
}CodexにAppwrite MCPをインストール
~/.codex/config.toml
[mcp_servers.mcp]
command = "uvx"
args = ["mcp-server-appwrite"]
Gemini CLIにAppwrite MCPをインストール
~/.gemini/settings.json
{
  "mcpServers": {
    "mcp": {
      "command": "uvx",
      "args": [
        "mcp-server-appwrite"
      ]
    }
  }
}自動チェック
実行日 2026年11月12日詳細レポート →自動チェックに合格しました。これはセキュリティ監査ではありません。コードを読み、サーバーに必要最小限のアクセス権を与えてください。 チェックの仕組み

- ソースリポジトリがリンクされており、アクセス可能合格
- オープンソースライセンス (OSI)合格
- 過去1年以内にコミットまたはリリースあり合格
- パッケージ名が有名なパッケージに酷似していない合格
- リモートエンドポイントがHTTPSを使用合格
- 破壊的なツールがラベル付けされている未チェック
- モデルへの隠れた指示がない合格
- パッケージと依存関係に重大なアドバイザリがない合格
README
GitHubで見るAppwrite MCP server

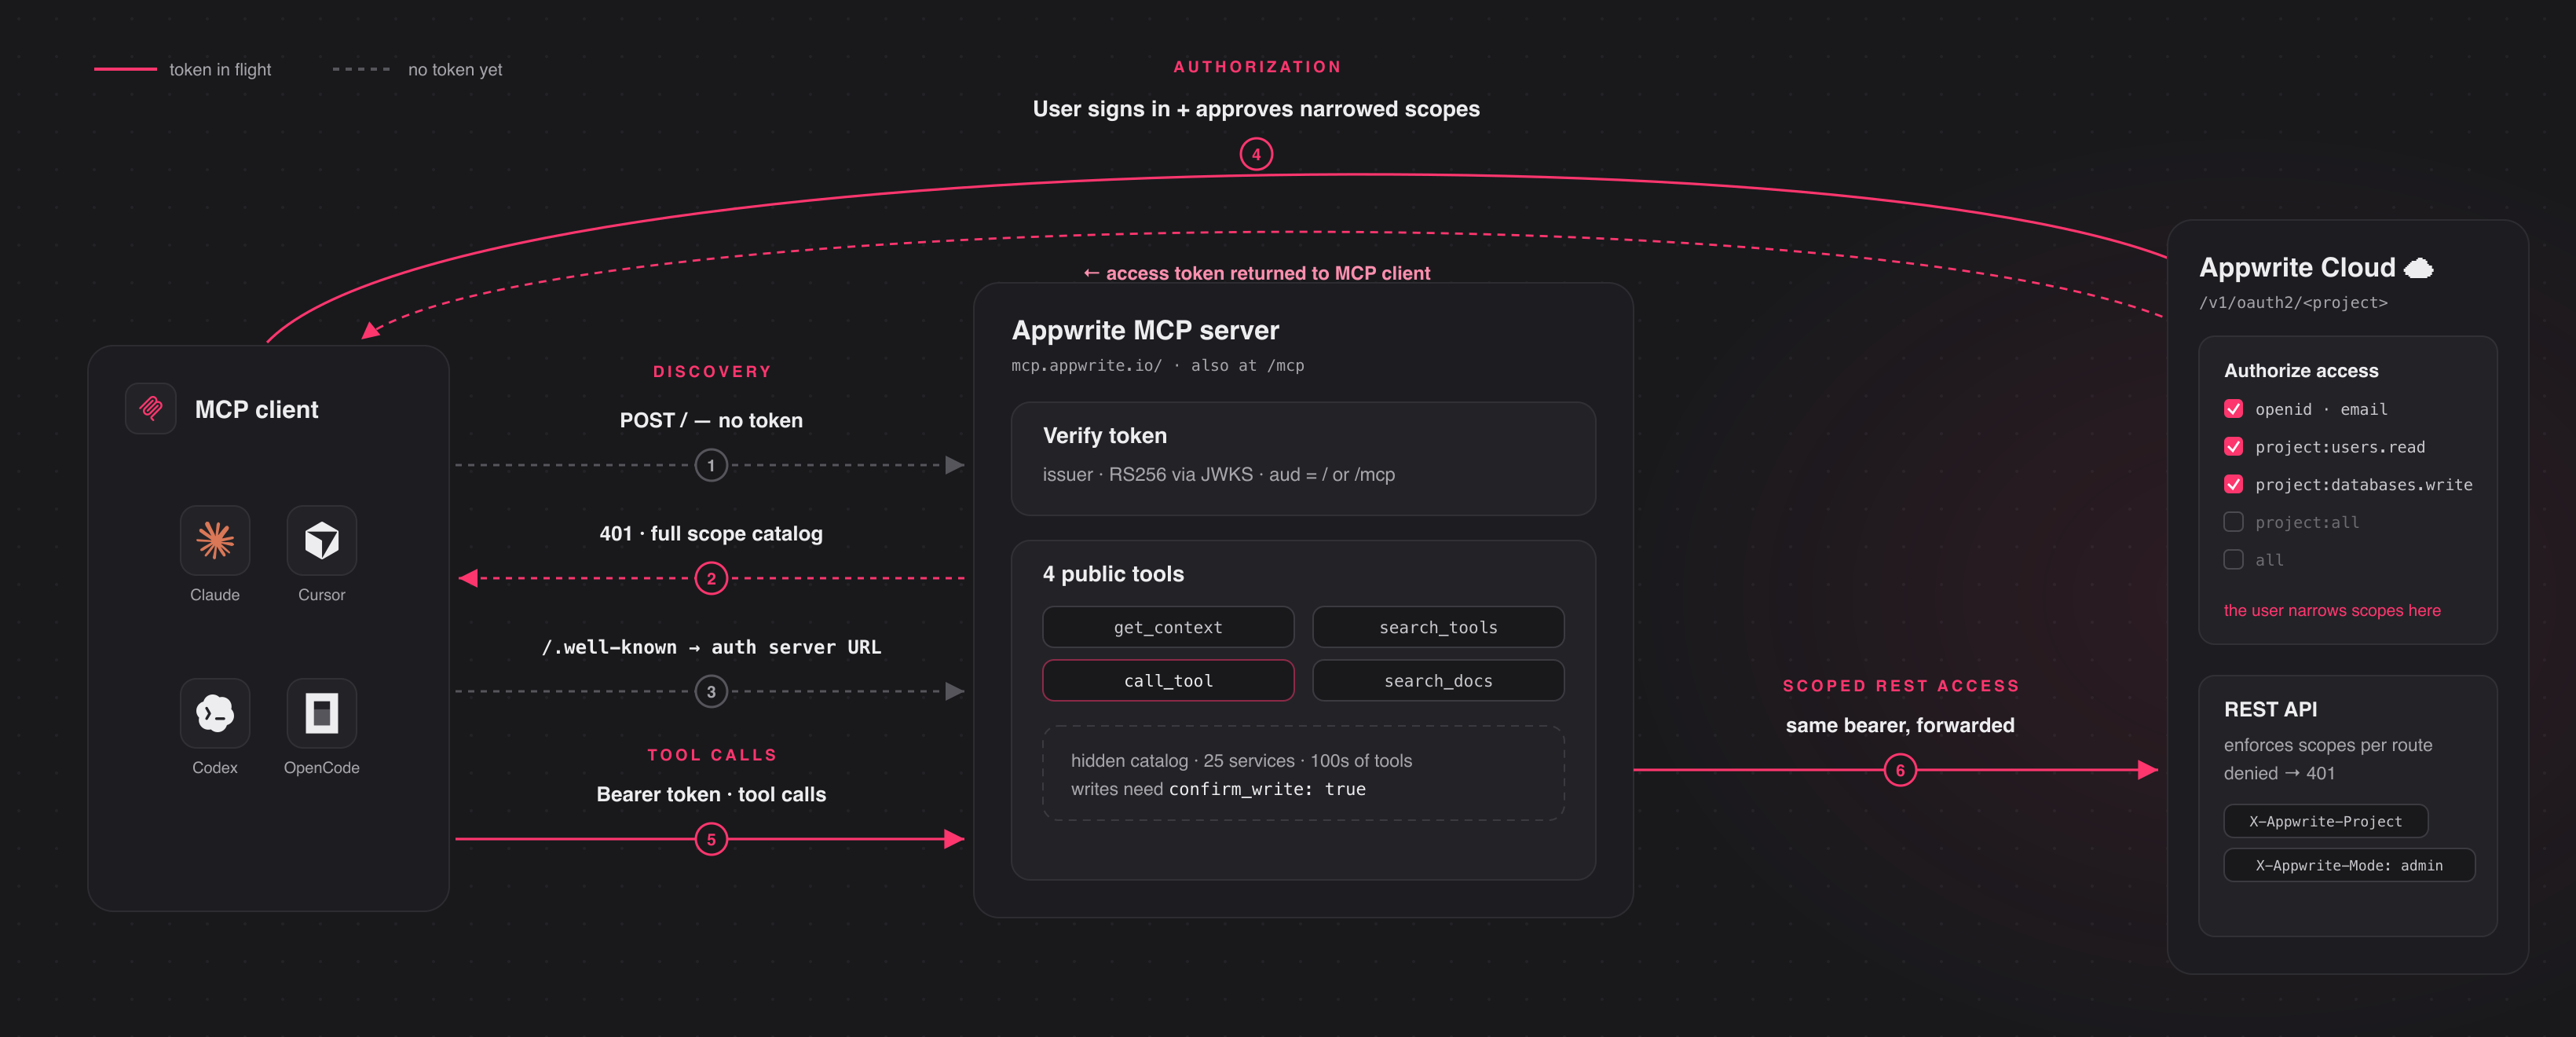
A Model Context Protocol server for Appwrite. It exposes Appwrite's API — databases, users, functions, teams, storage, and more — as tools your MCP client can call.
Connect to the hosted server at https://mcp.appwrite.io/ and authenticate
through your browser. The first time you connect, your client opens an Appwrite
consent screen; approve the scopes and you're connected. There are no keys to
copy. The conventional https://mcp.appwrite.io/mcp URL is also supported and
connects to the same server.
Connect your client
Pick your client below. Each adds the hosted Appwrite Cloud server.
claude mcp add --transport http appwrite https://mcp.appwrite.io/
Then, inside a Claude Code session, run /mcp, select appwrite, and follow
the browser prompt to authenticate.
Go to Settings → Connectors → Add custom connector and paste
https://mcp.appwrite.io/. Available on Pro and Max plans; on Team and
Enterprise plans only an organization Owner can add custom connectors.
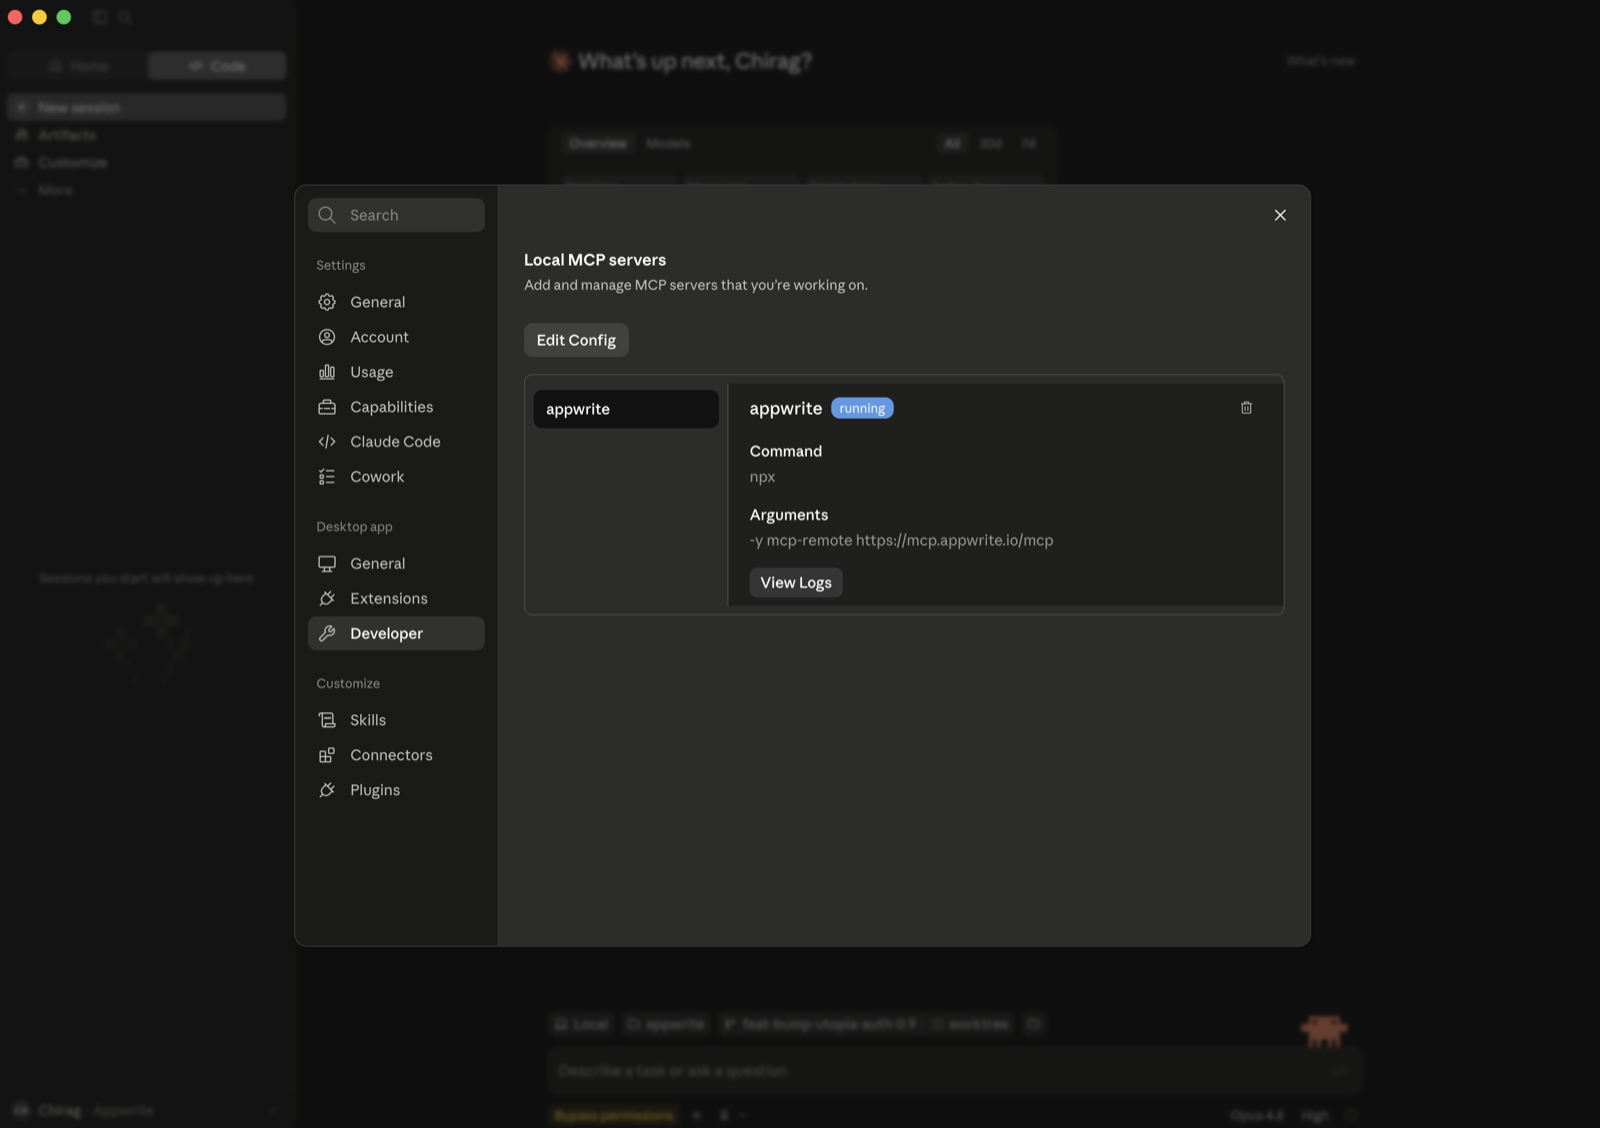
If you don't see that option (free plan, or a Team/Enterprise member), bridge the remote server through stdio instead (requires Node.js). Go to Settings → Developer → Local MCP servers, click Edit Config, and add:
{
  "mcpServers": {
    "appwrite": {
      "command": "npx",
      "args": ["-y", "mcp-remote", "https://mcp.appwrite.io/"]
    }
  }
}
Restart Claude Desktop; the server appears under Local MCP servers and a browser window opens to authenticate.
Edit ~/.cursor/mcp.json (global) or .cursor/mcp.json (project).
{
  "mcpServers": {
    "appwrite": {
      "url": "https://mcp.appwrite.io/"
    }
  }
}
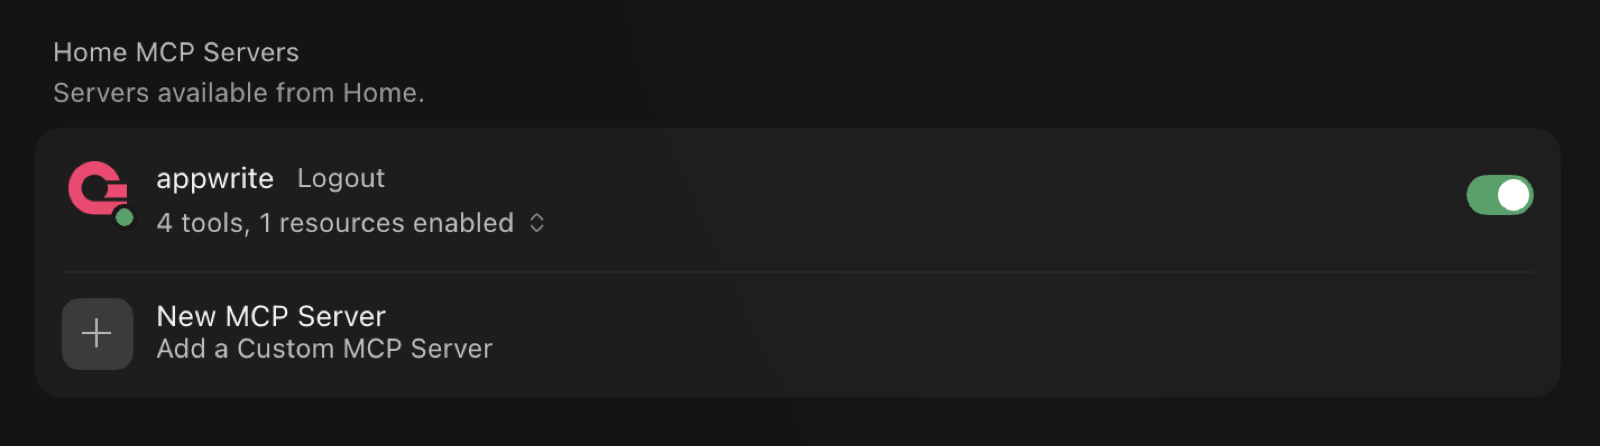
Cursor prompts you to log in through the browser; the server then shows up under Settings → MCP with its tools enabled.
Edit .vscode/mcp.json (workspace) or your user configuration via the Command
Palette → MCP: Open User Configuration.
{
  "servers": {
    "appwrite": {
      "type": "http",
      "url": "https://mcp.appwrite.io/"
    }
  }
}
Edit ~/.codex/config.toml.
[mcp_servers.appwrite]
url = "https://mcp.appwrite.io/"
Then authenticate from the terminal:
codex mcp login appwrite
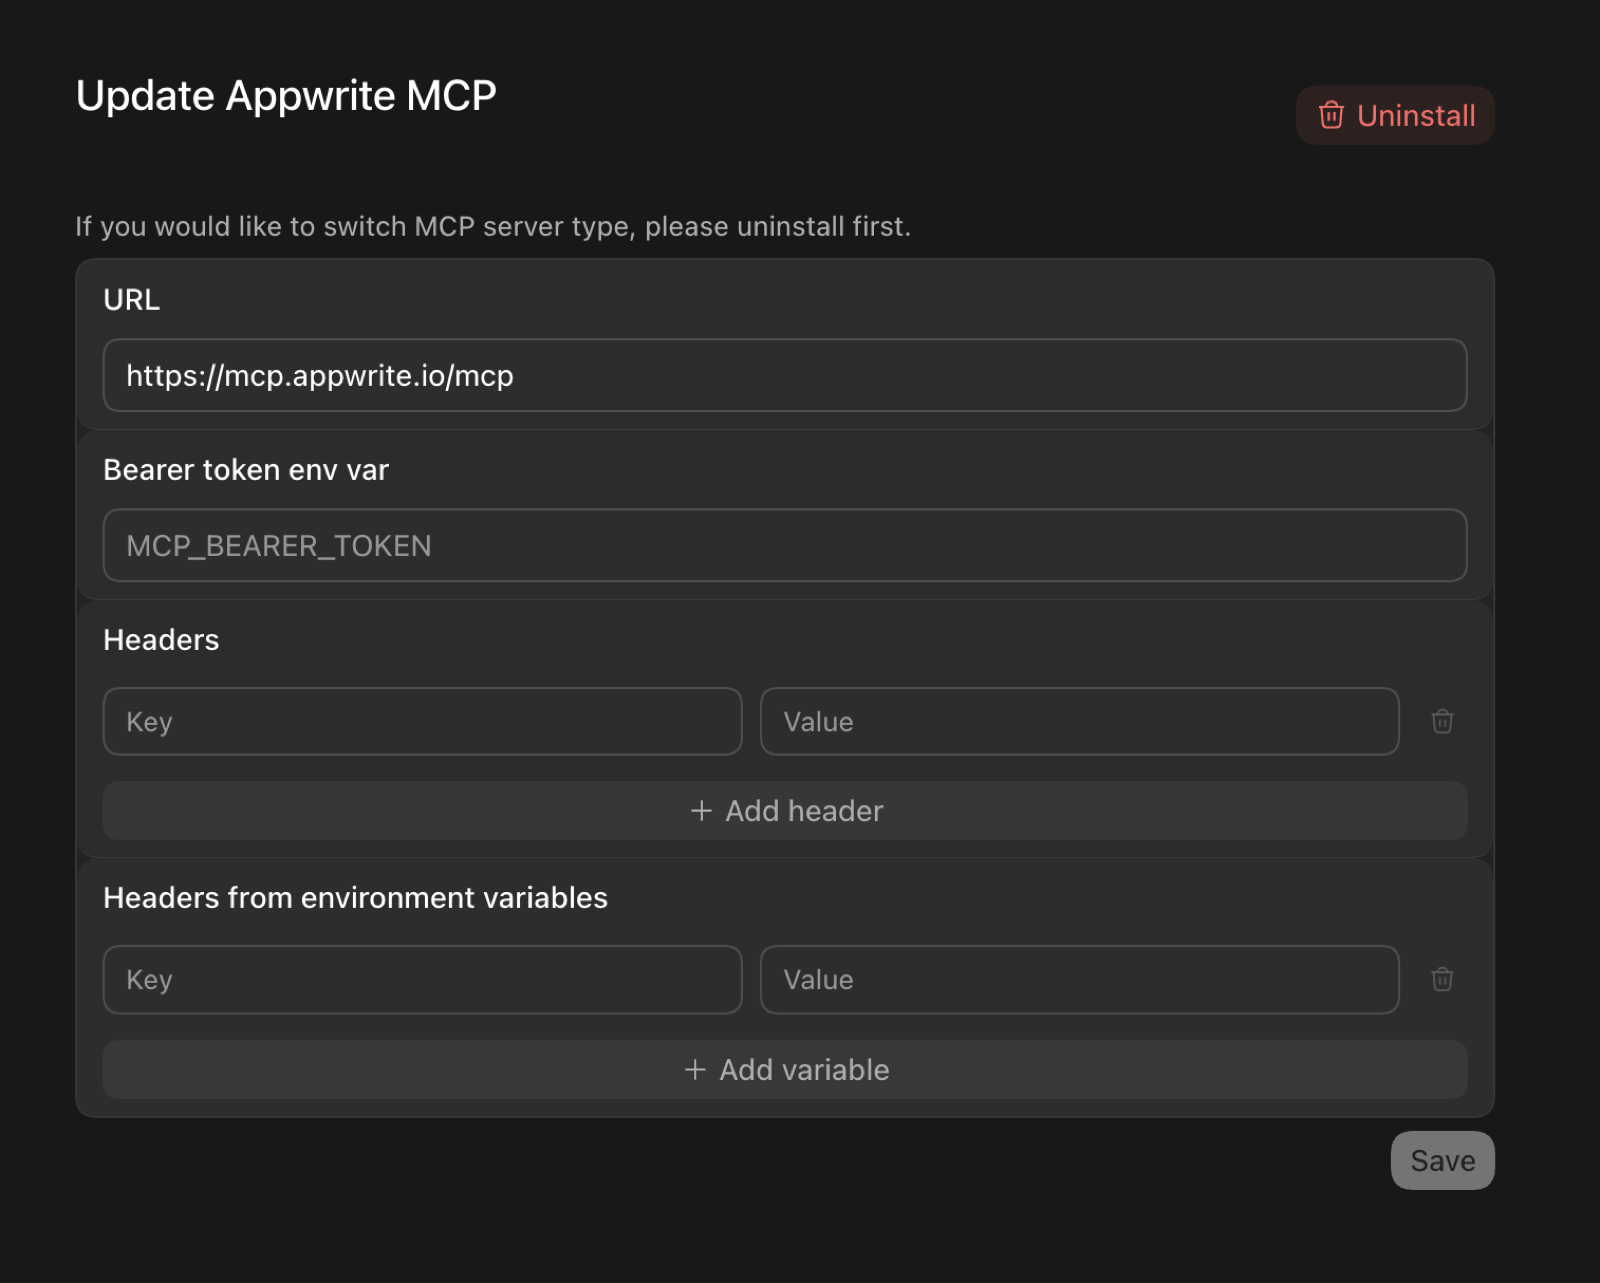
In the Codex GUI, you can instead add the server from the MCP settings —
set the URL to https://mcp.appwrite.io/ and leave the token and header
fields empty (authentication happens through the browser):
Edit opencode.json (project) or ~/.config/opencode/opencode.json (global).
{
  "$schema": "https://opencode.ai/config.json",
  "mcp": {
    "appwrite": {
      "type": "remote",
      "url": "https://mcp.appwrite.io/",
      "enabled": true
    }
  }
}
Edit ~/.codeium/windsurf/mcp_config.json.
{
  "mcpServers": {
    "appwrite": {
      "serverUrl": "https://mcp.appwrite.io/"
    }
  }
}
gemini mcp add --transport http appwrite https://mcp.appwrite.io/
Or edit ~/.gemini/settings.json (note the key is httpUrl, not url):
{
  "mcpServers": {
    "appwrite": {
      "httpUrl": "https://mcp.appwrite.io/"
    }
  }
}
Gemini CLI opens the browser OAuth flow automatically on first connect. To
re-authenticate, run /mcp auth appwrite inside a session.
Edit ~/.gemini/config/mcp_config.json (global) or .agents/mcp_config.json (project workspace).
{
  "mcpServers": {
    "appwrite": {
      "serverUrl": "https://mcp.appwrite.io/"
    }
  }
}
⚠️ Note: Antigravity strictly requires the
serverUrlkey for remote transport. Using legacy fields likeurlorhttpUrlwill cause tool registration to fail silently.
Antigravity opens the browser OAuth flow automatically on first connect. If you manually edit the JSON file, navigate to Settings → Customizations → Installed MCP Servers and click Refresh to reload the tool definitions.
copilot mcp add --transport http appwrite https://mcp.appwrite.io/
Or run /mcp add inside a session, or edit ~/.copilot/mcp-config.json:
{
  "mcpServers": {
    "appwrite": {
      "type": "http",
      "url": "https://mcp.appwrite.io/"
    }
  }
}
A browser window opens to authenticate on first connect. Check status with
/mcp.
Go to Settings → AI → MCP Servers → Add Server → Add Remote Server, or add
to your settings.json (zed: open settings):
{
  "context_servers": {
    "appwrite": {
      "url": "https://mcp.appwrite.io/"
    }
  }
}
Zed prompts you to authenticate through the browser on first connect.
Go to Settings → Agents → MCP servers → + Add, choose the URL-based
server type, and enter https://mcp.appwrite.io/.
Warp opens a browser window to authenticate on first connect.
JetBrains IDEs don't yet support OAuth for remote MCP servers, so bridge through stdio (requires Node.js). Go to Settings → Tools → AI Assistant → Model Context Protocol (MCP) → Add, switch to the JSON view, and paste:
{
  "mcpServers": {
    "appwrite": {
      "command": "npx",
      "args": ["-y", "mcp-remote", "https://mcp.appwrite.io/"]
    }
  }
}
A browser window opens to authenticate on first connect.
Cline doesn't yet support OAuth for remote MCP servers, so bridge through stdio (requires Node.js). In the Cline panel, open the MCP Servers icon → Configure tab → Configure MCP Servers, and add:
{
  "mcpServers": {
    "appwrite": {
      "command": "npx",
      "args": ["-y", "mcp-remote", "https://mcp.appwrite.io/"]
    }
  }
}
A browser window opens to authenticate on first connect.
Reasons and environments
Every write the agent makes carries a short reason (why it made the change).
Appwrite records it on the project's audit log, so you can review what your
agent changed, and why, in the project's Activity tab.
On Appwrite Cloud, the agent can act in a project's environments (for example
staging): appwrite_get_context lists them, and each call takes the
environment's ID as environment_id next to the project's project_id. See
Tool surface.
Self-hosted Appwrite
Running your own Appwrite instance? Run the MCP server locally over stdio and
authenticate with a project API key. See docs/self-hosted.md
for per-client setup.
Documentation
- Tool surface — the tools exposed to the model and the internal Appwrite catalog.
- How Cloud authentication works — the OAuth 2.1 flow.
- Documentation search — the in-process
appwrite_search_docstool and how to rebuild its index. - Events — MCP Events: webhook subscriptions to changes in your Appwrite project (in development, not available yet).
- Self-hosted Appwrite — run the server locally with a project API key.
- Local development — running, testing, and debugging the server locally.
- AGENTS.md — full contributor guide and pre-PR checklist.
License
This MCP server is licensed under the MIT License. See the LICENSE file for details.
Appwrite MCPのよくある質問
Appwrite MCPをClaude Codeに追加するには
ターミナルでclaude mcp add mcp -- uvx mcp-server-appwriteを実行します。すべてのプロジェクトで利用するには--scope userを追加します。
Appwrite MCPをCursorに追加するには
~/.cursor/mcp.jsonを開き、上記のインストールセクションに示すCursor設定を使ってmcpServersの下にサーバーを追加します。
Appwrite MCP serverでの認証方法を教えてください。
ブラウザ経由でAppwriteの同意画面を使用して認証を行います。ホスト版ではコピーして使用するキーは必要ありません。
セルフホストしているAppwriteインスタンスでも使用できますか?
はい、stdio経由でMCP serverをローカルで実行し、プロジェクトのAPI keyを使用して認証することが可能です。
AIエージェントによる変更履歴をどのように追跡できますか?
すべての書き込み操作には短い理由が含まれており、Appwriteがプロジェクトの監査ログに記録します。これはActivityタブから確認できます。