
Stellt die Appwrite API für Datenbanken, User, Functions, Teams und Storage als Tools bereit, damit AI-Clients dein Backend verwalten können.
Auch bekannt als appwrite/mcp, mcp-server-appwrite
- Stars
- 72
- Tools
- —
- Downloads, 30 Tage
- 334.841
- Neueste Version
- 2.6.2
- Letzter Commit
- 13. Nov. 2026
- Lizenz
- MIT
Was ist Appwrite MCP?
Appwrite ist ein MCP server. Stellt die Appwrite API für Datenbanken, User, Functions, Teams und Storage als Tools bereit, damit AI-Clients dein Backend verwalten können.
Zusammenfassung generiert aus dem README des Projekts
Über Appwrite MCP server
Mit diesem Server ist es möglich, Backend-Infrastruktur über AI-Clients zu verwalten, da er die Appwrite API als Set von Tools bereitstellt. Entwickler können damit direkt aus ihrer bevorzugten Entwicklungsumgebung heraus mit Datenbanken, Usern, Functions, Teams und Storage interagieren. Er funktioniert mit einer Vielzahl von Clients, darunter Claude Desktop, Cursor, VS Code, Zed und Windsurf.
Die Verbindung zum hosted Appwrite Cloud Server erfolgt über einen browserbasierten OAuth-Flow, sodass du keine API Keys kopieren und einfügen musst, um loszulegen. Für Nutzer, die selbst gehostete Appwrite-Instanzen verwenden, kann der Server lokal via stdio unter Verwendung eines Project API Keys betrieben werden. Jede Aktion eines Agents wird zusammen mit einem Grund im Appwrite Project Audit Log aufgezeichnet, sodass du Änderungen im Activity-Tab überprüfen kannst.
Diese Integration unterstützt komplexe Workflows über verschiedene Umgebungen hinweg, wie zum Beispiel Staging, indem spezifische Environment IDs verwendet werden. Sie enthält außerdem ein Tool zur Dokumentationssuche, das dem Modell hilft, dein spezifisches Setup besser zu verstehen.
Was du damit machen kannst
- 1Backend-Ressourcen verwaltenEin AI Agent kann Datenbanken, User und Storage-Einstellungen innerhalb deines Projekts erstellen oder ändern.
- 2Agent-Aktionen auditierenDu kannst nachvollziehen, warum eine KI spezifische Änderungen an deinem Backend vorgenommen hat, indem du die Activity Logs des Projekts prüfst.
- 3Über Umgebungen hinweg arbeitenEntwickler können eine KI anweisen, Aufgaben gezielt innerhalb einer Staging- oder Production-Umgebung auszuführen.
- 4Technische Dokumentation durchsuchenDie KI kann mithilfe eines internen Search-Tools Informationen über dein Appwrite-Setup nachschlagen.
Geschrieben aus dem README des Projekts. Jeder Use Case wurde gegen ein Zitat daraus geprüft.
So installierst du Appwrite MCP
Formate geprüft am 10. Nov. 2026Appwrite MCP in Claude Code installieren
$ claude mcp add mcp -- uvx mcp-server-appwriteAppwrite MCP in Cursor installieren
~/.cursor/mcp.json
{
  "mcpServers": {
    "mcp": {
      "command": "uvx",
      "args": [
        "mcp-server-appwrite"
      ]
    }
  }
}Appwrite MCP in VS Code installieren
.vscode/mcp.json
{
  "servers": {
    "mcp": {
      "type": "stdio",
      "command": "uvx",
      "args": [
        "mcp-server-appwrite"
      ]
    }
  }
}Appwrite MCP in Claude Desktop installieren
claude_desktop_config.json
{
  "mcpServers": {
    "mcp": {
      "command": "uvx",
      "args": [
        "mcp-server-appwrite"
      ]
    }
  }
}Appwrite MCP in Codex installieren
~/.codex/config.toml
[mcp_servers.mcp]
command = "uvx"
args = ["mcp-server-appwrite"]
Appwrite MCP in Gemini CLI installieren
~/.gemini/settings.json
{
  "mcpServers": {
    "mcp": {
      "command": "uvx",
      "args": [
        "mcp-server-appwrite"
      ]
    }
  }
}Automatisierte Checks
Geluften am 12. Nov. 2026Vollständiger Bericht →Unsere automatisierten Checks bestanden. Das ist kein Security-Audit: Lies den Code und gib dem Server nur den minimal notwendigen Zugriff. Wie die Checks funktionieren

- Source Repository verknüpft und erreichbarBestanden
- Open Source Lizenz (OSI)Bestanden
- Commit oder Release im letzten JahrBestanden
- Package-Name ähnelt keinem populären PackageBestanden
- Remote Endpoint nutzt HTTPSBestanden
- Destruktive Tools sind markiertNicht geprüft
- Keine versteckten Anweisungen an das ModellBestanden
- Kein kritischer Hinweis im Paket oder seinen AbhängigkeitenBestanden
README
Auf GitHub ansehenAppwrite MCP server

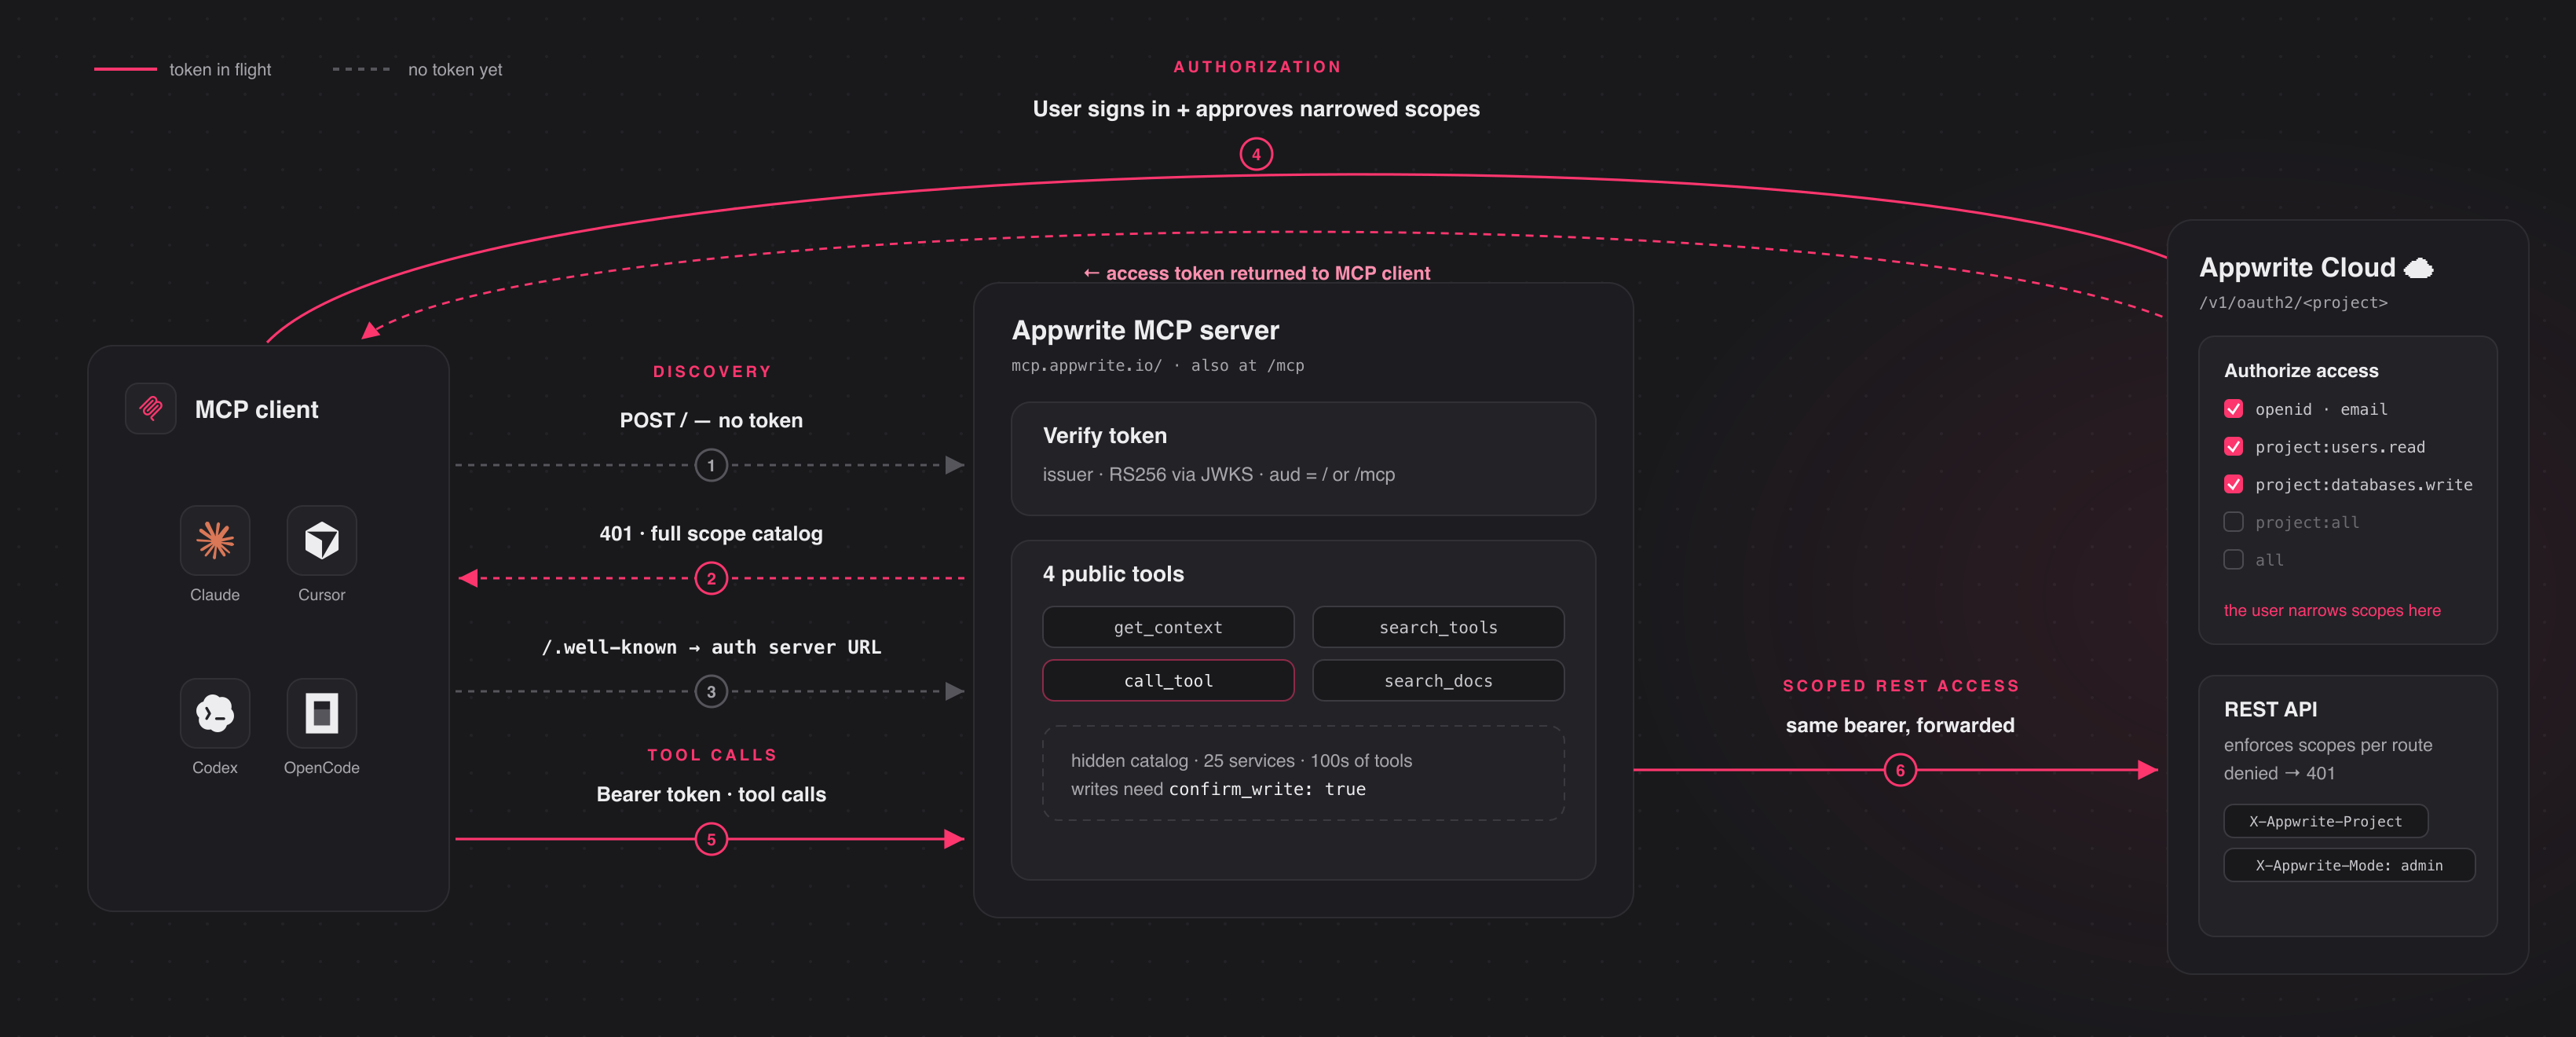
A Model Context Protocol server for Appwrite. It exposes Appwrite's API — databases, users, functions, teams, storage, and more — as tools your MCP client can call.
Connect to the hosted server at https://mcp.appwrite.io/ and authenticate
through your browser. The first time you connect, your client opens an Appwrite
consent screen; approve the scopes and you're connected. There are no keys to
copy. The conventional https://mcp.appwrite.io/mcp URL is also supported and
connects to the same server.
Connect your client
Pick your client below. Each adds the hosted Appwrite Cloud server.
claude mcp add --transport http appwrite https://mcp.appwrite.io/
Then, inside a Claude Code session, run /mcp, select appwrite, and follow
the browser prompt to authenticate.
Go to Settings → Connectors → Add custom connector and paste
https://mcp.appwrite.io/. Available on Pro and Max plans; on Team and
Enterprise plans only an organization Owner can add custom connectors.
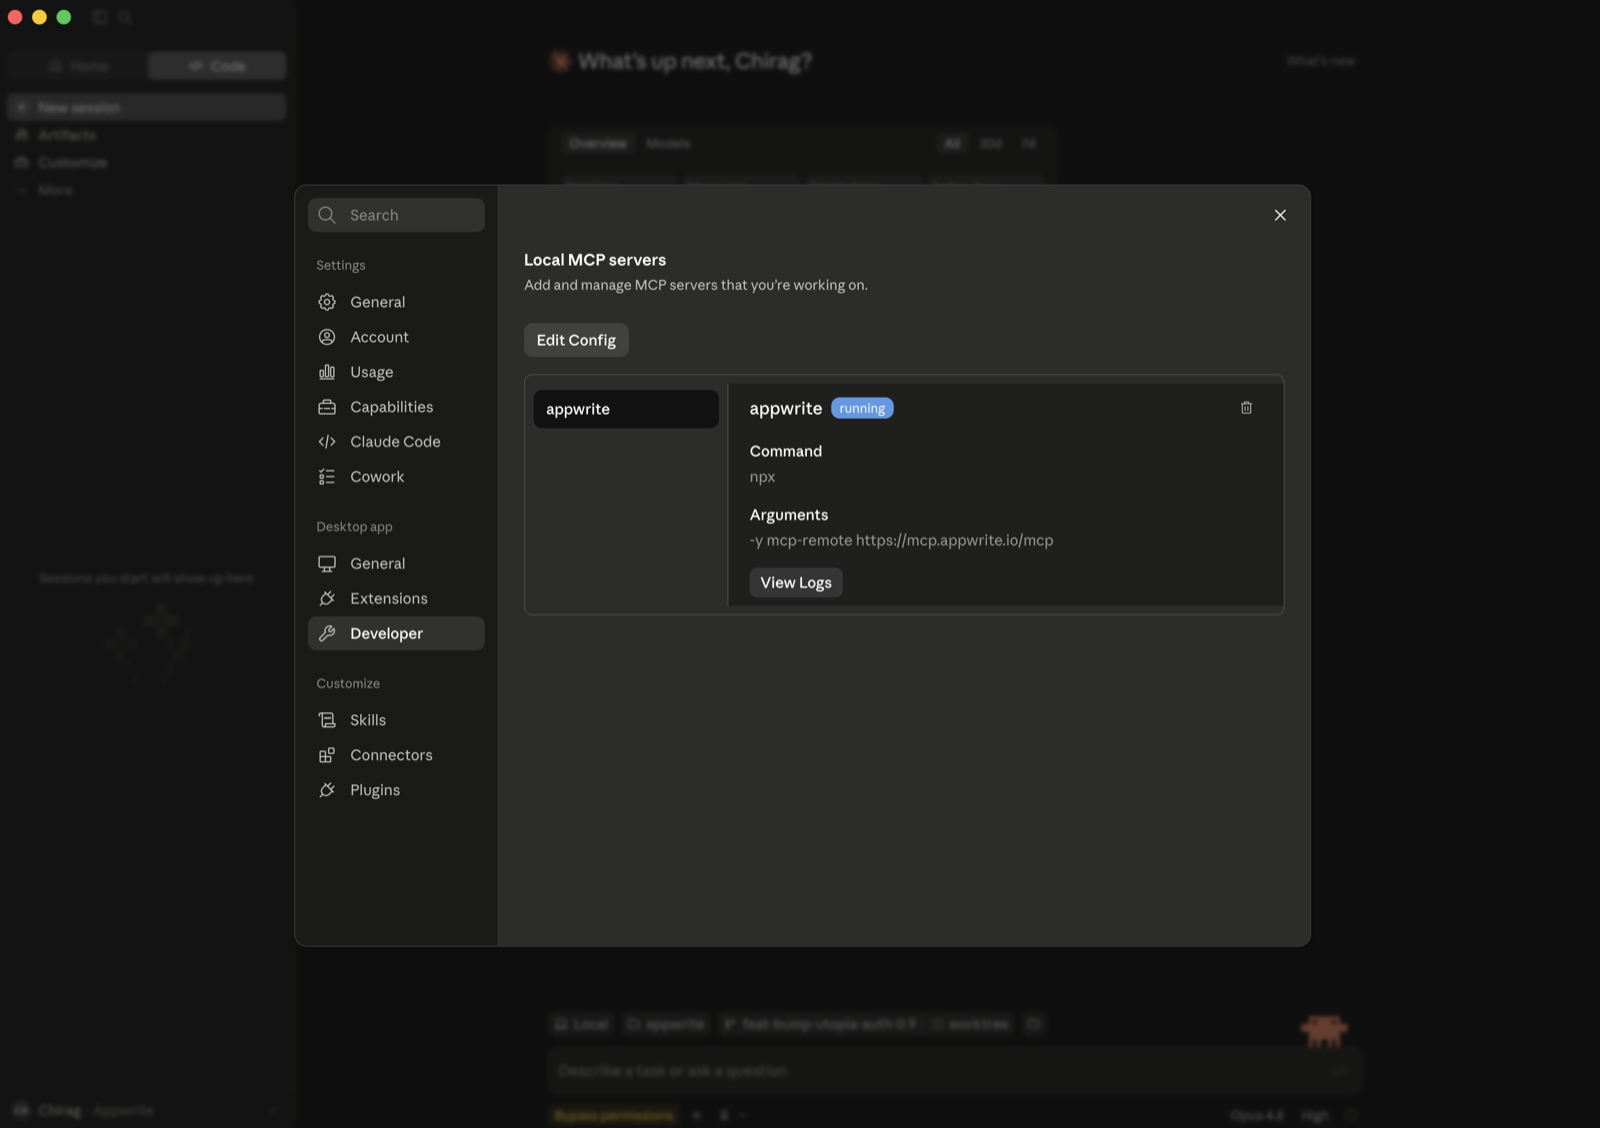
If you don't see that option (free plan, or a Team/Enterprise member), bridge the remote server through stdio instead (requires Node.js). Go to Settings → Developer → Local MCP servers, click Edit Config, and add:
{
  "mcpServers": {
    "appwrite": {
      "command": "npx",
      "args": ["-y", "mcp-remote", "https://mcp.appwrite.io/"]
    }
  }
}
Restart Claude Desktop; the server appears under Local MCP servers and a browser window opens to authenticate.
Edit ~/.cursor/mcp.json (global) or .cursor/mcp.json (project).
{
  "mcpServers": {
    "appwrite": {
      "url": "https://mcp.appwrite.io/"
    }
  }
}
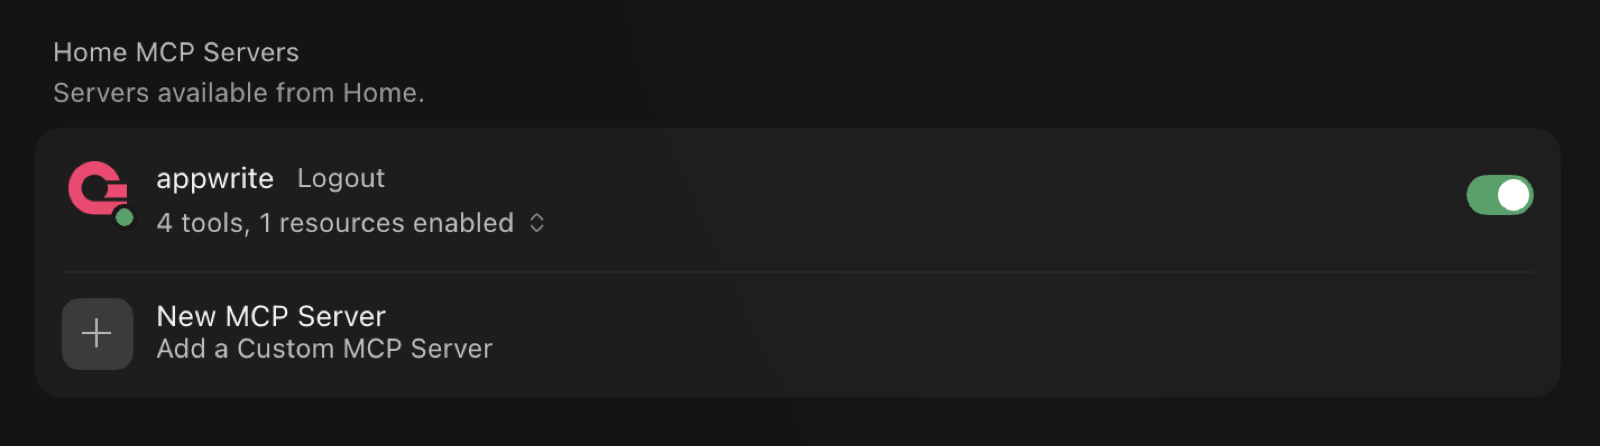
Cursor prompts you to log in through the browser; the server then shows up under Settings → MCP with its tools enabled.
Edit .vscode/mcp.json (workspace) or your user configuration via the Command
Palette → MCP: Open User Configuration.
{
  "servers": {
    "appwrite": {
      "type": "http",
      "url": "https://mcp.appwrite.io/"
    }
  }
}
Edit ~/.codex/config.toml.
[mcp_servers.appwrite]
url = "https://mcp.appwrite.io/"
Then authenticate from the terminal:
codex mcp login appwrite
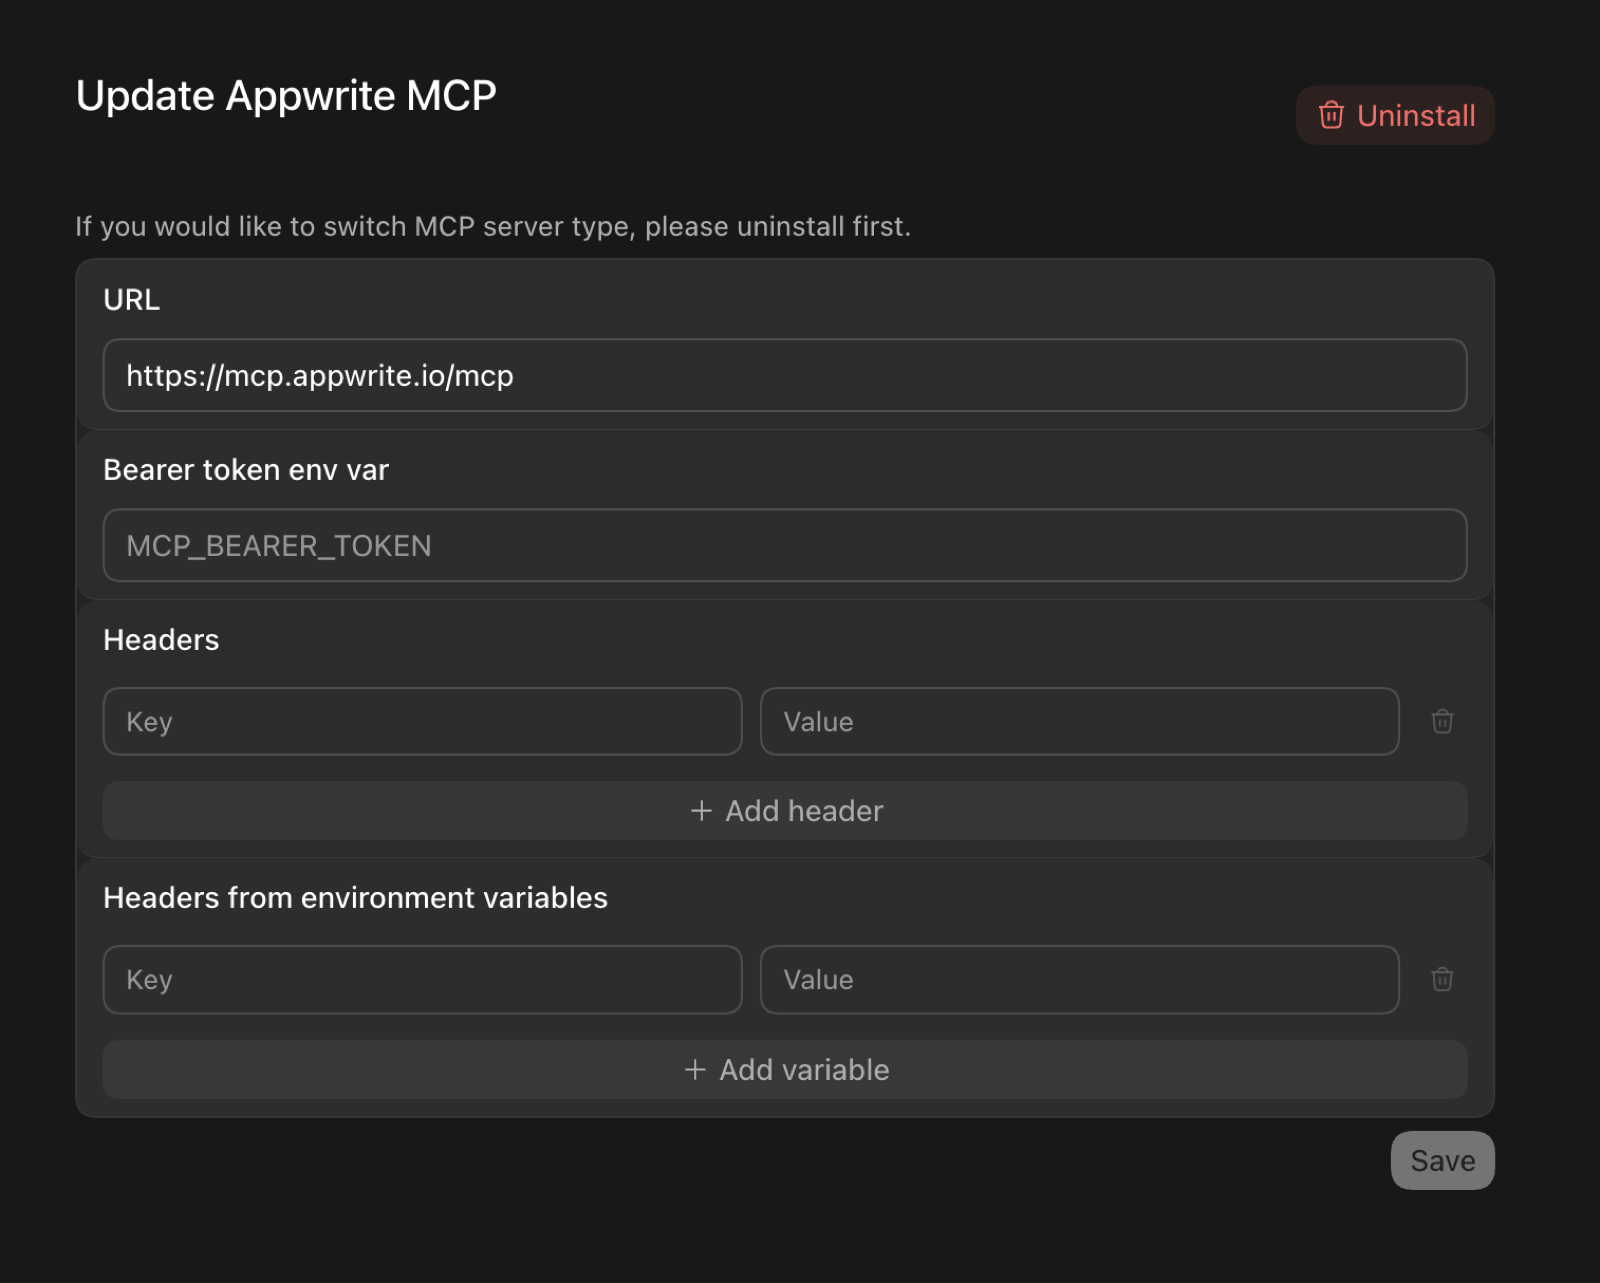
In the Codex GUI, you can instead add the server from the MCP settings —
set the URL to https://mcp.appwrite.io/ and leave the token and header
fields empty (authentication happens through the browser):
Edit opencode.json (project) or ~/.config/opencode/opencode.json (global).
{
  "$schema": "https://opencode.ai/config.json",
  "mcp": {
    "appwrite": {
      "type": "remote",
      "url": "https://mcp.appwrite.io/",
      "enabled": true
    }
  }
}
Edit ~/.codeium/windsurf/mcp_config.json.
{
  "mcpServers": {
    "appwrite": {
      "serverUrl": "https://mcp.appwrite.io/"
    }
  }
}
gemini mcp add --transport http appwrite https://mcp.appwrite.io/
Or edit ~/.gemini/settings.json (note the key is httpUrl, not url):
{
  "mcpServers": {
    "appwrite": {
      "httpUrl": "https://mcp.appwrite.io/"
    }
  }
}
Gemini CLI opens the browser OAuth flow automatically on first connect. To
re-authenticate, run /mcp auth appwrite inside a session.
Edit ~/.gemini/config/mcp_config.json (global) or .agents/mcp_config.json (project workspace).
{
  "mcpServers": {
    "appwrite": {
      "serverUrl": "https://mcp.appwrite.io/"
    }
  }
}
⚠️ Note: Antigravity strictly requires the
serverUrlkey for remote transport. Using legacy fields likeurlorhttpUrlwill cause tool registration to fail silently.
Antigravity opens the browser OAuth flow automatically on first connect. If you manually edit the JSON file, navigate to Settings → Customizations → Installed MCP Servers and click Refresh to reload the tool definitions.
copilot mcp add --transport http appwrite https://mcp.appwrite.io/
Or run /mcp add inside a session, or edit ~/.copilot/mcp-config.json:
{
  "mcpServers": {
    "appwrite": {
      "type": "http",
      "url": "https://mcp.appwrite.io/"
    }
  }
}
A browser window opens to authenticate on first connect. Check status with
/mcp.
Go to Settings → AI → MCP Servers → Add Server → Add Remote Server, or add
to your settings.json (zed: open settings):
{
  "context_servers": {
    "appwrite": {
      "url": "https://mcp.appwrite.io/"
    }
  }
}
Zed prompts you to authenticate through the browser on first connect.
Go to Settings → Agents → MCP servers → + Add, choose the URL-based
server type, and enter https://mcp.appwrite.io/.
Warp opens a browser window to authenticate on first connect.
JetBrains IDEs don't yet support OAuth for remote MCP servers, so bridge through stdio (requires Node.js). Go to Settings → Tools → AI Assistant → Model Context Protocol (MCP) → Add, switch to the JSON view, and paste:
{
  "mcpServers": {
    "appwrite": {
      "command": "npx",
      "args": ["-y", "mcp-remote", "https://mcp.appwrite.io/"]
    }
  }
}
A browser window opens to authenticate on first connect.
Cline doesn't yet support OAuth for remote MCP servers, so bridge through stdio (requires Node.js). In the Cline panel, open the MCP Servers icon → Configure tab → Configure MCP Servers, and add:
{
  "mcpServers": {
    "appwrite": {
      "command": "npx",
      "args": ["-y", "mcp-remote", "https://mcp.appwrite.io/"]
    }
  }
}
A browser window opens to authenticate on first connect.
Reasons and environments
Every write the agent makes carries a short reason (why it made the change).
Appwrite records it on the project's audit log, so you can review what your
agent changed, and why, in the project's Activity tab.
On Appwrite Cloud, the agent can act in a project's environments (for example
staging): appwrite_get_context lists them, and each call takes the
environment's ID as environment_id next to the project's project_id. See
Tool surface.
Self-hosted Appwrite
Running your own Appwrite instance? Run the MCP server locally over stdio and
authenticate with a project API key. See docs/self-hosted.md
for per-client setup.
Documentation
- Tool surface — the tools exposed to the model and the internal Appwrite catalog.
- How Cloud authentication works — the OAuth 2.1 flow.
- Documentation search — the in-process
appwrite_search_docstool and how to rebuild its index. - Events — MCP Events: webhook subscriptions to changes in your Appwrite project (in development, not available yet).
- Self-hosted Appwrite — run the server locally with a project API key.
- Local development — running, testing, and debugging the server locally.
- AGENTS.md — full contributor guide and pre-PR checklist.
License
This MCP server is licensed under the MIT License. See the LICENSE file for details.
Appwrite MCP Fragen
Wie füge ich Appwrite MCP zu Claude Code hinzu?
Führe claude mcp add mcp -- uvx mcp-server-appwrite in deinem Terminal aus. Füge --scope user hinzu, damit der Server in jedem Projekt verfügbar ist.
Wie füge ich Appwrite MCP zu Cursor hinzu?
Öffne ~/.cursor/mcp.json und füge den Server unter mcpServers hinzu, mit der Cursor-Config aus dem Installationsabschnitt oben.
Wie authentifiziere ich mich beim Appwrite MCP server?
Du authentifizierst dich über deinen Browser via eines Appwrite Consent-Screens. Für die hosted Version musst du keine Keys kopieren.
Kann ich das mit einer selbst gehosteten Appwrite-Instanz nutzen?
Ja, du kannst den MCP server lokal über stdio laufen lassen und dich mit einem Project API Key authentifizieren.
Wie kann ich Änderungen verfolgen, die der AI Agent vorgenommen hat?
Jeder Schreibvorgang enthält einen kurzen Grund, den Appwrite im Audit Log des Projekts speichert. Dies kannst du im Activity-Tab einsehen.